
Installation & Assembly

Ceiling Medallions
Installation Instructions
Ceiling medallions from AFD add that extra touch of ambiance
and beauty, adorning chandeliers in entryways, dining rooms,
or used as decoration in any room. Made from lightweight
materials, our ceiling medallions are exquisitely detailed and
often are installed by consumers by following these instructions.
Before Installation
1 Please Read And Follow All Installation Instructions Carefully
2 Precautions and Safety Instruction are included below and safe practices
should be followed on all installations as well as use of all tools to
manufacturers safety instruction.
3 Turn off power at the breaker box BEFORE you begin installation.
4 Disconnect and remove current fixture before installing ceiling medallion.
5 Depending on size of the medallion you are installing it is recommended to
have a minimum of 2 people and 2 ladders (Please follow Ladder MFC
safety policies) for holding the medallion in place and during fastening to
ceiling.
Surface and Medallion Preparation
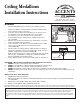
1 Look at the Ceiling Medallion and locate the mounting spaces placed
evenly around the border (shallow indented areas without caps) [A]. Use
a 1/4” drill bit to drill though the medallion to create mounting holes in
these allotted locations.
2 With the help of an assistant place medallion on the ceiling where you
want to install the product and lightly outline medallion shape
on the ceiling and mark through your newly drilled mounting holes where
you will be securing the medallion to the ceiling so that when removed
the marks you made are clear
[B].
3 OPTIONAL, Remove stucco on ceiling using a scraper to allow for a more
professional look. This can often be done by using a spray bottle with
water to soften the stucco and use a scraper to remove wet stucco to the
marked outline of the ceiling medallion. Since this step is for aesthetics,
it is unneccesary unless you feel this extra process is what you require.
The medallions are quite pliable and will look quite fine without this extra
step in most installations.
ACCE NTS
A
www.afdhome.com
11423 Satellite Blvd. Orlando, FL 32837
T: 407.857.6000 / 800.747.1893 F: 407.857.9953
Tools & Materials You Will Need (Not Included)
B
Drill mounting holes
Screws or Wall Anchoring Kit
Screw driver
Drill with 1/4” drill bit
Ladder (s)
Sponge or clean cloth
Pencil
Optional Tools & Materials
Spray bottle with water
Scraper
Scissor lift
Installation instructions continue on back
Available at local hardware stores
Depending on the ceiling surface, options exist as to the
method of the anchoring kit to be used. It can be as simple as
using typical screws into a wood ceiling or the more common
use of an anchoring kit used for hollow wall or plaster ceiling.
It is wise to determine the length of the screws needed
depending on the thickness of the ceiling.
With anchoring kits flexibility is one of the easy installation
advantages.