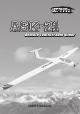
Remote control radio glider USER S MANUAL
Contents Technical Parameter 01 Features 01 Warning 01 Please read the following instructions and fully understand it 02 Main parts of the airplane 02 Flying adjustment 03 Tips for flying 03 Charge mode and warning 03 Li-Po battery Charge mode and warning 04 Caution 04 Assembly 05 Trouble shooting 07 Valuable experience 07 Operating Manual for the radio control system 08 Transmitter particular introduce 09 The process of frequency bind for DSSS series 2.
ENGLISH PARTS Please read this manual carefully and follow the instruction. Thank you for choosing this classical model airplane of Art-Tech. This model is generally for beginner, intermediate and experienced hobby enthusiast. It includes the following accessories: 2.4G transmitter, ESC, motor, battery, servo, etc, which will bring much fun for the manipulator. Technical Parameter: Wingspan: 2000mm/78.74in Battery: 11.1V, 1300mAh Li-Po Length: 1000mm/39.37in ESC: 20A brushless Weight: 760g/26.
Please read the following instructions and fully understand it. 1) This ASK-21 model is not suitable to fly in the below list place: the crowd, the place with telegraph pole, automobiles, place near the road and aerodrome, you need enough space to control the plane. Please consider the safety for other people and yourself. 1 2) Please don’t fly this model in bad weather 2 3) Do not attempt to catch the plane while flying.
Flying adjustment 1) The ASK-21 glider will have a better perform after fully charged. 2) Beeline flying: Please adjust the inching switch in the transmitter if you find it is a little difficult to fly straightly. For example, when you find the ASK-21 glider flies to the left by aberrancy, please turn the inching switch to the right in the transmitter. 3) Horizontal flying: Please adjust the inching switch in the transmitter if you find it is a little difficult to fly horizontally.
Notice 1. Do not insert any conductive into the cooling hole when power is on, or damage will be caused to the charger. 2. While charging is in process, please do not place it near flammable materials. 3. Expect Li poly battery, this charger is not allowed for other kinds of battery. 4. While charging, please keep it out of the reach of Children. 5.
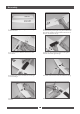
Assembly 1. Take out left&right wings,and the avigation aluminium bar. 2.Insert the aluminium bar into the steel tube of the left wing and right wing,and make sure the center position of the aluminum bar is in the join of the two wings. 3.Connect wire of aileron servo to Y wire of receiver. 4.Take out the stressful sheet of wing and locked the left & right wings. 5.Screwed the nylon screws,fix the wings in the fuselage. 6.Install control wire-steel of stabilizer wing 7.
Assembly 10.Trimming power of each servo's area. 9.Install the canopy 11.The airplane is fully installed,ready to fly.
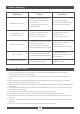
Trouble shooting Problem Cause Solution 1. Battery is not fully charged. 2. The battery of transmitter is Motor does not run 1. Charge the batteries. not sufficient 2. Install a full charged battery 3. Check the wire connection 3. Contact the local dealer inside the model No reaction of the control surface 1. The servo cable didn’t plug 1. Check the connection of properly or inverted plug. the servo cable 2.The servo is damaged 2.Change another servo. 1.
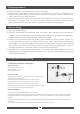
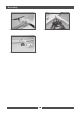
Notes If the parts of the ASK-21 Glider were damaged, please contact the dealer to purchase new components. Operating Manual for the radio control system Components to the R/C system a transmitter, a receiver, a servo, a speed controller Motor The sketch map for connecting the receiver: CH ESC RECEIVER ER61-2.4GHz Signal (White line) (Black line) (Red line) Battery CH RECEIVER ER61-2.
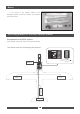
Transmitter particular introduce Mode 1 Antenna Carrying bar Hook Elevator down Throttle Max Aileron left Rudder Rudder right left Elevator up Aileron right Throttle Min Trim CH3 Trim CH2 Trim CH1 Trim CH4 Power indicator Power switch Charger port Frequency Switch Reverse switch on rud der Reverse switch on thrott le Reverse switch on elevator Reverse switch on aileron Mode 2 Antenna Carrying bar Hook Throttle Max Rudder left Elevator down Aileron left Rudder right Aileron right Elevator up
The process of frequency bind for DSSS series 2.4GHz R/C system ! Especial notice: The process of frequency binding for this radio, please follow the instruction of this page. 1. Press the switch for frequency bind, then turn on the transmitter's power. 2. Plug the short-circuit plug into the Receiver in the position of BATT.Connect the ESC to receiver for electricity supply, wihch results to the indicator light glitter. 3. If the frequency bind is successful, the indicator light will light. 4.
Normal flight Speed up Left stick pushing up Speed down Left stick pulling down Nose turn left Left stick moving left Nose turn right Left stick moving right nose turn down/ descending Right stick pushing up Nose turn up/ ascending Right stick pulling down The body incline to left Right stick moving left The body incline to right Right stick moving right Chart for R/C mode 2 (left hand throttle) 11
Inspection and adjustment before flying 1. Switch for power supply: Install 8 cells dry batteries in the transmitter according to the symbol of battery’s polarity, then turn on the switch of power. Install the full charged battery into the foreside of the fuselage, and connect the plug of battery with the electronic Speed Controller.
4. If the motor runs slowly or the thrust is not powerful, please do not take it off. Check if the battery has been fully charged, and if there is any problems with the motor or ESC. The power system can be adjusted during flying to save power and lengthen the flying time, and the recommended method is flying---gliding—flying. 5. If you want to land it after flying for some time, pull the throttle stick to the low position and let it land gently. 6.
www.art-tech.