www.fishman.
Whenever this symbol appears, it alerts you to the presence of important operating and maintenance (servicing) instructions in the user’s manual for this amplifier. Wherever this symbol appears, it alerts you to the presence of uninsulated dangerous voltage inside the enclosure that may be sufficient to constitute a risk of shock.
INFORMATIONS IMPORTANTES WARNING: DE SECURITE • • • • • • • • • • • • • • • • • • • • • Lisez attentivement ces instructions. Veuillez conserver ces instructions. Observez tous les avertissements. Suivez toutes les consignes à la lettre. N’utilisez jamais cet appareil dans un endroit humide ni à proximité d’eau.
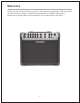
Read Me! Before using Loudbox Artist, carefully read the Important Safety Instructions and the Getting Started sections in this User Guide. Save Your Packing Materials The box and packing materials were specially designed to protect the amplifier during shipping. Save all this stuff in case you need to re-ship the Loudbox Artist. Hear This! The Loudbox Artist amplifier is capable of cleanly reproducing the sound of your instrument at very high volume levels.
Welcome Thank you for making Fishman a part of your acoustic experience. We are proud to offer the finest acoustic amplification products available; high-quality professional-grade tools which empower you to sound your very best.
Getting Started Here are some basic setup tips to help get you going. To operate the Loudbox Artist safely, please read the entire manual, especially the Important Safety Instructions on page 2. If your amplifier has an operating voltage of 120V, plug the provided AC line cord into the back of the amplifier. If your amplifier operates at 230V, you must supply your own detachable power cord.
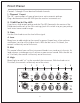
Front Panel Controls 1 through 10 are identical for both channels. 1. Channel 1 Input The 1/4” input accepts all types of passive or active acoustic pickups. Plug a balanced mic into the XLR input for vocal or instrument use. 2. 10dB Pad & Clip LED If you have a high output pickup and the Clip LED (located in the center of the Pad button) comes on at low Gain settings, push this switch in to put your pickup level into a more useable range. 3. Gain Use the Gain knob to set the level of the signal. 4.
7 Front Panel (cont.) 7. Anti-Feedback If you encounter low-frequency feedback, sweep this control to isolate and eliminate it. To learn more about acoustic feedback, see page 9. 8. Phase Use the Phase switch in conjunction with the Anti-Feedback filter to eliminate acoustic feedback. To read more about acoustic feedback, see page 9. 9. Effect A Level Controls the amount of Effect A in the input channel. 10. Effect B On When this button is lit, the input channel’s audio is processed by Effect B. 11.
Front Panel (cont.) 15. Aux Level Use this to control the level of an audio device plugged into the Aux input. Note that the Aux channel is independent of the Mute switch, so you can play prerecorded music on your breaks. 16. Master Volume Set the overall level of the Loudbox Artist with the Master Volume. In general put the Master Volume as high as possible (2 o’clock to 5 o’clock) to achieve the cleanest sound. 17. Power Lights up when the amplifier power is on. 18.
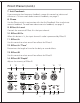
Rear Panel 1 2 3 4 5 6 7 8 9 1. Power switch Lower the Master Volume before you turn on the amp. Flip the power switch to the up position. 2. AC power Operate the amplifier only at the voltage indicated on the rear panel. For 120V amplifiers purchased in the USA, Canada and Mexico, plug in the supplied detachable AC power cable. For 100V and 230V amplifiers purchased outside the USA and Canada, you will need to supply your own detachable AC cable.
Rear Panel (cont.) 6. Channel 2 Effects Loop (serial) Patch an external effect through these jacks. Use a standard ¼” shielded instrument cable to connect the Channel 2 Send to the input of the effect. Connect the Channel 2 Return jack to the output of the effect. The Channel 2 loop is located post-EQ and is compatible with battery-operated stompboxstyle effects processors. 7. Channel 2 D.I. Out (Pre-EQ) Use this output when you want a flat D.I. signal to send to a mixing console.
Tone Tips Set up For reference, start with the tone controls flat (straight-up, twelve o’clock). In this position, there is no equalization applied to your sound. Begin at a very low volume and work your way up. As you turn up, try adjusting the Loudbox Artist’s tone controls as recommended below. 1. Low volume At a low volume (just above conversation level) our ears are not very sensitive to bass and treble, so give the Low and High controls a good boost. 2.
About Acoustic Feedback Feedback usually occurs in the lowest octave of your instrument, generally with two notes about a half step apart. The lower type of feedback (cavity resonance) starts when the sound pressure coming out of the speakers excites the resonant air chamber inside your instrument. We have found that it is effective to tune out an instrument’s cavity resonance feedback with the Anti-Feedback (notch filter) in the Loudbox Artist.
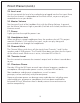
Mic Preamp Ch 2 Effect B Level Instrument Input Mic Input Mic Preamp Ch 1 Effect A Level Instrument Input Mic Input HPF 40Hz Pad 10dB Pad 10dB +24V Phantom Power HPF 40Hz +24V Phantom Power Tone Controls Low, Mid, High Gain Channel 2 Tone Controls Low, Mid, High Ch 2 Effect B On Ch 1 Effect B On Gain Channel 1 Anti-feedback Notch Filter Channel Mute Foot Switch Phase Phase Effect Return Effect Send Effect Return (bal., mic level) Pre-EQ D.I.
Technical Specifications Input Impedance: 1/4” Input XLR Input Aux Input (stereo) 5MOhm 2.4kOhm Balanced 10kOhm Phantom Power XLR Input 24VDC / 1.2kOhm DC source impedance per pin Tone Controls and Anti-Feedback: Low ±12.5dB @ 50Hz (resonant) Mid ±10.5dB @ 750Hz (resonant) High ±12.5dB @ 15kHz (shelving) Anti Feedback range -14dB @ 15Hz – 330Hz (Hi-Q resonant notch) Channel 1 & 2 D.I.
Technical Specifications (cont.) Speaker System: Woofer Tweeter Tweeter Level Crossover Baffle Angle 8” paper cone, acoustic suspension 1” cloth dome,neodymium magnet Up to 6dB cut 3.
www.fishman.