
User guide


8
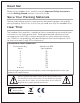
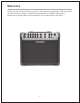
Front Panel
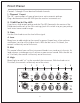
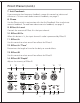
Controls 1 through 10 are identical for both channels.
1. Channel 1 Input
The 1/4” input accepts all types of passive or active acoustic pickups.
Plug a balanced mic into the XLR input for vocal or instrument use.
2. 10dB Pad & Clip LED
If you have a high output pickup and the Clip LED (located in the center of the
Pad button) comes on at low Gain settings, push this switch in to put your pickup
level into a more useable range.
3. Gain
Use the Gain knob to set the level of the signal.
4. Low
Boost here to add weight to the sound. In general, boost bass at low volumes
and flatten it out (or cut) at higher levels. With the dial set at 12 o’clock, the
control is effectively out of the circuit.
5. Mid
This control affects how well the instrument blends in or stands out in the mix. At
loud volumes a midrange cut will achieve a more natural sound. With the dial set
at 12 o’clock, the control is effectively out of the circuit.
6. High
Boost highs to add “air” to the sound of the instrument. With the knob set at
12 o’clock, the control is effectively out of the circuit.
1 2 4 5
6
7
9 10 11 12 15 16 17
13 14 20
3 8
1918 21