PHANTOM 2 User Manual V1.1 For PHANTOM 2 Main Controller Firmware version V3.02 & PHANTOM 2 Assistant version V3.0 & PHANTOM RC Assistant version V1.1 April 30, 2014 Revision Congratulations on purchasing your new DJI product. Please thoroughly read the entire contents of this manual to fully use and understand the product. It is advised that you regularly check the PHANTOM 2’s product page at www.dji.com which is updated on a regular basis.
Content CONTENT ........................................................................................................................2 IN THE BOX .....................................................................................................................4 REQUIRED ITEMS ............................................................................................................4 SYMBOL LEGEND .........................................................................................................
5.2 CALIBRATION PROCEDURES ..............................................................................................21 5.3 WHEN RECALIBRATION IS REQUIRED ..................................................................................21 6 FLIGHT ....................................................................................................................... 22 6.1 FLYING ENVIRONMENT REQUIREMENTS ..............................................................................22 6.
In the Box PHANTOM 2 2.4GHz Remote Controller Propeller Pair Intelligent Battery Charger Plug Set Screwdriver Assistant Wrench Cables Micro-USB Cable Screws Accessories Box Required Items AA Battery X4 Symbol Legend Forbidden(Important) Caution ©2013-2014 DJI Innovations. All Rights Reserved.
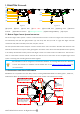
1. PHANTOM 2 Aircraft [1] [2] [3] [4] [5] [6] [7] [9] [10] [8] [11] Figure 1-1 [1]Propeller Antenna [2]Motor [3]Front Side Figure 1-2 [4]Front LEDs [5]Micro-USB Port [6]Landing Gear [8]CAN-Bus Connector [9]LED Flight Indicators [10]DJI Intelligent Battery [7]Receiver [11]Compass 1.
Important Notes of Using with Other DJI Products (1) The video cable can provide power for the wireless video transmission module with a battery voltage (11.1V~12.6V) and a maximum current 2A. (2) Make sure the working current of the wireless video transmission module you connect can work with an operational voltage between 11.1V~12.6V and the total working current of the iOSD and wireless video transmission module is under 2A, as an overcurrent will damage the central board’s components.
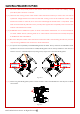
Connections with Other DJI Products (1) Connecting the H3-2D and H3-3D gimbal and wireless video transmission module, the figure below uses H3-2D as an example. Wireless Battvideo Batt+ transmission VIDEO GND module Transmitter VIDEO Description of the Video Cable (sequence by color) VIDEO VIDEO GND VBat+ GND ZENMUSE H3-2D Compass Figure 1-6 (2) Connecting the H3-2D and H3-3D gimbal, iOSD mini and wireless video transmission module, the figure below uses H3-2D as an example.
(3) Connecting the H3-2D and H3-3D gimbal, iOSD mini and DJI specified wireless video transmission module AVL58, the figure below uses H3-2D as an example. Description of the Video Cable (sequence by color) VIDEO VIDEO GND VBat+ GND DJI specified wireless video transmission module AVL58 Transmitter ZENMUSE H3-2D CAN-Bus connector Compass DJI Figure 1-8 We recommend connecting the VBat+ port of the video cable to the two BATT+ ports of the AVL58 simultaneously.
Figure 1-9 The diagram below illustrates the conneciton between the iOSD Mark II and the wireless video transmission module.
(6) Using the PC Ground Station Air End Ground End PC Ground Station Figure 1-11 1.3 LED Flight Indicators Description 1. LED flight indicators are used to show the aircraft’s current status. Once powered on, the indicators will light up.
2nd Level Low Battery Capacity Warning Not Stationary or Sensor Bias is too big Errors & Aircraft cannot fly. Compass data abnormal because of ferro-magnetic interference or the compass needs calibration. (1) The LED indicators diagram above are for Phantom 2 mode. In Naza-M mode, LED indicators will work according to the Naza-M flight control system. (2) Connect to the PHANTOM 2 Assistant Software for detailed information about warnings and errors. 2.
2 Propellers PHANTOM 2 uses the original 9-inch propellers which are classified by the color of each central nut. Damaged propellers should be replaced by purchasing new ones if necessary. Propellers Grey Nut (9443) Black Nut (9443 R) Attach to the motor thread that does Attach to the motor thread that has a not have a black dot. black dot. Diagram Assembly Location Fastening/Un-fastening Lock: Tighten the propeller in this direction. Instructions Unlock: Remove the propeller in this direction.
3 Remote Controller The PHANTOM 2 remote controller can be configured in the PHANTOM RC Assistant Software. The sticks mode is Mode 2 on delivery.
The remote controller will power off automatically when battery voltage drops below 4V. Land and change batteries as soon as possible when the low voltage alert occurs to avoid loss of control during flight. 3.3 Antenna Orientation The remote controller’s antenna should point skywards without obstructions for maximum communication range during flight. Figure 3-3 3.4 Remote Controller Operation The operations of remote controller are based on mode 2 stick configuration.
The yaw stick controls the aircraft rudder. Push the stick left and the aircraft will rotate counter clock-wise. Push the stick right and the aircraft will rotate clock-wise. If the stick is centered, the aircraft will always fly in the same direction. The command stick controls the rotating angular velocity of the aircraft. Increasing movement of the command stick results in faster aircraft rotation velocity. The pitch stick controls the aircraft’s front & back tilt.
Slide Lever controls the pitch of the H3-2D and H3-3D gimbal. The position of slide lever determines the pitch angle relative to the horizontal level. Slide the lever left to make the gimbal pitch down up to a -90° position. Slide the lever right to pitch up to +0° position resulting in gimbal being at a horizontally level orientation. (1) For ‘Ready to Fly’ the aircraft will hover when all sticks are released.
please carry out the linking procedures. 4 Intelligent Battery The intelligent battery is specially designed for the PHANTOM 2, with a battery capacity of 5200mAh, voltage of 11.1V and charge-discharge management functionality. The battery should only be charged with the DJI charger . Intelligent Battery Charger DJI Intelligent Battery Functions (1) Balance Charging Automatically balance the voltage of each battery cell during charging. (2) Capacity Display Display the current battery level.
4. The battery is fully charged when the Battery Level indicator lights are off. Please disconnect the charger and battery when the charging is completed. Wall Socket 4.2 Install the Battery Push the battery into the battery compartment correctly as the following diagram shows. Make sure to push the battery into the compartment until you hear a ‘click’ sound. Figure 4-1 An incorrectly inserted battery may cause one of the following to occur: (1) Bad contact. (2) Unavailable battery information.
will blink for 10 seconds, then all LEDs will light out and the intelligent battery will turn off. Refer to < Battery Level Indicator Description> for details. More battery information is available in the battery tab of the PHANTOM 2 Assistant Software. 4.4 Description of the Battery Level Indicator The battery level indicators will show the current battery level during both the charging and discharging process as well as battery life. The following is a description of the indicators.
40%~50% 30%~40% 20%~30% Less than 20% 4.5 Correct Battery Usage Notes 1. Never plug or unplug the battery into the aircraft when it is powered on. 2. The battery should be charged in an environment that is between 0℃ to 40℃, and be discharged in an environment that is between -20℃ to 50℃. Both charging and discharging should be in an environment where the relative humidity is lower than 80%. 3. It’s recommended to charge and discharge the battery thoroughly once every 20 charge/discharge cycles.
5 Calibrating the Compass IMPORTANT: Make sure to perform the Compass Calibration procedures prior to the first flight. The compass is very sensitive to electromagnetic interference which causes abnormal compass data and leads to poor flight performance or even flight failure. Regular calibration of the compass enables the compass to perform at its optimal level. 5.
6 Flight 6.1 Flying Environment Requirements (1) Before your first flight, please allow yourself some flight training (Using a flight simulator to practice flying, getting instruction from an experienced person, etc.). (2) DO NOT fly in bad weather, such as rain or wind (more than moderate breeze) or fog. (3) The flying field should be open and void of tall buildings or other obstacles; the steel structure within buildings may interfere with the compass.
7. After landing the aircraft on the ground, keep the throttle stick at its lowest position for about 3 to 5 seconds which will automatically stop the motors. You SHOULD NOT execute the CSC during normal flight! This will stop the motors and cause the aircraft to descend rapidly and drop without any type of control. (1) When the LED flight indicator blinks yellow rapidly during flight, the aircraft has entered into Failsafe mode, refer to for details.
Go Home Procedures 1 Record Home Point. à LED Flight Indicator 4 Signal lost lasts 3s, begin to go home. 2 Flying. 3 Remote controller signal lost. LED Flight Indicator LED Flight Indicator 5 Fly back to home point. 6 Landing after hovering 15s.
less than 15% power. (1) When battery power drops below 30% and LED indicator will blink red slowly. (2) At lower than 15% the LED indicator will blink red rapidly, the PHANTOM 2 will also begin to descend and land automatically. After it has landed, keep the throttle stick at its lowest point or execute CSC. (3) There is a hidden third low battery threshold in addition to the 1st and 2nd level warnings. This uses 10.65V as its threshold.
Ready to Fly Limits Max Height Rear LED flight indicator Ground Station The flight height is restricted to fly Warning: Height limit under the max height. reached. None. The flight distance is restricted to fly Warning: Distance limit Rapid red flashings Max Radius within the max radius. reached. when close to the Max radius limit. Ready to Fly(non-GPS) Flight Limits Ground Station Rear LED flight indicator The flight height is restricted to fly Warning: Height limit reached.
Ready to Fly Airspace Limits Rear LED Flight Indicator Motors will not start. A If the Phantom flies into a special area in Ready to Fly Orange (non-GPS) mode and Ready to Fly mode activates, it will automatically descend and land then stop its motors. B If the Phantom flies into a special area in Ready to Fly Yellow (non-GPS) mode and Ready to Fly mode activates, it will descend to airspace C and hover 5 meters below edge d.
Phantom mode Flight Status Limits of Special Area Max Height Max Radius Ready to Fly √ √ √ Ready to Fly (non-GPS) × √ × Naza-M mode Control Mode GPS ATTI. Manual number of GPS found Limits of Special Area Max Height Max Radius ≥6 √ √ √ <6 × √ × ≥6 √ √ × <6 × √ × ≥6 × × × <6 × × × Disclaimer Please ensure that you are kept up to date with International and Domestic airspace rules and regulations before using this product.
7 Assistant Software Installation and Configuration 7.1 Installing Driver and PHANTOM 2 Assistant Software Installing and running on Windows 1. Download driver installer and Assistant Software installer in EXE format from the download page of PHANTOM 2 on the DJI website. 2. Connect the PHANTOM 2 to a PC via a Micro-USB cable. 3. Run the driver installer and follow the prompts to finish installation. 4. Next, run the Assistant Software installer and follow the prompts to finish installation. 5.
Installer in DMG format supports only Mac OS X 10.6 or above. Usage of PHANTOM 2 Assistant Software on Mac OS X and Windows are exactly the same. The Assistant Software pages appear in other places of this manual are on the Windows for example. 7.2 Using the PHANTOM 2 Assistant Software on a PC 1. Start up the PC, power on the PHANTOM 2, then connect the PHANTOM 2 to the PC with a Micro-USB cable. DO NOT disconnect until configuration is finished. 2.
(1) Users should not enable the Naza-M function before finishing Advanced Flight Maneuvers procedure in the " PHANTOM Pilot Training Guide”. If the Naza-M mode is enabled, users can switch the control mode between ATTI. Mode, GPS Mode or Manual Mode, and access the advanced settings (e.g. IOC). In addition, the LED located on the rear frame arms will display Naza-M flight status indications instead of the PHANTOM 2's indicators.
7.4 PHANTOM RC Assistant Software Description Please follow the procedures to finish the configuration of the remote controller. 1. Turn off the remote controller and find the Micro-USB port on the bottom of it. 2. Start up the PC, power on the remote controller, and then Connect the remote controller to the PC with a Micro-USB cable. DO NOT disconnect until the configuration is finished. 3. Run the PHANTOM RC Assistant Software and wait for the remote controller to connect to the Assistant Software.
8 Appendix 8.1 Specifications Aircraft Operating environment temperature -10℃ to 50℃ Power consumption 5.6W Supported Battery DJI Intelligent battery Weight (including the battery) 1000g Recommend payload ≤1300g Maximum payload 1350g Hovering Accuracy (Ready to Fly) Vertical: 0.8m; Horizontal: 2.5m Max Yaw Angular Velocity 200°/s Max Tiltable Angle 35° Max Ascent / Descent Speed Ascent: 6m/s; Descent: 2m/s Max Flight Speed 15m/s (Not Recommended) Wheelbase 350mm 2.
1st Level Low Battery Capacity Warning 2nd Level Low Battery Capacity Warning Not Stationary or Sensor Bias is too big Errors & Aircraft cannot fly.* Compass data abnormal because of ferro-magnetic interference or the compass needs calibration. * Users can connect to the PHANTOM 2 Assistant Software to get detailed information about warnings and errors. ©2013-2014 DJI Innovations. All Rights Reserved.