
User manual

©2013-2014 DJI Innovations. All Rights Reserved.
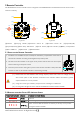
3 Remote Controller
The PHANTOM 2 remote controller can be configured in the PHANTOM RC Assistant Software. The sticks mode is
Mode 2 on delivery.
[1]
[2]
[4]
[3]
[8]
[9]
J2
J1
J3
J4
[6]
[7]
[5]
[12]
[10]
[11]
[13]
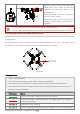
Figure 3-1 Figure 3-2
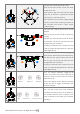
[1]Antenna [2]Carrying Handle [3]3-Position Switch S1 [4]3-Position Switch S2 [5]Joystick1(J1;J2)
[6]Joystick2(J3;J4) [7]Neck Strap Attachment [8]Power Switch [9]Power Indicator [10]Battery Compartment
[11]Micro-USB Port [12]Slide Lever [13]Potentiometer
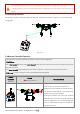
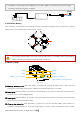
3.1 Power on the Remote Controller
1. Install the four AA Batteries (not included) into the battery compartment on the back of
the remote controller according to the negative and positive poles.
2. Set the S1 and S2 switches to the upper most position and all sticks are at mid-point
before switching on the power switch.
3. Push the power switch to the right to power on the remote controller. If the power LED
indicator is solid on, the remote controller is functioning normally.
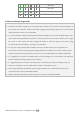
(1) Please make sure the batteries have enough capacity before use. If the low voltage warning
alert sounds (refer to the <Remote Controller Power Indicator Status Information>), please
replace batteries as soon as possible.
(2) Using the correct type of battery will prevent risk of damage or malfunction.
(3) For long term storage, be sure to remove the batteries from the remote controller.
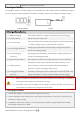
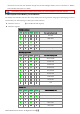
3.2 Remote controller Power LED Indicator Status
Power LED Indicator
Sound
Remote Controller Status
None
Normal
B-B-B……
Low voltage (at 4V-4.3V). Replace the batteries immediately
B--B--B……
Alert will sound after 15 minutes of inactivity. It will stop once you start
using the remote controller.