
User Guide
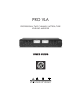


FFRROONNTT PPAANNEELL CCOONNTTRROOLLSS && IINNDDIICCAATTOORRSS
PPoowweerr
The Power switch supplies and removes power from the unit.
The PRO VLA should be powered “on” with all monitor levels
turned down to protect against any “thumping” caused by gain
settings. Likewise, the PRO VLA should be turned “off” after
turning all monitor levels down.
TThhrreesshhoolldd CCoonnttrrooll
The Threshold control sets the point at which the PRO VLA will
act on a signal. Turning this control counter-clockwise lowers
the threshold (adding more compression to a signal). Turning
this control clockwise raises the threshold.
Setting the Threshold control is dependent on the input signal.
The output from a guitar might be -20dB to -10dB, where the
level from an insert on a console might be -10dB to +15dB.
The easiest way to set the threshold control is to start with the
control fully clockwise. Slowly turn the control counter-clock-
wise (lowering threshold) until you see the yellow Threshold
LED light. Now adjust the control (either lower or higher) until
you have the amount of compression you desire. Use the Gain
Reduction meter as a visual guide to the amount of compres-
sion applied.
RRaattiioo CCoonnttrrooll
The Ratio Control selects the “amount” of compression applied
to the input signal once that signal reaches or exceeds the
threshold. This compression amount is expressed as a ratio of
input to output. For example if a 4:1 compression ratio is cho-
sen, for every 4dB over the threshold the input signal rises, the
output level only rises by 1dB. In this case if the input signal
was 12dB over the threshold, the output level would rise by
only 3dB.
Generally compression ratios of 10:1 and greater are consid-
ered limiting.
The range of the Ratio control is 2:1 to 10:1. The PRO VLA may
be used as either a compressor or limiter.
track recorder, DAT machine, hard disk recorder, or analog
recorder.
- In a mixer’s channel insert points.
- Between a microphone preamp and signal processors.
- Between preamplified electronic musical instruments (synthe-
sizers, guitars, bass, samplers, acoustic instruments with pick-
ups) and other line level equipment.
Note: the PRO VLA should be securely mounted in a standard
19” rack.
SSAAFFEETTYY PPRREECCAAUUTTIIOONNSS
Warning: To avoid the risk of shock or fire, do not expose this
unit to moisture. Do not remove metal panels from chassis
parts. Removing the chassis from its cabinet parts exposes dan-
gerous high voltages. There are no user-serviceable parts inside.
Hazardous voltages are present inside the chassis. Refer all ser-
vicing to qualified personnel.
Caution: If your power cord becomes damaged and must be
replaced, always replace it with the proper type (3 prong).
PPOOWWEERRIINNGG UUPP
When the power switch is turned on, the VU meters will light.
LEDs will light if its associated switch is in its “in” position.
Power on the PRO VLA
before
any monitoring levels or power
amps are turned on.
Like all tube-based equipment, the PRO VLA needs to warm up
to operating temperature. The 12AX7 tubes will reach operating
temperature within one to three minutes. During this warm up
period you may experience variations due to the THD of the
tubes stabilizing. This is normal and the PRO VLA will provide
consistent results once this warm up period is over.
If the PRO VLA fails to power up when the power switch is
turned on, check to see that its power cord is plugged into an
active outlet. If the unit still fails to operate properly, turn it off
and unplug it. Then consult your dealer or A R T’s Customer
Service department.
66 77