Voice Internet Phone Gateway Quick Installation Guide IPC 1000 Series ARTDio Company Inc. Edition 1.
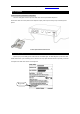
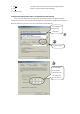
Note: For more detailed hardware installation instructions, please refer to the IPC 1000 series User’s Manual. Step 1. Preparation Connect the phone to perform basic configurations Connect an analog phone to the FXS port of IPC 1000 series unit as the picture below and power on. Please notices that do not connect phone line of the telephone company to the FXS port as doing so may cause damage to the product! Connect a phone to the IPC 1000 series unit Step 2.
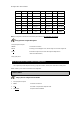
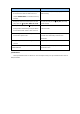
The Region ID is coded as follows: ID NO. Country ID NO. Country ID NO. Country ID NO.
5. 030# Enable “static” IP mode. 6. 04210*62*149*250# Configures the IP Address “210.62.149.250”. 7. 05255*255*255*128# Configures the Subnet Mask “255.255.255.128”. 8. 06210*62*149*254# Configures the Default Gateway “210.62.149.254”. 9. 882834# The numbers ”2834” in this string are the web based management password. 10. 981# Restarts. (The system should be restarted immediately) 11. Hang up the phone Note: This is the area code of the phone number.
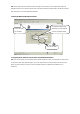
7. 882834# The numbers ”2834” in this string are the web based management password. 8. 981# Restarts. (The system should be restarted immediately) 9. Hang up the phone 2. Configure the TCP/IP Properties of the PC connected to the IPC 1000 series unit You can use a popular browser such as IE or Netscape to perform further configurations.
Note: If the IPC 1000 series unit’s IP address has been set to public or static IP mode; you must configure the IP Address and Subnet Mask of the PC to be in the same subnet as the IPC 1000 series unit rather than using IP address “192.168.0.5” and Subnet Mask “255.255.255.0” as the above illustration demonstrates. 3.
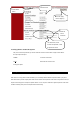
1. Select BASIC 2. Select PPPoE Button. 4. Click the “Apply” button to apply any 3. Enter the PPPoE information. Fill in the (PPPoE) account username and password, re-enter the password to confirm 10. Using a phone to restart the System After you have set all the parameters, you need to restart IPC 1000 series to start PPPoE and get a new IP address. 1.Pick up the phone and press 2. ##0000 You will hear 3 short tones. 3. 981# Restarts the IPC 1000 series unit. 4. Hang up the phone. 4.
Editing Phone Book 1. Click the PHONEBOOK button to go to the phonebook configuration page. 2. Fill in the country code, area code and phone number 5. Click the “Apply” button to apply any changes 3. Fill in the IP address 4. Fill in the signaling UDP port.
Local IPC 1000 series 1. Remote IPC 1000 series Assuming the user makes a traditional phone call through After a few seconds the phone will begin ringing. (The FXO LED the PSTN to reach a remote IPC 1000 series unit, for should be flashing) example ”002862164458275” (You will then hear the ring back tone). 2. 3. Waiting for the recipient to answer the phone, ask called Pick up the phone and press the“#” key twice, the learning party to press the “#” key twice.
5 . Placing VoIP Calls The way making VoIP calls are almost the same as making traditional phone calls that you would use every day. If the recipient IPC 1000 series is located in local, the number is the same as the destination number with leading and ending ‘#’ keys. If the recipient IPC 1000 series is located in different area (long distance call), place the long distance access code and area code in front of the destination number and leading and ending ‘#’ keys.
6 . SIP Configuration Before configuring SIP, you need an SIP proxy’s domain name or IP address if you are making SIP calls through SIP proxy. Following pictures guide you configuring the SIP Proxy’s parameters. 1. Click the ADVANCED button to go to the configuration page. 2. Click the SIP COMMON button to go to the SIP configuration page. 3. Enter domain name or IP address of Proxy Server and select Enable 8. Click the “Apply” button to apply any changes 4.
Configure outbound authentication if SIP proxy server or other SIP phone request for authentication. 1. Click the ADVANCED button to go to the configuration page. 2. Click the SIP OUTBOUND 4. Click the “Apply” button to apply any changes 3. Enter information for authentication including realm, username, port and password.
7 . SIP Phone Books Configure SIP phone book to map SIP phone number with index. Making a SIP call by using analogy phone, just pick up the phone and dial *# index #. 1. Click the PHONEBOOK button to go to the configuration page. 6. Click the “Apply” button to apply any changes 2. Click the SIP button. 5. Select via proxy or not. 3. Enter numbers. 4. Enter information of other SIP phone number including name, host and port. 8 .