user manual Dishwasher ASL 64050
electrolux Electrolux. Thinking of you. Share more of our thinking at www.electrolux.
electrolux 3 • Water in the dishwasher is not for drinking purposes. Detergent residue may still be present in your machine. • Ensure that the door of the dishwasher is always closed when it is not being loaded or unloaded. In this way you will avoid anybody tripping over the open door and hurting themselves. • Do not sit or stand on the open door. Child safety • This appliance is designed to be operated by adults. Children must be supervised to ensure that they do not play with the appliance.
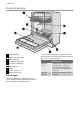
electrolux Product description 1 2 3 4 5 6 7 8 9 Upper basket Water hardness dial Salt container Detergent dispenser Rinse aid dispenser Rating plate Filters Lower spray arm Upper spray arm Optical signal Once the washing programme starts, a point-shaped optical signal shows on the floor beneath the appliance door. If you install the appliance higher up with a furniture door mounted flush, the optical signal can no longer be seen.
electrolux 5 Control panel 1 2 3 4 5 6 On/off button Digital display Delay start button Programme selection buttons Indicator lights Function buttons Indicator lights 1) 1) Comes on when the special salt has run out. Comes on when the rinse aid has run out. Indicates the activation/deactivation of the multitab function. Refer to 'Multitab function'. 1) The salt and rinse aid indicator lights never come on while a washing programme is running, even if filling with salt and/or rinse aid is necessary.
electrolux Setting mode Press the on/off button; if ALL programme button lights are on the appliance is in setting mode. – setting of the water softener, – end of the washing programme, – intervention of an alarm due to malfunction of the machine. Always remember that when performing the following operations: – selecting a washing programme, – setting the water softener level, – activating/deactivating the rinse aid, – activating/deactivating the audible signals, the appliance MUST be in setting mode.
electrolux 7 Water hardness Adjusting the water hardness setting Use of salt °dH °TH mmol/l manually electronically 51 - 70 91 - 125 9,1 - 12,5 2 level 10 yes 43 - 50 76 - 90 7,6 - 9,0 2 level 9 yes 37 - 42 65 - 75 6,5 - 7,5 2 level 8 yes 29 - 36 51 - 64 5,1 - 6,4 2 level 7 yes 23 - 28 40 - 50 4,0 - 5,0 2 level 6 yes 19 - 22 33 - 39 3,3 - 3,9 2 level 5 yes 15 - 18 26 - 32 2,6 - 3,2 1 level 4 yes 11 - 14 19 - 25 1,9 - 2,5 1 level 3 yes 4 - 10 7 - 18 0
electrolux 2. Pour 1 litre of water into the container (this is necessary only before filling with salt for the first time) . 3. Using the funnel provided, pour in the salt until the container is full. 4. Replace the cap making sure that there is no trace of salt on the screw thread or on the gasket. 5. Replace the cap tightly turning it clockwise until it stops with a click. Do not worry if water overflows from the unit when filling with salt, this is quite normal.
electrolux 9 According to the finish and drying results obtained, adjust the dose of rinse aid by means of the 6 position selector (position 1 minimum dosage, position 6 maximum dosage). The dose is factory set in position 4. Increase the dose if there are drops of water or lime spots on the dishes after washing. Reduce it if there are sticky whitish streaks on the dishes or a bluish film on glassware or knife blades. Daily use • Check if it’s necessary to refill with dishwasher salt or rinse aid.
electrolux Loading cutlery and dishes The lower basket The lower basket is designed to take saucepan, lids, plates, salad bowls, cutlery etc. Service dishes and large lids should be arranged around the edge of the basket, ensuring that the spray arms can turn freely. horizontally in the upper basket. Take care when loading or unloading sharp items such as knives.
electrolux 11 The cutlery basket is in two parts which can be separated to give greater loading flexibility. To separate the two parts, slide them horizontally in opposite directions and pull them apart. Glasses with long stems can be placed upside down in the cup racks. For taller items, the cup racks can be folded upwards. Before closing the door, ensured that the spray arms can rotate freely.
electrolux 1. Pull out the basket until it stops. 2. Carefully lift both sides upwards and then allow the mechanism to drop back down slowly, keeping hold of it. Never lift or lower the basket on one side only When the basket is in the higher position cups cannot be placed on the cup racks. After loading your machine always close the door, as an open door can be a hazard.
electrolux 13 4. Close the lid and press until it locks in place. Detergent tablets from different manufacturers dissolve at different rates. For this reason, some detergent tablets do not attain their full cleaning power during short washing programmes. Therefore, please use long washing programmes when using detergent tablets, to ensure the complete removal of detergent residuals.
electrolux 5. To memorize the operation, switch off the dishwasher by pressing the on/off button. If you decide to revert back to the use of individual detergents we advise that you: 1. Deactivate the multitab function. 2. Fill up the salt container and the rinse aid dispenser again. 3. Adjust the water hardness setting to the highest setting and perform 1 normal washing programme without loading any dishes. 4. Adjust the water hardness setting according to the hardness of the water in your area. 5.
electrolux 15 Press one of the buttons (not the on/off button), to go back to end-of-programme mode. Unloading the dishwasher • Hot dishes are sensitive to knocks. The dishes should therefore be allowed to cool down before removing from the appliance. • Empty the lower basket first and then the upper one; this will avoid water dripping from the upper basket onto the dishes in the lower one.
electrolux Washing programmes Washing programmes Programme 1) 2) 3) Degree of soil Type of load Programme description Heavy soil Crockery, cutlery, pots and pans Prewash Main wash up to 70°C 2 intermediate rinses Final rinse Drying Any Crockery, cutlery, pots and pans Prewash Main wash up to 45°C or 70°C 1 or 2 intermediate rinses Final rinse Drying Normal or light soil Crockery and cutlery Main wash up to 60°C Final rinse Normal soil Crockery and cutlery Prewash Main wash up to 50°C 1
electrolux 17 Care and cleaning Cleaning the filters The filters must be checked and cleaned from time to time. Dirty filters will degrade the washing result. Warning! Before cleaning the filters ensure that the machine is switched off. 1. Open the door, remove the lower basket. 2. The dishwasher filter system comprises a coarse filter (A), a microfilter (B) and a flat filter (C). A B C 3. Unlock the filter system using the handle on the microfilter.
electrolux 1. Unplug the appliance and then turn off the water. 2. Leave the door ajar to prevent the formation of any unpleasant smells. 3. Leave the inside of the machine clean. Frost precautions Avoid placing the machine in a location where the temperature is below 0°C. If this is unavoidable, empty the machine, close the appliance door, disconnect the water inlet pipe and empty it. Moving the machine If you have to move the machine (moving house etc...): 1. Unplug it. 2. Turn the water tap off. 3.
electrolux 19 Malfunction Possible cause and solution • The dishwasher door has not been properly closed. Close the door. • The main plug is not plugged in. Insert the main plug • The fuse has blown out in the household fuse box. Replace the fuse. • Delay start has been set. If dishes are to be washed immediately, cancel the delay start. The programme does not start Once these checks have been carried out switch on the appliance and close the door.
electrolux Depth cm 55 Electrical connection - Voltage Overall power - Fuse Information on the electrical connection is given on the rating plate on the inner edge of the dishwasher door. Water supply pressure Minimum 0,05 MPa (0,5 bar) Maximum 0,8 MPa (8 bar) Capacity Place settings 12 Hints for test institutes Testing in accordance with EN 60704 must be carried out with appliance fully loaded and using the test programme (refer to 'Washing programmes').
electrolux 21 Installation Warning! Any electrical and/or plumbing work required to install this appliance should be carried out by a qualified electrician and/or plumber or competent person. Remove all packaging before positioning the machine. If possible, position the machine next to a water tap and a drain. This dishwasher is designed to be fitted under a kitchen counter or work surface.
electrolux max 400 cm max 85 cm min 40 cm The drain hose can face either to the right or left of the dishwasher Ensure the drain hose is not bent or squashed as this could prevent or slow down the discharge of water. The sink plug must not be in place when the machine is draining as this could cause the water to syphon back into the machine. If you use a drain hose extension, its internal diameter must be no smaller than the diameter of the hose provided.
electrolux 23 product, please contact your local council, your household waste disposal service or the shop where you purchased the product. Packaging material The packaging materials are environmentally friendly and can be recycled. The plastic components are identified by markings, e.g. >PE<, >PS<, etc. Please dispose of the packaging materials in the appropriate container at the community waste disposal facilities. Warning! When a unit is no longer being used: • Pull the plug out of the socket.
www.electrolux.