AGH7252BOX EN FR Hob Table de cuisson User Manual Notice d'utilisation 2 17
CONTENTS Safety information Safety instructions Installation Product description Daily use 2 4 6 10 10 Hints and tips Care and cleaning Troubleshooting Technical data 11 12 13 14 Subject to change without notice. SAFETY INFORMATION Before the installation and use of the appliance, carefully read the supplied instructions. The manufacturer is not responsible for any injuries or damages that are the result of incorrect installation or usage.
General Safety • • • • • • • • • • • • WARNING: The appliance and its accessible parts become hot during use. Care should be taken to avoid touching heating elements. Do not operate the appliance by means of an external timer or separate remote-control system. WARNING: Unattended cooking on a hob with fat or oil can be dangerous and may result in fire. NEVER try to extinguish a fire with water, but switch off the appliance and then cover flame e.g. with a lid or a fire blanket.
suitable or hob guards incorporated in the appliance. The use of inappropriate guards can cause accidents. SAFETY INSTRUCTIONS This appliance is suitable for the following markets: MA TN Installation WARNING! Only a qualified person must install this appliance. WARNING! Risk of injury or damage to the appliance. • Remove all the packaging. • Do not install or use a damaged appliance. • Follow the installation instructions supplied with the appliance.
• Use only correct isolation devices: line protecting cut-outs, fuses (screw type fuses removed from the holder), earth leakage trips and contactors. • The electrical installation must have an isolation device which lets you disconnect the appliance from the mains at all poles. The isolation device must have a contact opening width of minimum 3 mm. Gas connection • All gas connections should be made by a qualified person.
• • • • the room where the appliance is installed. Prolonged intensive use of the appliance may call for additional ventilation, for example opening of a window, or more effective ventilation, for example increasing the level of mechanical ventilation where present. This appliance is for cooking purposes only. It must not be used for other purposes, for example room heating. Do not let acid liquids, for example vinegar, lemon juice or limescale remover, touch the hob. This can cause matt patches.
Make sure that the gas supply pressure of the appliance obeys the recommended values. The adjustable connection is fixed to the comprehensive ramp by means of a threaded nut G 1/2". Screw the parts without force, adjust the connection in the necessary direction and tighten everything. A B C A. End of shaft with nut B. Washer supplied with the appliance C. Elbow supplied with the appliance Liquid gas Use the rubber pipe holder for liquid gas. Always engage the gasket.
• from natural gas G20 20 mbar to liquid gas, fully tighten the bypass screw in. • from liquid gas to natural gas G20 20 mbar, undo the bypass screw approximately 1/4 of a turn. WARNING! Make sure the flame does not go out when you quickly turn the knob from the maximum position to the minimum position. Electrical connection • Make sure that the rated voltage and type of power on the rating plate agree with the voltage and the power of the local power supply.
4. CAUTION! Install the appliance only on a worktop with flat surface. Possibilities for insertion The panel installed below the hob must be easy to remove and let an easy access in case a technical assistance intervention is necessary. 5. Kitchen unit with door 6. min 6 mm A B 7. min 30 mm min 5 mm (max 150 mm) 60 mm A. Removable panel B. Space for connections A 8.
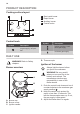
PRODUCT DESCRIPTION Cooking surface layout 1 2 3 4 2 1 Semi-rapid burner Rapid burner Auxiliary burner Control knobs 3 4 Control knob Symbol Symbol Description Description ignition position / maxi‐ mum gas supply no gas supply / off posi‐ tion minimum gas supply DAILY USE D. Thermocouple WARNING! Refer to Safety chapters. Ignition of the burner Burner overview Always light the burner before you put on the cookware. A B C D A. Burner cap B. Burner crown C.
If after some tries the burner does not light, check if the crown and its cap are in correct positions. WARNING! Do not keep the control knob pushed for more than 15 seconds. If the burner does not light after 15 seconds, release the control knob, turn it into off position and try to light the burner again after minimum 1 minute.
Diameters of cookware Use cookware with diameters applicable to the size of burners. Burner Rapid (central) Burner Diameter of cookware (mm) Rapid (rear right) 160 - 260 Diameter of cookware (mm) Semi-rapid (front) 120 - 180 Semi-rapid (rear) 120 - 240 180 - 260 Auxiliary 80 - 180 CARE AND CLEANING WARNING! Refer to Safety chapters. General information • Clean the hob after each use. • Always use cookware with a clean base.
stains, shiny metallic discoloration. Clean the hob with a moist cloth and a non-abrasive detergent. After cleaning, wipe the hob dry with a soft cloth. • To clean the enamelled parts, caps and crowns, wash them with warm soapy water and dry them carefully before you put them back on. Cleaning the spark plug This feature is obtained through a ceramic ignition candle with a metal electrode.
Problem Possible cause Remedy The flame ring is uneven. Burner crown is blocked with food residues. Make sure that the injector is not blocked and the burn‐ er crown is clean. If you cannot find a solution... If you cannot find a solution to the problem yourself, contact your dealer or an Authorised Service Centre. Give the data from the rating plate. Make sure, you operated the hob correctly.
Bypass diameters BURNER Ø BYPASS 1/100 mm Rapid 45 Semi-rapid 35 Auxiliary 28 Other technical data TOTAL POW‐ ER: Gas original: Gas replace‐ ment: G30/G31 (3B/P) 30/30 mbar 771 g/h G20 (2H) 20 mbar 11,0 kW Electric supply: 220-240 V ~ 50/60 Hz Appliance cate‐ gory: II2H3B/P Gas connec‐ tion: G 1/2" Appliance class: 3 Gas burners for LPG G30/G31 30/30 mbar BURNER NORMAL POWER kW MINIMUM POWER kW INJECTOR MARK NOMINAL GAS FLOW g/h Rapid 2,8 0,75 86 204 Semi-rapid 2,0 0,45
electrical and electronic appliances. Do not dispose of appliances marked with the symbol with the household waste. Return the product to your local recycling facility or contact your municipal office.
TABLE DES MATIÈRES Informations de sécurité Consignes de sécurité Installation Description de l'appareil Utilisation quotidienne 17 19 22 26 26 Conseils Entretien et nettoyage En cas d'anomalie de fonctionnement Caractéristiques techniques 27 28 30 31 Sous réserve de modifications. INFORMATIONS DE SÉCURITÉ Avant d'installer et d'utiliser cet appareil, lisez soigneusement les instructions fournies.
• Les enfants ne doivent pas nettoyer ni entreprendre une opération de maintenance sur l'appareil sans surveillance. Sécurité générale • • • • • • • • • • • AVERTISSEMENT : L'appareil et ses parties accessibles deviennent chauds pendant son fonctionnement. Veillez à ne pas toucher les éléments chauffants. Ne faites pas fonctionner l'appareil avec un minuteur externe ou un système de commande à distance.
• AVERTISSEMENT : Utilisez uniquement les dispositifs de protection pour table de cuisson conçus ou indiqués comme adaptés par le fabricant de l'appareil de cuisson dans les instructions d'utilisation, ou les dispositifs de protection pour table de cuisson intégrés à l'appareil. L'utilisation de dispositifs de protection non adaptés peut entraîner des accidents.
• • • • • • • • surfaces brûlantes de l'appareil ou les récipients brûlants lorsque vous branchez l'appareil à des prises électriques situées à proximité. N'utilisez pas d'adaptateurs multiprises ni de rallonges. Veillez à ne pas endommager la fiche secteur (si présente) ni le câble d'alimentation. Contactez notre service après-vente agréé ou un électricien pour remplacer le câble d'alimentation s'il est endommagé.
• Les vapeurs dégagées par l'huile très chaude peuvent provoquer une combustion spontanée. • L'huile qui a servi contient des restes d'aliments pouvant provoquer un incendie à température plus faible que l'huile n'ayant jamais servi. • Ne placez pas de produits inflammables ou d'éléments imbibés de produits inflammables à l'intérieur ou à proximité de l'appareil, ni sur celui-ci. AVERTISSEMENT! Risque d'endommagement de l'appareil. • Ne laissez pas de récipients chauds sur le bandeau de commande.
Mise au rebut AVERTISSEMENT! Risque de blessure ou d'asphyxie. • Contactez votre service municipal pour obtenir des informations sur la marche à suivre pour mettre l'appareil au rebut. • Débranchez l'appareil de l'alimentation électrique. • Coupez le câble d'alimentation au ras de l'appareil et mettez-le au rebut. • Aplatissez les tuyaux de gaz externes. INSTALLATION AVERTISSEMENT! Reportezvous aux chapitres concernant la sécurité.
• il peut être facilement contrôlé sur toute sa longueur afin de vérifier son état. Vérifiez les points suivants pour contrôler le bon état du tuyau flexible : • il ne présente aucune fente, coupure, marque de brûlure sur les deux extrémités et sur toute sa longueur ; • le matériau n'est pas durci, mais présente une élasticité correcte ; • les colliers de serrage ne sont pas rouillés ; • la date d'expiration n'est pas dépassée.
• Assurez-vous que la prise de courant est accessible une fois l'appareil installé. • Pour débrancher l'appareil, ne tirez jamais sur le câble d'alimentation électrique. Tirez toujours sur la fiche pour la débrancher de la prise secteur. • L'appareil ne doit pas être raccordé à l'aide d'un prolongateur, d'un adaptateur ni d'une prise multiple (risque d'incendie). Assurez-vous que le raccordement à la terre est conforme aux normes et réglementations.
Possibilités d'insertion 5. Le panneau installé sous la table de cuisson doit être facile à retirer et facilement accessible au cas où une intervention technique serait nécessaire. Élément de cuisine avec une porte 6. min 6 mm 7. A B min 30 mm min 5 mm (max 150 mm) 60 mm A 8. A) équerre fournie A. Panneau amovible B.
DESCRIPTION DE L'APPAREIL Description de la table de cuisson 1 2 3 4 2 1 Brûleur semi-rapide Brûleur rapide Brûleur auxiliaire Manettes de commande 3 4 Manette de commande Symbole Symbole Description Description alimentation en gaz mini‐ male pas d'alimentation en gaz / position Arrêt position d'allumage / ali‐ mentation en gaz maxi‐ male UTILISATION QUOTIDIENNE AVERTISSEMENT! Reportezvous aux chapitres concernant la sécurité. Vue d'ensemble des brûleurs A B C D A. B. C. D.
Allumage du brûleur Allumez toujours le brûleur avant de poser un récipient dessus. AVERTISSEMENT! Faites très attention lorsque vous utilisez une flamme nue dans une cuisine. Le fabricant décline toute responsabilité en cas de mauvaise utilisation de la flamme. 1. Enfoncez la manette et tournez-la vers la gauche jusqu'à la position d'arrivée de gaz maximale ( ). 2. Maintenez la manette enfoncée pendant 10 secondes environ. Cela permet au thermocouple de chauffer.
Récipients ATTENTION! N'utilisez pas de plats en fonte, en argile, en grès, de grils ou de plats à gratin. L'acier inoxydable peut ternir s'il est trop chauffé. AVERTISSEMENT! Ne placez pas le même récipient sur deux brûleurs. AVERTISSEMENT! Ne placez pas de récipients instables ou déformés sur le brûleur afin d'éviter les débordements et les blessures. ATTENTION! Assurez-vous que le fond des récipients ne se trouve pas trop près de la manette de commande sinon la flamme fait chauffer la manette.
spécifiquement conçus pour le nettoyage de l'acier inoxydable. • N'utilisez pas de produits nettoyants contenant des produits chimiques corrosifs comme le chlorure. Ne nettoyez pas la surface avec des produits désinfectants, des agents détachants ou anti-rouille, ou des produits de nettoyage par immersion. Supports de casserole Les supports de casserole ne sont pas adaptés au lavage dans un lave-vaisselle. Ils doivent être lavés à la main. 1.
Entretien périodique Contactez périodiquement votre service après-vente pour contrôler l'état du tuyau d'arrivée de gaz et du régulateur de pression si votre installation en est équipée. EN CAS D'ANOMALIE DE FONCTIONNEMENT AVERTISSEMENT! Reportezvous aux chapitres concernant la sécurité. Que faire, quand... Problème Cause probable Solution Aucune étincelle ne se pro‐ duit lorsque vous tentez d'actionner le générateur d'étincelles.
Étiquettes fournies dans le sachet des accessoires Collez les étiquettes adhésives comme indiqué ci-dessous : A B MOD. MOD. PROD.NO. PROD.NO. SER.NO SER.NO DATA DATA C 0049 MOD. PROD.NO. SER.NO. TYPE IP20 03 IT MADE IN ITALY A. Collez-la sur la carte de garantie et envoyez cette partie (le cas échéant). B. Collez-la sur la carte de garantie et conservez cette partie (le cas échéant). C. Collez-la sur la notice d'utilisation.
Autres caractéristiques techniques PUISSANCE TOTALE : Gaz d'origi‐ ne : G30/G31 (3B/P) 30/30 mbar 771 g/h Gaz de rem‐ placement : G20 (2H) 20 mbar 11,0 kW Alimentation électrique : 220-240 V ~ 50/60 Hz Catégorie de l'appareil : II2H3B/P Raccordement au gaz : G 1/2" Classe de l'ap‐ pareil : 3 Brûleurs à gaz pour LPG G30/G31 30/30 mbar BRÛLEUR PUISSANCE NORMALE kW PUISSANCE MINIMALE kW CARACTÉ‐ RISTIQUE DE L'INJECTEUR DÉBIT DE GAZ NOMINAL g/h Rapide 2,8 0,75 86 204 Semi-rapide 2,
867345540-B-352018