AKG611A3OX EN Cooker User Manual
CONTENTS Safety information Safety instructions Product description Before first use Hob - Daily use Hob - Hints and tips Hob - Care and cleaning 2 4 7 8 9 10 10 Oven - Daily use Oven - Clock functions Oven - Using the accessories Oven - Hints and tips Oven - Care and cleaning Troubleshooting Installation 11 13 13 15 19 21 22 Subject to change without notice. SAFETY INFORMATION Before the installation and use of the appliance, carefully read the supplied instructions.
• Children shall not carry out cleaning and user maintenance of the appliance without supervision. General Safety • • • • • • • • • • • • • • Only a qualified person must install this appliance and replace the cable. This appliance is intended for use up to an altitude of 2000 m above sea level. This appliance is not intended to be used on a ships, boats or vessels. Do not install the appliance behind a decorative door in order to avoid overheating. Do not install the appliance on a platform.
• • • • • • WARNING: The appliance and its accessible parts become hot during use. Care should be taken to avoid touching heating elements. Always use oven gloves to remove or put in accessories or ovenware. Before maintenance cut the power supply. Ensure that the appliance is switched off before replacing the lamp to avoid the possibility of electric shock.
• Always use a correctly installed shockproof socket. • Do not use multi-plug adapters and extension cables. • Do not let mains cables touch or come near the appliance door, especially when the door is hot. • The shock protection of live and insulated parts must be fastened in such a way that it cannot be removed without tools. • Connect the mains plug to the mains socket only at the end of the installation. Make sure that there is access to the mains plug after the installation.
WARNING! Risk of damage to the appliance. • To prevent damage or discoloration to the enamel: – do not put ovenware or other objects in the appliance directly on the bottom. – do not put water directly into the hot appliance. – do not keep moist dishes and food in the appliance after you finish the cooking. – be careful when you remove or install the accessories. • Discoloration of the enamel or stainless steel has no effect on the performance of the appliance. • Use a deep pan for moist cakes.
• Keep children away when the grill is in use. • Do not put the oven shelf with food on the highest shelf level. • Keep the lid glass open, while the oven is in operation (if applicable). Internal lighting Service • To repair the appliance contact an Authorised Service Centre. • Use original spare parts only. Disposal WARNING! Risk of electric shock. • The type of light bulb or halogen lamp used for this appliance is for household appliances only. Do not use it for house lighting.
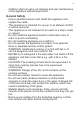
Cooking surface layout 1 2 5 3 1 Auxiliary burner 2 Steam outlet - number and position depend on the model 3 Semi-rapid burner 4 Semi-rapid burner 5 Rapid burner 4 Accessories • Wire shelf For cookware, cake tins, roasts. • Baking tray For cakes and biscuits. • Turnspit For roasting larger joints of meat and poultry. • Storage compartment The storage compartment is below the oven cavity. To use the compartment, lift the lower front door then pull it down.
HOB - DAILY USE WARNING! Do not keep the knob pushed for more than 15 seconds. If the burner does not light after 15 seconds, release the knob, turn it into the off position and try to light the burner again after minimum 1 minute. WARNING! Refer to Safety chapters. Ignition of the hob burner Always light the burner before you put on the cookware. WARNING! Be very careful when you use open fire in the kitchen environment. The manufacturer declines any responsibility in case of the flame misuse.
WARNING! Always turn the flame down or switch it off before you remove the pans from the burner. HOB - HINTS AND TIPS WARNING! Refer to Safety chapters. Cookware WARNING! Do not put the same pan on two burners. WARNING! Do not put unstable or damaged pots on the burner to prevent spills and injuries. CAUTION! Make sure that pot handles are not above the front edge of the cooktop.
Cleaning the spark plug This feature is obtained through a ceramic ignition candle with a metal electrode. Keep these components well clean to prevent difficult lighting and check that the burner crown holes are not obstructed. Pan supports The pan supports are not resistant to washing in a dishwasher. They must be washed by hand. 1. Remove the pan supports to easily clean the hob. Be very careful when you replace the pan supports to prevent the hob top from damage. 2.
Ignition of the oven gas burner CAUTION! When turning on the oven burner the oven door must be opened. CAUTION! Make sure that the lid is opened. When using the oven the lid has to be opened to avoid over-heating. Oven safety device: The gas oven has a thermocouple. It stops the gas flow if the flame goes out. 1. Open the oven door. 2. Ignite the oven gas burner. • For ignition on the spark generator button push and hold the button .
CAUTION! Do not put the meat on the highest shelf level. There is a risk of fire. CAUTION! Make sure to turn the knob for the oven funstions as far as it goes. Avoid the intermediary position between Off and Grill. On the intermediary positions the spark generator can remain active. 1. Open the oven door. 2. Ignite the grill burner. • For manual ignition hold a flame near the grill burner holes. Push and turn the knob for the grill to the flame position. Hold the knob pushed down.
upwards. Make sure the shelf does not touch the back wall of the oven. Tray: Do not push the baking tray all the way to the back wall of the cavity. This prevents the heat from circulating around the tray. The food may be burnt, especially in the rear part of the tray. B. Forks C. Spit D. Handle The support hook is installed in the top of the oven cavity. You can leave the support hook in the oven, when the turnspit is not active. 1. Open the oven door. 2. Put the turnspit handle into the spit. 3.
10. Light the grill. Refer to "Oven - Daily use" chapter. 11. Press the turnspit button . 12. Make sure that turnspit rotates. 13. Close the oven door. The turnspit does not stop if you open the oven door. When meat is ready press the turnspit button. Turn off the grill. Install the turnspit handle. Carefully remove the turnspit and the roasting pan from the oven. OVEN - HINTS AND TIPS WARNING! Refer to Safety chapters. The temperature and baking times in the tables are guidelines only.
Cooking tables Casseroles Food Quantity (kg) Tem‐ pera‐ ture (°C) Time (min ) Grill po‐ sition Grilling time (min) Total prepara‐ tion time (min) Shelf posi‐ tion Lasa‐ 1.5 - 2.5 195 40 45 min. 10 - 15 50 - 60 2 1.5 - 2.5 195 40 45 min. 10 - 15 50 - 60 2 1.5 - 2.5 190 60 65 min. 10 - 15 70 - 80 2 1.5 - 2.5 195 55 60 min. 10 - 15 65 - 75 2 1.5 - 2.5 195 30 35 max.
Food Quantity (kg) Tem‐ pera‐ ture (°C) Time (min ) Grill po‐ sition Grilling time (min) Total prepara‐ tion time (min) Shelf posi‐ tion Beef 1.2 - 1.8 210 90 100 min. 5 - 10 100 120 2 1) Turn over after 45 min. Fish Food Quantity (kg) Tem‐ pera‐ ture (°C) Tim e (min ) Grill po‐ sition Grilling time (min) Total prepara‐ tion time (min) Shelf posi‐ tion Pike 0.8 - 1.5 180 50 60 min. 5 - 10 60 - 80 2 Dorade 0.4 - 0.7 180 30 40 min. 5 - 10 40 - 60 2 Trout 0.5 - 1.
Cakes Food Quanti‐ ty (kg) Tem‐ pera‐ ture (°C) Time (min) Grill po‐ sition Grilling time (min) Total prepara‐ tion time (min) Shelf posi‐ tion Flat cake 0.6 1.0 165 30 35 min. 5 - 10 35 - 45 3 1) Sponge cake 1.0 1.5 165 105 110 - - 105 110 2 Feter Mshalted 1.0 1.5 195 40 45 min. 5 - 10 45 - 55 2 1.0 1.2 195 45 55 min. 5 - 10 50 - 65 2 1.0 1.5 195 40 45 min. 5 - 10 45 - 55 2 1) Salty cake 1) Yeast cake 1) 1) Preheat the oven for 10 minutes.
Revolving frying Food Quantity (kg) Grill position Time (min) Shelf posi‐ tion Sheep on skewer 1.5 - 2.0 max. 100 - 120 Turnspit Chicken on skewer 1.2 - 1.8 max. 100 - 110 Turnspit OVEN - CARE AND CLEANING WARNING! Refer to Safety chapters. Notes on cleaning Clean the front of the oven with a soft cloth with warm water and a mild cleaning agent. To clean metal surfaces, use a dedicated cleaning agent. Clean the oven interior after each use.
6. Use a spatula made of wood or plastic or equivalent to open the inner door. Hold the outer door, and push the inner door against the top edge of the door. Lift the inner door. 3 2 2 3. Close the oven door to the first opening position (halfway). Then pull forward and remove the door from its seat. 7. Clean the oven door with water and soap. Clean inner side of the door. Dry the oven door carefully. When the cleaning is completed, install the glass panels and the oven door.
The back lamp 1. Turn the lamp glass cover to remove it. 2. Clean the glass cover. 3. Replace the lamp with a suitable 300 °C heat-resistant lamp. 4. Install the glass cover. TROUBLESHOOTING WARNING! Refer to Safety chapters. What to do if... Problem Possible cause Remedy There is no spark when you try to activate the spark gen‐ erator. The hob is not connected to an electrical supply or it is connected incorrectly. Check if the hob is correctly connected to the electrical supply.
Problem Possible cause Remedy Steam and condensation settle on the food and in the cavity of the oven. You left the dish in the oven for too long. Do not leave the dishes in the oven for longer than 15 20 minutes after the cooking process ends. The oven does not heat up. The necessary settings are not set. Make sure that the settings are correct. The turnspit does not rotate. The turnspit is not correctly installed into the turnspit hole. Refer to "Using the turnspit".
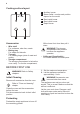
Minimum distances Dimension mm A 400 B 650 C 150 D 20 Technical data Voltage Frequency 50 - 60 Hz Appliance class 1 Dimension mm Height 850 - 870 Width 600 Depth 600 220 - 240 V Other technical data Appliance category: II2H3B/P LPG: G30 (3B/P) 28-30 mbar Natural Gas: G20 (2H) 20 mbar Bypass diameters BURNER Ø BYPASS 1/100 mm Auxiliary 29 / 30 Semi-rapid 32 Rapid 42 Oven 50 Grill 50 Gas burners for NATURAL GAS G20 20 mbar BURNER NORMAL POW‐ ER kW REDUCED POWER
Gas burners for LPG G30 28-30 mbar BURNER NORMAL POWER kW GAS RATE g/h REDUCED POWER kW INJECTOR MARK 1/100 mm Rapid 3.0 218.1 0.72 88 Semi-rapid 2.0 145.4 0.43 71 Auxiliary 1.0 72.7 0.35 50 Oven 2.5 181.8 1.0 75 Grill 2.4 174.5 1.5 75 Gas connection The gas pipe in the appliance has two endings. You can connect the gas supply to either one of them. The pipe that is not used must be clogged with the pipe closer, which added to the appliance.
Adjustment to different types of gas WARNING! Let only an authorized person do the adjustment to different types of gas. 3. Remove the injectors with a socket spanner 7. 4. Replace injectors with the ones necessary for the type of gas you use. If the appliance is set for liquid gas you can change it to natural gas, with the correct injectors. The gas rate is adjusted to suit. WARNING! Before you replace the injectors, make sure that the gas knobs are in the Off position.
Changing from natural gas to liquid gas A B 1. Fully tighten the bypass screw. 2. Put the knob back. Changing from liquid gas to natural gas 1. Unscrew approximately one turn the bypass screw position A. 2. Put the knob for the hob back. 3. Connect the appliance to the electricity. 4. 5. 6. 7. 8. WARNING! Put the mains plug into the mains socket only if all parts are back into their initial position. There is a risk of injury. Light the burner. Refer to "Hob - Daily use" chapter.
Adjusting the minimum gas level on the oven burner 1. Disconnect the appliance from the electricity. 2. Remove the knob for the oven functions. If there is no access to the bypass screw dismount the control panel before adjustment start. 3. With a thin and flat screwdriver adjust the bypass screw A. The model determines the position of the bypass screw A. A Changing from natural gas to liquid gas 1. Fully tighten the bypass screw. 2. Put the knob back. 3. Connect the appliance to the electricity.
B 3. Assemble the burner in a reverse sequence. Before you fix the screw, make sure that the burner is pushed correctly to the back panel. Test the grill injectors. Levelling 4. If the floor is not equally flat, use the adjustable feet on the bottom of the appliance to set a stable position for the appliance. CAUTION! Remove all the accessories from the oven. 1. Open the lid of the appliance and disassemble it. 2. Disassemble the pan supports and all the burner assemblies.
ENVIRONMENTAL CONCERNS not dispose of appliances marked with the symbol with the household waste. Return the product to your local recycling facility or contact your municipal office. Recycle materials with the symbol . Put the packaging in relevant containers to recycle it. Help protect the environment and human health by recycling waste of electrical and electronic appliances.
867342061-C-462018