AZB1000AAX EN FR Oven Four User Manual Notice d'utilisation 2 19
CONTENTS Safety information Safety instructions Product description Before first use Daily use Using the accessories 2 3 6 6 6 7 Additional functions Hints and tips Care and cleaning Troubleshooting Installation Energy efficiency 8 8 13 16 16 18 Subject to change without notice. SAFETY INFORMATION Before the installation and use of the appliance, carefully read the supplied instructions.
General Safety • • • • • • • • Only a qualified person must install this appliance and replace the cable. WARNING: The appliance and its accessible parts become hot during use. Care should be taken to avoid touching heating elements. Always use oven gloves to remove or put in accessories or ovenware. Before carrying out any maintenance, disconnect the appliance from the power supply. Ensure that the appliance is switched off before replacing the lamp to avoid the possibility of electric shock.
• Make sure not to cause damage to the mains plug and to the mains cable. Should the mains cable need to be replaced, this must be carried out by our Authorised Service Centre. • Do not let mains cables touch or come near the appliance door, especially when the door is hot. • The shock protection of live and insulated parts must be fastened in such a way that it cannot be removed without tools. • Connect the mains plug to the mains socket only at the end of the installation.
moisture can build up behind a closed furniture panel and cause subsequent damage to the appliance, the housing unit or the floor. Do not close the furniture panel until the appliance has cooled down completely after use. Care and cleaning WARNING! Risk of injury, fire, or damage to the appliance. • Before maintenance, deactivate the appliance and disconnect the mains plug from the mains socket. • Make sure the appliance is cold. There is the risk that the glass panels can break.
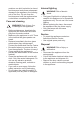
PRODUCT DESCRIPTION General overview 1 2 3 4 5 6 4 7 8 3 9 2 1 Accessories • Wire shelf For cookware, cake tins, roasts. 1 2 3 4 5 6 7 8 9 Control panel Temperature indicator / symbol Knob for the temperature Knob for the heating functions Power lamp / symbol Air vents for the cooling fan Heating element Lamp Shelf positions • Baking tray For cakes and biscuits. BEFORE FIRST USE WARNING! Refer to Safety chapters. Initial Cleaning Remove all accessories from the oven.
2. Turn the knob for the temperature to select a temperature. 3. To turn off the oven, turn the knobs for the oven functions and temperature to the off position. The lamp turns on when the oven operates. Oven functions Oven function Application Off position The oven is off. Conventional Cooking (Top / Bottom Heat) To bake and roast food on one shelf position. Bottom Heat To bake cakes with crispy bottom and to preserve food. Top Heat To brown bread, cakes and pastries. To finish cooked dishes.
ADDITIONAL FUNCTIONS Cooling fan When the oven operates, the cooling fan turns on automatically to keep the surfaces of the oven cool. If you turn off the oven, the cooling fan stops. dangerous overheating. To prevent this, the oven has a safety thermostat which interrupts the power supply. The oven turns on again automatically when the temperature drops.
Food Top / Bottom Heat Time (min) Comments Temperature (°C) Shelf position Butter-milk cheese cake 170 1 60 - 80 In a 26 cm cake mould Apple cake (Apple pie) 170 1 100 - 120 In two 20 cm cake moulds on a wire shelf Strudel 175 2 60 - 80 In a baking tray Jam-tart 170 2 30 - 40 In a 26 cm cake mould Fruit cake 170 2 60 - 70 In a 26 cm cake mould Sponge cake (Fatless sponge cake) 170 2 35 - 45 In a 26 cm cake mould Christmas cake / Rich fruit cake 170 2 50 - 60 In a 2
Bread and pizza Food Top / Bottom Heat Time (min) Comments Temperature (°C) Shelf position White bread1) 190 1 60 - 70 1 - 2 pieces, 500 gr one piece Rye bread 190 1 30 - 45 In a bread tin Bread rolls1) 190 2 25 - 40 6 - 8 rolls in a baking tray Pizza1) 190 1 20 - 30 On a deep pan Scones1) 200 3 10 - 20 In a baking tray Time (min) Comments 1) Preheat the oven for 10 minutes.
Food Top / Bottom Heat Time (min) Comments Temperature (°C) Shelf position Veal 190 2 90 - 120 On a wire shelf and a deep pan English roast beef rare 210 2 44 - 50 On a wire shelf and a deep pan English roast beef medium 210 2 51 - 55 On a wire shelf and a deep pan English roast beef well done 210 2 55 - 60 On a wire shelf and a deep pan Shoulder of pork 180 2 120 - 150 On a deep pan Shin of pork 180 2 100 - 120 2 pieces on a deep an Lamb 190 2 110 - 130 Leg Chic
Food Top / Bottom Heat Tuna fish / Sal‐ mon Temperature (°C) Shelf position 190 2 Grilling Time (min) Comments 35 - 60 4 - 6 fillets Set the temperature to 250 °C. Preheat the oven for 10 minutes. Use the third position. Food Quantity Time (min) Pieces Quantity (kg) 1st side 2nd side Fillet steaks 4 0.8 12 - 15 12 - 14 Beef steaks 4 0.6 10 - 12 6-8 Sausages 8 - 12 - 15 10 - 12 Pork chops 4 0.
Food Function Acces‐ sories She lf po‐ si‐ tion Tem‐ pera‐ ture (°C) Time (min) Comments Apple pie Conven‐ tional Cooking Wire shelf 1 170 80 - 120 Use 2 tins (20 cm diameter), di‐ agonally shifted. Sponge cake Conven‐ tional Cooking Wire shelf 2 170 35 - 45 Use a cake mould (26 cm di‐ ameter). Short bread Conven‐ tional Cooking Baking tray 3 150 20 - 35 Preheat the oven for 10 mi‐ nutes. Toast 4-6 pieces Grilling Wire shelf 3 max.
condensation, operate the oven for 10 minutes before cooking. Clean the moisture from the cavity after each use. Stainless steel or aluminium ovens Clean the oven door with a damp cloth or sponge only. Dry it with a soft cloth. Do not use steel wool, acids or abrasive materials as they can damage the oven surface. Clean the oven control panel with the same precautions. Cleaning the door gasket Regularly do a check of the door gasket. The door gasket is around the frame of the oven cavity.
8. Clean the glass panel with water and soap. Dry the glass panel carefully. When the cleaning is completed, install the glass panel and the oven door. Do the above steps in the opposite sequence. Make sure that you install the internal glass panel in the seats correctly. A 5. Release the locking system to remove the internal glass panel. Replacing the lamp WARNING! Risk of electric shock. The lamp can be hot. 6. Turn the two fasteners by 90° and remove them from their seats. 90° 7.
TROUBLESHOOTING WARNING! Refer to Safety chapters. What to do if... Problem Possible cause Remedy The oven does not heat up. The oven is deactivated. Activate the oven. The oven does not heat up. The fuse is blown. Make sure that the fuse is the cause of the malfunc‐ tion. If the fuse is blown again and again, contact a qualified electrician. The lamp does not operate. The lamp is defective. Replace the lamp. Steam and condensation settle on the food and in the cavity of the oven.
Electrical installation Building In The manufacturer is not responsible if you do not follow the safety precautions from the Safety chapters. 540 21 558 min. 550 6 114 19 20 600 min. 560 589 570 This appliance is supplied only with a main cable. Cable 594 Cable types applicable for installation or replacement: 6 H07 RN-F, H05 RN-F, H05 RRF, H05 VVF, H05 V2V2-F (T90), H05 BB-F 3 For the section of the cable refer to the total power on the rating plate.
ENERGY EFFICIENCY Product Fiche and information according to EU 65-66/2014 Supplier's name Arthur Martin Model identification AZB1000AAX Energy Efficiency Index 105.1 Energy efficiency class A Energy consumption with a standard load, conventional mode 0.83 kWh/cycle Number of cavities 1 Heat source Electricity Volume 56 l Type of oven Built-In Oven Mass 26.
TABLE DES MATIÈRES Informations de sécurité Consignes de sécurité Description de l'appareil Avant la première utilisation Utilisation quotidienne Utilisation des accessoires 19 20 23 23 24 24 Fonctions supplémentaires Conseils Entretien et nettoyage En cas d'anomalie de fonctionnement Installation Rendement énergétique 25 25 31 34 34 36 Sous réserve de modifications. INFORMATIONS DE SÉCURITÉ Avant d'installer et d'utiliser cet appareil, lisez soigneusement les instructions fournies.
• • Si l'appareil est équipé d'un dispositif de sécurité enfants, nous vous recommandons de l'activer. Les enfants ne doivent pas nettoyer ni entreprendre une opération de maintenance sur l'appareil sans surveillance. Sécurité générale • • • • • • • • L'appareil doit être installé et le câble remplacé uniquement par un professionnel qualifié . AVERTISSEMENT : L'appareil et ses parties accessibles deviennent chauds pendant son fonctionnement. Veillez à ne pas toucher les éléments chauffants.
• Les côtés de l'appareil doivent rester à côté d'appareils ou d'éléments ayant la même hauteur. Branchement électrique AVERTISSEMENT! Risque d'incendie ou d'électrocution. • L'ensemble des branchements électriques doit être effectué par un technicien qualifié. • L'appareil doit être relié à la terre. • Vérifiez que les paramètres figurant sur la plaque signalétique correspondent aux données électriques de votre réseau. • Utilisez toujours une prise de courant de sécurité correctement installée.
• Pour éviter tout endommagement ou décoloration de l'émail : – ne posez pas de plats allant au four ni aucun autre objet directement sur le fond de l'appareil. – ne placez jamais de feuilles d'aluminium directement sur le fond de la cavité de l'appareil. – ne versez jamais d'eau directement dans l'appareil lorsqu'il est chaud. – une fois la cuisson terminée, ne laissez jamais d'aliments ou de plats humides à l'intérieur de l'appareil.
Mise au rebut AVERTISSEMENT! Risque de blessure ou d'asphyxie. • Débranchez l'appareil de l'alimentation électrique. • Coupez le câble d'alimentation au ras de l'appareil et mettez-le au rebut. • Retirez le dispositif de verrouillage du hublot pour empêcher les enfants et les animaux de s'enfermer dans l'appareil.
Les accessoires peuvent chauffer plus que d'habitude. L'appareil peut émettre une odeur et de la fumée. Assurez-vous que la ventilation dans la pièce est suffisante. UTILISATION QUOTIDIENNE AVERTISSEMENT! Reportezvous aux chapitres concernant la sécurité. Activation et désactivation du four 2. Tournez la manette du thermostat pour sélectionner la température souhaitée. 3. Pour éteindre le four, tournez la manette des fonctions du four et le thermostat sur la position Arrêt.
FONCTIONS SUPPLÉMENTAIRES Ventilateur de refroidissement Lorsque le four fonctionne, le ventilateur de refroidissement se met automatiquement en marche pour refroidir les surfaces du four. Lorsque vous éteignez le four, le ventilateur de refroidissement s'arrête. causer une surchauffe dangereuse. Pour éviter cela, le four dispose d'un thermostat de sécurité interrompant l'alimentation électrique. Le four se remet automatiquement en fonctionnement lorsque la température baisse.
Tableau de rôtissage et de cuisson des gâteaux Gâteaux Plat Voûte Durée (min) Remarques Température (°C) Positions des grilles Pâtes à gâ‐ teaux 170 2 45 - 60 Dans un moule à gâteau Pâte sablée 170 2 24 - 34 Dans un moule à gâteau Gâteau au fro‐ mage (au ba‐ beurre) 170 1 60 - 80 Dans un moule à gâteau de 26 cm Tarte aux pom‐ mes 170 1 100 - 120 Dans deux moules à gâ‐ teau de 20 cm sur une grille métallique Strudel 175 2 60 - 80 Sur un plateau de cuisson Tarte à la confi‐
Plat Voûte Durée (min) Remarques Température (°C) Positions des grilles Petits pains1) 190 3 15 - 20 Sur un plateau de cuisson Choux1) 190 3 25 - 35 Sur un plateau de cuisson Tourtes 180 3 45 - 70 Dans un moule à gâteau de 20 cm Gâteau à éta‐ ges 180 1 ou 2 40 - 55 Gauche + droit dans un moule à gâteau de 20 cm Durée (min) Remarques 1) Préchauffez le four pendant 10 minutes.
Plat Voûte Durée (min) Remarques Température (°C) Positions des grilles Gratin aux lé‐ gumes 200 2 45 - 60 Dans un moule Quiches 190 1 40 - 50 Dans un moule Lasagnes 200 2 25 - 40 Dans un moule Cannelloni 200 2 25 - 40 Dans un moule « Yorkshire 220 2 20 - 30 Moule pour 6 puddings Durée (min) Remarques puddings »1) 1) Préchauffez le four pendant 10 minutes.
Plat Voûte Durée (min) Remarques Température (°C) Positions des grilles Épaule de porc 180 2 120 - 150 Dans un plat à rôtir Jarret de porc 180 2 100 - 120 2 pièces dans un plat à rôtir Agneau 190 2 110 - 130 Gigot Poulet 200 2 70 - 85 Entier dans un plat à rôtir Dinde 180 1 210 - 240 Entière dans un plat à rôtir Canard 175 2 120 - 150 Entier dans un plat à rôtir Oie 175 1 150 - 200 Entière dans un plat à rôtir Lapin 190 2 60 - 80 En morceaux Lièvre 190 2
Plat Quantité Durée (min) Morceaux Quantité (kg) 1re face 2e face Saucisses 8 - 12 - 15 10 - 12 Côtelettes de porc 4 0.6 12 - 16 12 - 14 Poulet (coupé en deux) 2 1 30 - 35 25 - 30 Brochettes 4 - 10 - 15 10 - 12 Escalope de poulet 4 0.4 12 - 15 12 - 14 Steak haché 6 0.6 20 - 30 - Filet de poisson 4 0.4 12 - 14 10 - 12 Sandwiches toastés 4-6 - 5-7 - Toasts 4-6 - 2-4 2-3 Informations pour les instituts de test Tests conformément à la norme IEC 60350-1.
Plat Fonction Acces‐ soires Po‐ si‐ tion s des gril‐ les Tem‐ péra‐ ture (°C) Durée (min) Remarques Biscuits sablés Convec‐ tion natu‐ relle Plateau de cuis‐ son 3 150 20 - 35 Préchauffez le four pendant 10 minutes. Toasts 46 pièces Gril Grille métalli‐ que 3 max. 2 à 4 minutes sur la premiè‐ re face ; 2 à 3 minutes sur la seconde face. Préchauffez le four pendant 3 minutes. Steak haché 6 piè‐ ces, 0,6 kg Gril Grille métalli‐ que et lèchef‐ rite 3 max.
fonctionner le four pendant 10 minutes avant la cuisson.Éliminez l'humidité dans la cavité après chaque utilisation. Fours en acier inoxydable ou en aluminium Nettoyez la porte uniquement avec une éponge ou un chiffon humides. Séchez-la avec un chiffon doux. N'utilisez jamais de produits abrasifs ou acides ni d'éponges métalliques car ils peuvent endommager la surface du four. Nettoyez le bandeau de commande du four en observant ces mêmes recommandations. Nettoyez le joint d'étanchéité de la porte 2.
4. Déposez la porte sur une surface stable recouverte d'un tissu doux. 8. Nettoyez le panneau de verre à l'eau savonneuse. Séchez soigneusement le panneau de verre. Une fois le nettoyage terminé, remettez le panneau de verre et la porte du four en place. Suivez les étapes ci-dessus dans l'ordre inverse. Veillez à installer correctement le panneau de verre intérieur dans son logement. A 5. Désengagez le système de verrouillage pour retirer le panneau de verre intérieur.
EN CAS D'ANOMALIE DE FONCTIONNEMENT AVERTISSEMENT! Reportezvous aux chapitres concernant la sécurité. En cas d'anomalie de fonctionnement Problème Cause probable Solution Le four ne chauffe pas. Le four est éteint. Allumez le four. Le four ne chauffe pas. Le fusible a disjoncté. Vérifiez que le fusible est bien la cause de l'anomalie. Si les fusibles disjonctent de manière répétée, faites ap‐ pel à un électricien qualifié. L'éclairage ne fonctionne pas. L'éclairage est défectueux.
Installation électrique Encastrement Le fabricant ne pourra être tenu pour responsable si vous ne respectez pas les précautions de sécurité du chapitre « Consignes de sécurité ». 540 21 558 min. 550 6 114 19 20 600 min. 560 589 Cet appareil n'est fourni qu'avec un câble d'alimentation.
RENDEMENT ÉNERGÉTIQUE Fiche du produit et informations conformément à la norme EU 65-66/2014 Nom du fournisseur Arthur Martin Identification du modèle AZB1000AAX Index d'efficacité énergétique 105.1 Classe d'efficacité énergétique A Consommation d'énergie avec charge standard et mo‐ de traditionnel 0.83 kWh/cycle Nombre de cavités 1 Source de chaleur Électricité Volume 56 l Type de four Four encastrable Masse 26.
électriques et électroniques. Ne jetez pas les appareils portant le symbole avec les ordures ménagères. Emmenez un tel produit dans votre centre local de recyclage ou contactez vos services municipaux.
867341590-A-132018