Model / Modèle / Modelo: DIM-PULW Smart Wi-Fi dimmer - PulsarTM INSTRUCTION MANUAL IMPORTANT, KEEP FOR FUTURE REFERENCE: PLEASE READ CAREFULLY. Gradateur intelligent Wi-Fi - PulsarMC MANUEL D’INSTRUCTIONS IMPORTANT, CONSERVER POUR CONSULTATION ULTÉRIEURE : LIRE ATTENTIVEMENT. Gradator inteligente Wi-Fi - PulsarMR MANUAL DE INSTRUCCIONES IMPORTANTE, CONSERVAR PARA FUTURA REFERENCIA : LEER DETENIDAMENTE.
INSTRUCTION MANUAL / MANUEL D’INSTRUCTIONS / MANUAL DE INSTRUCCIONES EN FR INCLUDED INCLUS Item Pièce Pieza Description Description Descripción WHAT YOU WILL NEED...
EN FR ES IMPORTANT IMPORTANT IMPORTANTE The installer and/or user must read, understand and follow these instructions before installing the product. This product must be properly installed before it is used. If instructions are not followed, the manufacturer will not be held responsible for any problems or product malfunction. Failure to follow installation and/or operating instructions voids the warranty.
2 INSTRUCTION MANUAL / MANUEL D’INSTRUCTIONS / MANUAL DE INSTRUCCIONES DIP-1 Switch Level DIP-2 1 Switch “A” Level “B” Level “C” Level D 3 Down Light L DIP-1 Switch “Down Light” “LED Bulb” Switch only 2 4 LED Bulb INC Bulb S Remark: Before you change the DIP switch level each t the bulb is working.
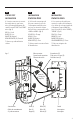
EN FR DIMMER FUNCTIONS 1 Turn ON the dimmer Hold 5s to pair ES FUNCIONS DU GRADATEUR 1 Allumer le gradateur Maintenez 5s pour jumeler FUNCIONES DEL GRADATOR 1 Enciende el atenuador Mantenga 5 segundos para emparejar 2 Turn OFF the dimmer 2 Éteindre le gradateur 2 Apaga el atenuador 3 Brightness UP signal 3 Signal de luminosité (+) 3 Señal de brillo (+) 4 Brightness level display area 4 Zone d'affichage du niveau 4 Área de visualización de nivel 5 ON-OFF / WI-FI signal ON position (Red lig
INSTRUCTION MANUAL / MANUEL D’INSTRUCTIONS / MANUAL DE INSTRUCCIONES EN FR ES CONNECTION BRANCHEMENT CONEXIÓN Single pole switches only. (fig. A) Interrupteurs unipolaires uniquement. (fig.A) Solo interruptores unipolares. (fig. A) Not compatible with a 3-way switch. (fig. B) Non compatible avec un interrupteur à 3 voies. (fig. B) No es compatible con un interruptor de 3 vías. (fig. B) fig. A fig.
EN FR ES STEP-BY-STEP INSTALLATION INSTALLATION ÉTAPE PAR ÉTAPE INSTALACIÓN ETAPA POR ETAPA 1. Turn off the power from the electrical panel and the circuit breaker. Make sure the power is off before removing the old plug. 1. Couper le courant à partir du panneau électrique et du disjoncteur. S’assurer que le courant est bien coupé avant de retirer l’ancienne prise. 1. Desconecte la alimentación del panel eléctrico y del disyuntor.
INSTRUCTION MANUAL / MANUEL D’INSTRUCTIONS / MANUAL DE INSTRUCCIONES EN FR ES STEP-BY-STEP INSTALLATION INSTALLATION ÉTAPE PAR ÉTAPE INSTALACIÓN ETAPA POR ETAPA 4. Identify the wires before disconnecting them from the old switch. Identify the white wire (N), the black wire (L), the grounding wire (G) and the red wire (Lo). 4. Identifier les fils avant de les débrancher de l’ancien interrupteur. Identifier le fil blanc (N), le fil noir (L), le fil de mise à la terre (G) et le fil rouge (Lo).
EN FR ES STEP-BY-STEP INSTALLATION INSTALLATION ÉTAPE PAR ÉTAPE INSTALACIÓN ETAPA POR ETAPA 6. Use wire connectors to connect the switch wires to your home wires, following the diagram. Be careful to match “LINE” and “LOAD” wires. (fig. 4) 6. Utilisez des connecteurs de fils pour connecter les fils de l'interrupteur aux fils de votre maison, en suivant le schéma. Veillez à faire correspondre les fils «LINE» et «LOAD». (fig. 4) 6.
INSTRUCTION MANUAL / MANUEL D’INSTRUCTIONS / MANUAL DE INSTRUCCIONES EN FR ES STEP-BY-STEP INSTALLATION INSTALLATION ÉTAPE PAR ÉTAPE INSTALACIÓN ETAPA POR ETAPA 6. Screw the switch to the junction box . (fig. 5) 6. Vissez l'interrupteur à la jonction boîte . (fig. 5) 6. Atornille el interruptor a la unión caja . (fig. 5) Screw the switch to the wall fig.
EN FR ES STEP-BY-STEP INSTALLATION INSTALLATION ÉTAPE PAR ÉTAPE INSTALACIÓN ETAPA POR ETAPA 7. Fix the plate to the swith. (fig. 6) 7. Fixez la plaque à l'interrupteur. (fig.6) 7. Fije la placa al interruptor. (fig. 6) 8. Restore electrical power. 8. Restaurar la energía eléctrica. 6. Rétablissez l'alimentation électrique. Attach the plate to the Switch core. fig.
INSTRUCTION MANUAL / MANUEL D’INSTRUCTIONS / MANUAL DE INSTRUCCIONES EN FR ES CONVENTIONAL USE UTILISATION CONVENTIONNELLE USO CONVENCIONAL This device can be used as a regular unit without using the APP. However, some of the functions are only possible to control with the APP. Ex: programming based on different parameters. Cet appareil peut être utilisé comme une unité régulière sans utiliser l’application. Cependant, certaines fonctions ne peuvent être contrôlées qu’avec l’APP.
APP SET UP AND PAIRING / CONFIGURATION ET ASSOCIATION DE L’APPLICATION / APLICACIÓN Y EMPAREJAMIENTO EN FR ES SMART CONNECTION CONNEXION INTELLIGENTE CONEXIÓN INTELIGENTE 1. Download the Artika app Download the Artika app from your App Store (IOS users) / Google Play (Android users). 1. Téléchargez l’application Artika Téléchargez l’application Artika depuis votre App Store (utilisateurs IOS) / Google Play (utilisateurs android). 2.
INSTRUCTION MANUAL / MANUEL D’INSTRUCTIONS / MANUAL DE INSTRUCCIONES EN FR 3. 3. Device Device Pairing Pairing A) Press To addand a device, click on the “+” for at A) hold the "ON" button top right corner. 5the seconds, green light(fig. will2)flash and will become successful B) Select thesteady pairingupon method “Add pairing. manually” or “Auto Scan”. (fig. 3) B) To add a device, on the “+” at If you decide to addclick manually, please the topyour rightdevice corner. 2) select in (fig.
APP SET UP AND PAIRING / CONFIGURATION ET ASSOCIATION DE L’APPLICATION / APLICACIÓN Y EMPAREJAMIENTO EN CAUTION ! If manual pairing method has been selected, make sure that the mode of connection selected is EZ Mode. This should be selected as default, but if the AP mode is selected, the pairing will fail. To change the connection method, click on “AP mode” at the top right corner and select EZ mode from the dropdown list. (fig.
INSTRUCTION MANUAL / MANUEL D’INSTRUCTIONS / MANUAL DE INSTRUCCIONES Canada (IC) EN FR ES Operation is subject to the following two conditions: L’exploitation est autorisée aux deux conditions suivantes : La operación está sujeta a las dos condiciones siguientes: 1. This device may not cause interference, and 1. L’appareil ne doit pas produire de brouillage, et 1. Este dispositivo no puede causar interferencias perjudiciales, y 2.
USA (FCC) EN This device complies with Part 15 of the FCC Rules. Operation is subject to the following two conditions: 1. This device may not cause harmful interference; and 2. this device must accept any interference received, including interference that may cause undesired operation. NOTE: This equipment has been tested and found to comply with the limits for Class B digital device, pursuant to part 15 of the FCC Rules.
INSTRUCTION MANUAL / MANUEL D’INSTRUCTIONS / MANUAL DE INSTRUCCIONES 18
EN FR ES WARRANTY GARANTIE GARANTÍA Artika For Living Inc. is proud to offer you a three (3) years limited warranty on manufacturing defects from the date of purchase for residential use only. The warranty is extended to the original owner in USA and Canada and is non-transferable. It does not apply to retailers, commercial applications or establishments. The original sales receipt is required for all warranty claims.
INSTRUCTION MANUAL / MANUEL D’INSTRUCTIONS / MANUAL DE INSTRUCCIONES Artika For Living Inc. 50th Avenue, Montréal (Lachine), Québec Canada H8T 2V5 1-866-661-9606 support@artika.com www.artika.com Customer Service Monday to Friday 9 a.m. - 5 p.m. EST Service à la clientèle du lundi au vendredi de 9 h à 17 h, heure de l’Est Atención al cliente Lunes a viernes 9 a.m. - 5 p.m.