
Operating Instructions

ITEM #4145448
MODEL # OUT-C7C-L2BL
ALLENDALE
TM
LED WALL SCONCE
Origin 21® is a registered trademark
of LF, LLC. All Rights Reserved.
1
SAFETY INFORMATION
Please read and understand this entire manual before attempting to assemble, operate or install the
product.
• Risk of electrical shock. Switch off the main electrical supply from the fuse box/circuit breaker
before installing the unit or doing any maintenance.
• Do not use outdoor.
USA (FCC)
• Changes or modifications to this unit not expressly approved by the party responsible for
compliance could void the user’s authority to operate the equipment.
• This device complies with Part 15 of the FCC Rules. Operation is subject to the following two
conditions:
1. This device may not cause harmful interference, and
2. This device must accept any interference received, including interference that may cause
undesired operation.
NOTICE
This equipment has been tested and found to comply with the limits for Class B digital device,
pursuant to part 15 of the FCC Rules. These limits are designed to provide reasonable protection
against harmful interference in a residential installation. This equipment generates, uses and can
radiate radio frequency energy and, if not installed and used in accordance with the instructions,
may cause harmful interference to radio or television reception. However, there is no guarantee
that interference will not occur in a installation. If this equipment causes harmful interference to
radio or television reception, which can be determined by turning the equipment off and on, the
user is encouraged to try to correct the interference by one or more of the following measures:
• Reorient or relocate the receiving antenna.
• Increase the separation between the equipment and the receiver.
• Connect the equipment into an outlet on a circuit different from that to which the receiver is
connected.
• Consult the dealer or an experienced radio/TV technician for help.
Canada IC
Operation is subject to the following two conditions:
1. this device may not cause interference, and
2. this device must accept any interference, including interference that may cause undesired
operation of the device.
CAUTION
• If using a dimmer, it must be LED compatible.
IMPORTANT
The installer and/or user must read, understand and follow these instructions before installing the
product. This product must be properly installed before it is used. If instructions are not followed,
the manufacturer will not be held responsible for any problems or product malfunction. Failure to
follow installation and/or operating instructions voids the warranty. We recommend that this
product be installed by a certified electrician. In some states or provinces, it is a legal requirement
for this type of product to be installed by a certified electrician, according to the electrical and
building codes effective in the region where the unit is used.
KEEP THESE INSTRUCTIONS FOR FUTURE REFERENCE.
ASSEMBLY INSTRUCTIONS
6 7
8
FINAL INSTALLATION
CARE AND MAINTENANCE
• Ensure power is off before cleaning. Clean with a mild glass cleaner and soft cloth.
Apply liquid cleaner to cloth. Do not spray fixture itself.
• Do not attempt to replace LEDs.
WARRANTY
This product is covered by a three (3) year limited warranty on manufacturing defects from the date of
purchase for residential use only. If within this period the product is found to be defective in material or
workmanship, contact our customer service department at 1-866-439-9800. The warranty is extended
to the original owner in USA and Canada and is non-transferable. This warranty is valid only on
products installed in accordance with the building code and laws effective in the region where the unit
is used as well as in accordance with the provided instruction manual. It does not cover products
installed incorrectly or subjected to abnormal use. The warranty does not cover handling, labor,
transportation, or any other cost associated with the installation or replacement of the product. This
limited warranty is valid in the country of purchase only. The manufacturer will not be held responsible
for any direct or consequential damages or injuries related to the use of this product arising from
improper use or installation of this product.
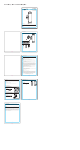
5
1. Center and place the mounting bracket (A)
over the existing junction box opening.
Make sure mounting bracket (A) is oriented
as shown.
Hardware Used
BB
x 2
Fixation screw
Hardware Used
CC
x 3
Wire connector
3. Secure LED wall sconce (B) with two
decorative nuts (AA). Make sure all wiring and wiring
connectors fit inside LED wall sconce (B) base.
Hardware Used
AA
x 2
Decorative nut
Serial Number
Purchase Date
WARNING
XXXXXX
ATTACH YOUR RECEIPT HERE
WIRING INSTRUCTIONS
2. Clip LED wall sconce (B) to mounting bracket (A)
and then connect wiring as shown (white, black
and ground). Secure connections with a wire
connector (CC).
Place LED wall sconce (B) over mounting
bracket flanges..
Questions, problems, missing parts? Before returning to your retailer, call our customer
service department at 1-866-439-9800, 8 a.m. - 8 p.m., EST, Monday - Sunday. You could
also contact us at partsplus@lowes.com or visit www.lowespartsplus.com.
2
A
2
Page 1
Page 2 Page 3
Page 4
Page 5
Page 6 Page 7
Page 8
PACKAGE CONTENTS
3
PART DESCRIPTION QUANTITY
A Mounting bracket 1
B LED wall sconce 1
A
HARDWARE CONTENTS (shown actual size)
Qty. 2
Fixation
Screw
Qty. 2
Wire
Connector
Decorative
Nut
Qty. 3
AA BB CC
Before beginning assembly of product, make sure all parts are present. Compare parts with package
contents list and hardware contents list. If any part is missing or damaged, do not attempt to
assemble the product.
Turn off power at the circuit breaker and the light switch. Ensure the power is off before removing the
old light fixture.
Estimated Assembly Time: XX minutes
Tools Required for Assembly (not included): Screwdriver, Silicone-based sealant.
PREPARATION
1
A
1
3
A
B