PASTE SERIAL NUMBER LABEL IN THIS LOCATION BARBECUE SERIAL NUMBER LABEL: 2 NOTES:
Artisan A division of Superior Equipment Solutions, Inc. TM 3020914 7039 East Slauson Avenue Commerce, CA. 90040 Ph.
READ THIS CARE AND USE MANUAL CAREFULLY AND COMPLETELY BEFORE USING YOUR GRILL TO REDUCE THE RISK OF FIRE, BURN HAZARD OR OTHER INJURY. KEEP THIS MANUAL FOR FUTURE REFERENCE. When properly cared for, your ARTISAN™ Grill will give safe, reliable service for many years. However, extreme care must be used since the grill produces intense heat, which can increase accident potential.
(Safety, cont.) When lighting a burner, always pay close attention to what you are doing. Be certain you are depressing the correct button, labeled for the igniter. When using the grill: do not touch the grill rack, burner grate, hood or immediate surrounding area as these areas become extremely hot and could cause burns. Use only the handles and knobs provided for operation of the grill. For proper lighting and performance of the burners keep the ports clean.
LOCATING AND ASSEMBLING THE GRILL: When determining a suitable location for your grill, take into account concerns such as exposure to wind, rain, sprinklers, proximity to traffic paths and keeping any gas supply line runs as short as possible. Locate the grill only in a well ventilated area. Never locate the grill in a building, garage, breezeway, shed or other such enclosed area without an approved ventilation system. Never locate the grill over, under or next to unprotected combustible construction.
WARNING: To prevent harm and ensure proper operation of your grill, it is imperative that the burners are properly installed with respect to the gas orifices. Be certain that the orifice is inserted completely into the burner’s inlet and that the burner rests firmly on its support bracket. The burner should not rock side-to-side nor top-to-bottom if properly installed. If excessive burner movement is present, reseat burner or contact your authorized service provider.
TILE TRAY INSTALLATION: Remove top grill. Tile tray located over the gas burners GAS CONNECTION - LIQUID PROPANE (LP): NOTE: THIS APPLIES TO LP MODELS ONLY. LP MODELS HAVE THE LETTERS “LP” IN THE MODEL NUMBER. NEVER CONNECT THE GRILL TO AN UNREGULATED GAS SUPPLY. Before proceeding, ensure the unit is fitted for LP gas. Connecting to an improper gas type will result in poor performance and increased risk of damage or injury.
The LP gas cylinder must be constructed and marked in accordance with the specifications for LP gas cylinders of the U.S. Department of Transportation (DOT). The cylinder must be provided with a shut off valve terminating in an LP gas supply cylinder valve outlet specified, as applicable, for connection type QCC1 in the standard for compressed gas cylinder valve outlet and inlet connections ANSI/CGA-V-I.
CAUTION CYLINDERS MUST BE STORED OUTDOORS IN A WELL VENTILATED AREA OUT OF THE REACH OF CHILDREN. DISCONNECTED LP CYLINDERS MUST HAVE THREADED VALVE PLUGS TIGHTLY INSTALLED, AND MUST NOT BE STORED IN A BUILDING, GARAGE OR ANY OTHER ENCLOSED AREA. THE GAS MUST BE TURNED OFF AT THE SUPPLY CYLINDER WHEN THE UNIT IS NOT IN USE. IF THE APPLIANCE IS STORED INDOORS, THE CYLINDER MUST BE DISCONNECTED AND REMOVED FROM THE APPLIANCE.
To connect the regulator / hose assembly follow the next steps: 1. Locate the regulator and gas connection point in the rear right side of your barbecue unit (remove the rear panel from the barbecue cart to gain access - in cart mounted models). 2. Connect the supplied gas pressure regulator to the 1/2” MPT barbecue connection, using either hard piping or a flexible Ø1/2” gas hose (available from DIY/Home stores) no longer than 48”.
Make a soap solution of one part liquid detergent and one part water for leak testing purposes. Apply the solution to the gas fittings by using a spray bottle, or brush. For LP units, always check with a full cylinder. TO TEST: Make sure all control valves are in the “OFF” position. Apply the soap solution described above to all fittings. Turn the gas supply on. Check all connections from the supply line, or LP cylinder up to and including the manifold pipe assembly.
Keep your face away from the grill as far as possible and pass a lit, long stem match through the notch in the grill rack to the ports of the burner you are trying to light. When attempting to light a burner with a match, ensure that the correct burner control knob is used. Position the match near the burner ports. Push and turn the control knob to “HI”. Repeat procedure on each burner if necessary. If the burner does not light in 4 seconds turn the knob OFF, wait 5 minutes and try again.
SIDE BURNER LIGHTING: When lighting, always keep your face and body as far away as possible from the burners. Push and turn the side burner right hand control knob to the “HI” position and immediately depress the igniter button. You’ll hear a snapping sound from the spark which is being generated at the side burners. It is necessary to keep the igniter button depressed until the burner is lit.
NOTE: Artisan™ grills are available with both U-burners and IR burners. The following instructions apply only to the U-burners. IR burners do not require adjustment and need only be checked visually for proper performance. On high, an IR burner should glow red evenly over its entire surface. U-BURNER AIR ADJUSTMENT: Each grill burner is tested and adjusted at the factory prior to shipment; however, variations in the local gas supply, elevation and other factors might make it necessary to adjust the burners.
LOW HEAT SETTING ADJUSTMENT: NOTE: THE LOW HEAT SETTING ON YOUR GRILL IS PRESET AT THE FACTORY. ADJUST ONLY IF ALTITUDE OR ENVIRONMENTAL FACTORS ARE CAUSING POOR, LOW HEAT, PERFORMANCE. WARNING NEVER ADJUST THE BURNER SO LOW THAT IT MAY GO OUT DURING USE. DO NOT OPERATE THE GRILL WITH THE LOW HEAT SCREW REMOVED. GAS CAN ESCAPE AND CAUSE A POTENTIALLY HAZARDOUS CONDITION. ADJUSTMENT STEPS: 1. Follow lighting instructions by setting the control knob on “HI” and allow the burner to preheat for 10 minutes. 2.
USING THE GRILL: Grilling requires high heat for searing and proper browning. Most foods are cooked at the “HI” heat setting for the entire cooking time. However, when grilling large pieces of meat or poultry, it may be necessary to turn the heat to a lower setting after the initial browning. This method will cook the food through without burning the outside. Foods cooked for a long time or basted with a sugary marinade may need a lower heat setting near the end of the cooking time.
To assure that an IR burner is lit, very carefully place your hand 8-10 inches away from the burner surface. If you do not feel the heat of the burner, shut off control knob, wait five minutes, and attempt to relight. ROTISSERIE MOTOR: The rotisserie motor is capable of turning up to a 25 Lb. cut of meat or poultry, with a maximum diameter of 10”.
INFRARED GRILLING TIPS: Even for an experienced chef, infrared cooking can, at first, present a bit of a challenge. By following these simple tips, you will soon be producing juicier, more flavorful foods than you have ever experienced before. As a general rule, foods will cook in less time than they would take on an ordinary grill. By turning food frequently (approximately every 2 minutes), excessive charring is simply avoided.
STAINLESS STEEL CARE: Stainless Steel is widely used for catering and residential kitchen equipment because of its strength, its ability to resist corrosion and its ease of cleaning. In fact, stainless steel ranks alongside glass and new china in terms of “ease of cleaning” and in percentage removal of bacteria during washing. As a result of these virtues, the metal is often taken for granted and it is assumed that no problems will arise during its usage.
Bleaches: Most common domestic bleaches & sterilizing solutions contain chlorine in the form of sodium hypochlorite. If used in concentrated form, bleaches can attack the stainless steel, causing pitting of the surface. They should always be used to the strengths prescribed by the manufacturer and should be thoroughly rinsed off with clean water immediately after use.
U-BURNER CLEANING: Clean the exterior of the burner with a brass wire brush. Clear any stubborn scale with a metal scraper. Clear any clogged ports with a thin wire. Never use a wooden toothpick as it may break off and clog the port. Shake out any debris through the air shutter. Use a flashlight to inspect the burner inlet to ensure it is not blocked, if obstructions can be seen, use a stiff wire to clean out the burner throat.
TROUBLESHOOTING: BEFORE CALLING FOR SERVICE: If your ARTISAN™ Grill does not function properly, use the following checklist before contacting your dealer for service. You may save the cost of a service call and the inconvenience of being without your grill. SPIDER AND INSECT WARNING: Spiders and insects can nest in the burners of this or any other grill, and cause the gas to flow from the front of the burner.
Check to make sure that the burners and the drip tray are clean and free from obstructions. Clean if necessary. NOTE: No part of the grill should ever be lined with aluminum foil as it will interfere with airflow and can cause a low heat condition in the firebox and a high heat condition inside the control panel. BURNER BLOWS OUT: First determine if the problem is being caused by location.
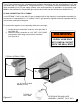
Should you need to replace the light bulb in you Artisan™ Grill, please refer to the following steps : LIGHT COVER REMOVE THE LIGHT COVER The light cover is supported by a spring mechanism on the light fixture. Simply pry open the light cover from the left or right side by hand only. DO NOT USE ANY TOOLS as you might chip the tempered glass cover. REMOVE THE LIGHT BULB Reach inside the light fixture and remove the light bulb by pulling it straight out of the socket.
ADDITIONAL IMPORTANT CLEANING AND STORAGE CONSIDERATIONS: In order to maintain your grill in clean working order, it will be necessary, under certain conditions, to take additional precautions. If your gill is located in a coastal area, it will be exposed to salty air which is corrosive.
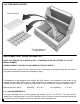
INSERTING / REPLACING THE BATTERY AAE MODELS ONLY REPLACE CAP REMOVE CAP DRIP TRAY To insert or replace the battery which powers the igniters: 1. Slide the drip tray forward slightly, as shown above. 2. Unscrew the battery cap (rotate counterclockwise as viewed from below). 3. Either insert a new battery or replace the old battery with a new battery. 4. Replace the battery cap (rotate clockwise as viewed from below). 5. Slide the drip tray back in place. Note: All ART2 models have 115 V ignition.
FOR WARRANTY CLAIMS PLEASE CALL: (866) 203 5607 28
Artisan Limited Warranty 15 years - Stainless Steel Burners. 10 Years - All Stainless Steel Parts. 3 Years - Ceramic Tile Trays (tiles excluded). 1 Year - Ignition Systems (batteries excluded), side burners, rotisserie motors and thermometers. The above Warranties commence on the date of original purchase. TERMS APPLICABLE TO THE WARRANTY ABOVE: Artisan’s warranty applies only to products installed for normal residential use.