INSTALLATION GUIDE RCC600-SM Subwoofer Module RCC600-FS Freestanding Subwoofer RCC600-SA Subwoofer Amplifier RCC600-CM Cabinet Mount
Thank you for choosing Artison’s RCC 600 Subwoofer System. We are pleased that you have selected our high-performance audio products. INTRODUCTION The following information will guide you through the installation and setup of your Artison RCC 600 Subwoofer Module, RCC 600 Freestanding Subwoofer, RCC 600 Subwoofer Amplifier and RCC 600 Cabinet Mount. Your RCC600-SM carton should contain the following: 1 . RCC 600 Subwoofer Module 1 . RCC 600 Subwoofer Module Paint Shield 1 .
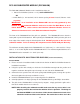
RCC 600 SUBWOOFER MODULE (RCC600-SM) The RCC 600 Subwoofer Module can be installed into either an: Artison Pre-Build Box (Volume ≈ 1.1 ft3) SOLD SEPERATELY OR Infinite Baffle (i.e. 2x4 stud wall, 16” On Center spacing at least 8 feet tall, Volume 2.8 ft3 or greater) IMPORTANT: In an installation of two RCC600-SM’s that are being powered by one RCC600-SA, both Subwoofer Modules need to be in either Pre-Build Boxes or be in Infinite Baffles.
area when installing the module. RCC600-IFPBB 1. Please refer to the Installation Guide included in the Artison In-Floor Pre-Build Box Carton for installation instructions. 2. Using the speaker wire already run inside the Pre-Build Box manage both the positive and negative conductors through the open tie-wraps on each side of the RCC600-SM. 3. Connect the bare speaker wire ends to the spring-loaded binding posts, manage the speaker wire back, tighten the tie-wraps and trim the excess. 4.
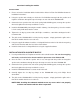
RCC 600 FREESTANDING SUBWOOFER (RCC600-FS) SUBWOOFER PLACEMENT AND ORIENTATION The RCC 600 Freestanding Subwoofer comes with four rubber feet to attach to the side of your choice. Carefully decide what placement and orientation are best for the subwoofer, the supplied rubber feet are not removable once applied. The classical rule for subwoofer placement is that the subwoofer should be placed near the same wall the front channels are located, at one-third of the total distance of the wall.
RCC 600 SUBWOOFER AMPLIFIER (RCC600-SA) The RCC 600 Subwoofer Amplifier can be installed into either cabinetry, on an equipment shelf, or it can be rack-mounted into a standard 19” Equipment Rack. In any installation be sure to provide adequate ventilation around the amplifier. The RCC600-SA has two simple and conveniently placed mode settings. The Music or Movie user controls are located on the front panel for selection based on the source material.
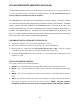
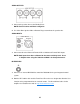
RCC600-SA FRONT PANEL CONTROLS GAIN – The position of this knob controls the overall gain (volume) of the subwoofer. Press this button in and it will spring out into a rotating knob, press it back in to hide it. The front panel gain control will become the master gain control until the remote is used. NOTE: The amplifier by default will resume to the last setting by either gain control device. DIM – This button controls the brightness of the Halo lighting on the front panel.
AUDIO OUTPUTS 1. Connect the speaker wires to the Binding Posts. NOTE: Red is Positive and Black is Negative. 2. Use either Bare Speaker Wire or Banana Plugs to terminate the speaker wire. AUDIO INPUTS 1. Connect to either the Balanced Female XLR or Unbalanced Female RCA Inputs. NOTE: Both inputs have been calibrated to the same sensitivity level. Use a Y-Adapter when using the Unbalanced RCA’s for best performance. IR FEEDTHRU 1.
POWER MODES 1. Select either: ON – Always On. AUTO – On with Signal Sense, without signal it will stay on for ≈15 minutes. TRIGGER – On with a 12 Volt trigger. 2. +12V Trigger Input – Use the Green Phoenix Connector to connect a 12 volt trigger wire from your other equipment, the polarity on the connector can be either way. SETUP MODES 1. EQ – Select the appropriate setting based on these guidelines: ∞ Baffle – The RCC 600 Subwoofer Module is installed in a wall that has an air volume of ≥2.8 ft3.
2. PHASE – Comes from the factory set at 0°. The phase of the subwoofer can be adjusted to fine tune the signal coincidence of the subwoofer and the lower frequencies of your LCR Speakers. Adjust the phase, listening for an increase in mid bass in the crossover region. A pink-noise generator or an RTA (Real-time Analyzer) can further analyze your installation. 3. LOW PASS – This is the crossover frequency setting of the Low Pass Filter.
1. AUTO EQ MIC – This is the input jack for the ARMC Microphone. 2. Switch Settings – Select either: a. BYPASS – ARMC not active. b. AUTO EQ. – ARMC active. Will remember the last measured room mode sequence and settings. 3. BLUE LED STATUS INDICATOR a. Continuous Short Flash – Switch in AUTO EQ setting, ARMC not yet saved. Since the amplifier leaves the factory with this function having been tested the LED should not flash continuously even when the switch is set to the AUTO EQ position.
RCC 600 CABINET MOUNT (RCC600-CM) The RCC 600 Cabinet Mount is an accessory to the RCC 600 Freestanding Subwoofer. The RCC600-CM allows the RCC600-FS to be hidden inside of any piece of furniture or built-in cabinetry. The subwoofer is designed to fit snuggly inside the cabinet mount and direct the subwoofer’s energy down through the bottom of the cabinet and either directly into the room or out through vents in the cabinet’s baseboard. INSTALLATION 1.
LIMITED WARRANTY This warranty remains in effect for five years from the date of purchase for speaker products and one year for electronic products. THIS WARRANTY PROTECTS THE ORIGINAL OWNER PROVIDING THAT THE PRODUCT HAS BEEN PURCHASED FROM AN AUTHORIZED ARTISON DEALER IN THE UNITED STATES. THE ORIGINAL BILL OF SALE MUST BE PRESENTED WHENEVER WARRANTY SERVICE IS REQUIRED.