
Installation Guide


11 | Page
Artistic Finishes, Inc. / 2224 Terminal Road / Roseville, MN 55113 / 888-816-5606 / www.artisticfinishes.com
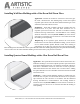
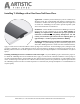
Installing Stair Nose Moldings with a Floating Floor
Application – The Stair Nose molding combines style and function to
create an attractive molding that catches the brunt of floor traffic while
enhancing the beauty of a staircase or step. The Stair Nose also
provides the proper overhang for a transition from one floor level to the
next, such as the step into a sunken living room.
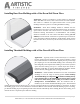
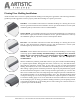
Installation – Artistic Finishes manufactures two types of Stair
Nosing. The standard flush Stair Nose is for nail down or glue down
floors and installs flush with the hardwood floor to provide a clean
transition to the next step or sunken room. The Overlap Stair Nose is
designed for floating floor installations. Stair Nose moldings are
available for floors ranging from ¼ inch in thickness up to ¾ inch.
Artistic Finishes matches the molding up to a piece of the
manufacturer’s flooring to verify the best molding is assigned to each
specific flooring line.
Flush Stair Nose – The Flush Stair Nose is typically used for glue
down/nail down applications. See the glue down/nail down section of
this installation guide for instructions on how to install the Flush Stair
Nose.
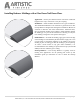
Overlap Stair Nose – The Overlap Stair Nose is typically used for
floating floor applications. When installing Overlap Stair Nose
moldings on a floating floor, it is important not to attach the molding
directly to the hardwood floor as the hardwood floor must be able to
expand or contract under the lip of the molding per the
manufacturer’s recommendations.
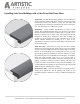
Start the installation by installing wood shims wherever you plan to
install an Overlap Stair Nose. The shim should be placed
approximately 1-¾ inches from the front edge of the riser. Secure the
shim in place by either nailing or gluing it down. Install the pad with
the edge of the pad placed directly against the shim. Next, install the
floating floor over the shim so that only ¼ to 3/8 inch of shim is
showing under the floor. The shim serves to stabilize the floor from
compressing under weight. Lay the Overlap Stair Nose in place. Note:
The shim should not extend under the base of the Overlap Stair
Nose. Lay the Overlap Stair Nose in place. The Overlap Stair Nose
should overlap the flooring by ¼ to 3/8 inch, leaving the balance for
required expansion or contraction. To attach the molding, apply one or
two ¼ inch beads of construction adhesive to the subfloor and set the
molding in place. If nailing, pre-drill the molding to prevent splitting
and nail to the subfloor behind the lip of the molding. Be sure when
nailing, not to obstruct the floor’s expansion space under the molding.