
Installation Guide


12 | Page
Artistic Finishes, Inc. / 2224 Terminal Road / Roseville, MN 55113 / 888-816-5606 / www.artisticfinishes.com
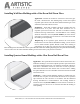
Installing Stair Nose Moldings with a Floating Floor
Application – Commonly used in doorways to join two wood floors in
adjoining rooms. Also recommended when making a transition from a
wood floor to another floor that is approximately the same height such
as ceramic tile. T-Moldings are also used to provide expansion joints
when a floor dimension exceeds 40 feet.
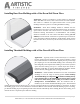
Installation – Artistic Finishes manufactures T-Moldings to fit floors
ranging from ¼ inch in thickness up to ¾ inch. When installing T-
Moldings, it is important not to obstruct the space for expansion or
contraction recommended by the flooring manufacturer. For this
reason, you will need a space between the two adjoining floors of
approximately 1-¼ inches to properly install the T-Molding.
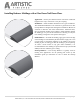
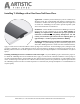
Installing T-Molding between a stationary floor and a floating
floor – Start the installation by installing wood shims wherever you
plan to install a T-molding. The shim should be placed approximately
1 inch from the edge of the floor to which you are transitioning. Secure the shim in place by either nailing or gluing it down.
Install the pad with the edge of the pad placed directly against the shim. Next, install the floating floor over the shim so that
only ¼ to 3/8 inch of shim is showing under the floor. The shim serves to stabilize the floor from compressing under weight.
Lay the T-molding in place. Apply a ¼ inch bead of construction adhesive to the top edge of the stationary floor. Set the
molding in place, making sure that you have a minimum of a ¼ inch molding overlap on the wood flooring, including an
expansion space between the T-molding and the wood floor to handle expansion or contraction. (See flooring manufacturer’s
recommendations on required space.)
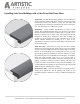
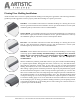
Installing T-Molding between two floating floors – When installing the T-molding between two floating wood floors,
begin the installation by installing wood shims under the edges of the floating floors where you plan to install T-molding.
The shims can be butted together or separated no more than 1 inch. Secure the shims in place by either nailing or gluing
them down. Install the pad with the edge of the pad placed directly against each shim. Next, install the floating floor over
the shim so that only ¼ to 3/8 inch of shim is showing under the floor. The shim serves to stabilize the floor from
compressing under weight. Lay the T-molding in place. Apply a ¼ inch bead of construction adhesive to the top edge of
one side of the wood floor. (Caution: Do not glue both sides.) Set the molding in place, making sure that you have a
minimum of a ¼ inch molding overlap on the side of the flooring that is not glued. Make sure you also include an expansion
space between the molding and the sides of the wood floor that are not glued to handle the expansion or contraction of both
floors. (See flooring manufacturer’s recommendations on required space.)