
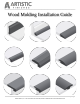
Installation Guide


3 | Page
Artistic Finishes, Inc. / 2224 Terminal Road / Roseville, MN 55113 / 888-816-5606 / www.artisticfinishes.com
Preparation and Installation Tips
Preparation
Preparation for the installation of hardwood moldings is the same as the preparation for installation of the hardwood
floor. Subfloors must be flat and level. “High spots” should be sanded down and “low spots” filled with a high-
compressive strength underlayment patch or self-leveling cement compound developed by a reputable manufacturer.
Color and grain matching – It is important to consider color and grain matching of any molding and hardwood
flooring that will be installed adjacent to one another. Because hardwood flooring and moldings are products of nature,
they are susceptible to variations in grain and wood color. These natural variations add variety and natural beauty to
the overall look of your floor. However, pre-selecting flooring and moldings that will be installed adjacent to one
another will enhance this beauty. Just prior to installation, the installer should sort through and set aside several
pieces of flooring that most accurately match the required moldings. Following this simple, but often overlooked
guideline will provide a pleasing and trouble-free finish on every job.
Dos and Don’ts with Hardwood Moldings
The following guidelines are presented as an overview of steps the installer can take to assure the hardwood molding
installation goes well. These “dos and don’ts” have been gathered from the experiences of many installers across the
country and can help to assure your installation goes well.
Prefinished moldings must be handled carefully to avoid chipping and marring of the face.
Moldings must be pre-drilled to avoid splitting whenever they are to be secured with nails or fasteners.
Avoid splits in moldings by controlling the size of the fastener and its proximity to the end of a cut or the edge of
the molding.
If a pneumatic nail gun is to be used, test it on a scrap molding before the installation to assess possible damage due
to fastening.
The tool of choice for cutting hardwood moldings is a 10 or 12 inch motorized miter saw with pre-set adjustments
for the basic miter cuts at 22.5°, 45°, and 90°. A carbide tipped blade makes the best cuts.
Always use miter cuts rather than butt cuts when splicing. Decide the direction of the miter by cutting the molding
with the long point oriented in the same direction as your natural line of vision when you enter the room.
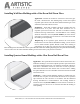
When installing Wall Base moldings, eliminate the need to putty holes on the molding by placing the bottom nail
below the finished line of the Quarter Round molding.
On Wall Base or Quarter Round moldings, never restrict the hardwood floors natural contraction/expansion
movement by driving the fasteners at a downward angle into the floor. Rather, attach the moldings to the wall or
vertical surface.