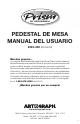
BY ARTOGRAPH Table Stand Owner’s Manual......................................... 1-4 Pedestal De Mesa Manual Del Usuario ........................ 5-8 Manuel De L’utilisateur Du Socle Vertical .................. 9-12 Vertikalstativ Gebrauchsanleitung ........................... 13-16 Tafelstandard Gebruikershandleiding ...................... 17-20 Supporto Da Tavolo Manuale Per L’utente .............. 21-24 TABLE STAND OWNER’S MANUAL MODEL #225-206 (without lens) Thank You...
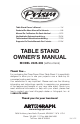
Stand Assembly Fig. A PLEASE NOTE! The model #225-206 is our current stand and is designed to be used with the Prism lens or the Super Prism Accessory Lens. If you have purchased the #225-206 stand and your Super Prism did not come with an accessory lens, you may purchase the accessory lens from Artograph. Request accessory lens #200-750. Lower Stand Assembly CAUTION! Column is spring-loaded and can move with speed when collar lock is released.
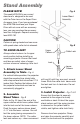
through the stand bracket hole as shown. Projector copy board cover should be facing forward or away from the stand (Fig. C). Tilt projector’s back toward the back plate until ears of the lock are inserted into the slots in the back of the projector. While holding projector against back plate, turn the locking knob counter clockwise as indicated in Fig. D, to lock the projector in place. Fig.
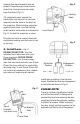
Fig. F • Copy Clip column beyond yellow warning label). For maximum reduction, the projector should be near the lowest position. Varying the height of the projector and adjusting the lens can achieve nearly any size. See Fig. E for size limitations. Floor Projection: Mount the copy over the top glass by sliding it beneath the copy clip, which will anchor your copy in place. Close the lid and turn the projector on to begin.
BY ARTOGRAPH PEDESTAL DE MESA MANUAL DEL USUARIO #225-206 (sin lente) Muchas gracias... por comprar este Pedestal de mesa Prism/Super Prism. Ha sido diseñado específicamente para permitirle utilizar su proyector sobre una mesa y así poder modificar escalas y trazar imágenes con mayor comodidad. Nos importa que usted esté satisfecho. Por favor lea cuidadosamente la información y las instrucciones dadas a continuación para familiarizarse mejor con las funciones y los beneficios de su nuevo pedestal de mesa.
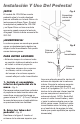
Instalación Y Uso Del Pedestal Fig. A ¡NOTA! El modelo No. 225-206 es nuestro pedestal actual y ha sido diseñado para ser utilizado con la lente Prism o la lente accesoria Super Prism. Si usted ha adquirido el pedestal No. 225-206 y su Super Prism no tiene una lente accesoria, puede comprar la lente de Artograph. Solicite la lente accesoria No. 200-750.
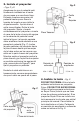
3. Instale el proyector Fig. D - Figs. C y D Asegúrese de que el pedestal esté firmemente instalado en el borde de una mesa o un escritorio firme. Extienda la columna superior del pedestal hasta que se libere la tensión del resorte o sea visible la etiqueta amarilla. Apriete bien el collar inmovilizador. Retire la lente del proyector. Sujete y levante cuidadosamente el proyector e inserte el cono de la lente a través del agujero en la ménsula del pedestal como indica la figura.
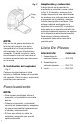
Fig. F • Copy Clip NOTA: Hay un aro de goma alrededor de la lente para prevenir que entre demasiado en el tubo portalente del proyector, lo que dificultaría su remoción. Cuando invierta la lente, sencillamente mueva el aro hacia el extremo opuesto hasta que descanse en la ranura. 5. Instalación del copiador - Fig. F Coloque el original sobre el vidrio superior y deslícelo debajo de la presilla del copiador. Cierre la tapa y encienda el proyector para comenzar.
BY ARTOGRAPH MANUEL DE L’UTILISATEUR DU SOCLE VERTICAL MODELE Nº 225-206 (sans lentille) Merci… d’avoir acheté ce Pied pour Table Prism/Super Prism. Il est conçu spécifiquement pour vous permettre d’utiliser votre projecteur sur une table afin de faciliter la mise à l’échelle et le calquage. Votre satisfaction compte beaucoup pour nous. Veuillez lire avec soin les renseignements et instructions qui suivent pour mieux comprendre les caractéristiques et les avantages de notre nouveau pied pour table.
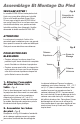
Assemblage Et Montage Du Pied Fig. A VEUILLEZ NOTER ! Le modèle N°225-206 est notre pied actuel. Il est conçu pour être utilisé avec la lentille Prism ou la lentille auxiliaire Super Prism. Si vous avez acheté le pied N°225-206 et que votre Super-Prism ne soit pas venu avec une lentille auxiliaire, vous pouvez acheter la lentille auxiliaire chez Artograph. Veuillez demander la lentille auxiliaire N°200-750.
3. Installer le projecteur Fig. D - Fig. C et D S’assurer que le pied est monté de manière sûre sur le bord d’une table de travail ou d’un bureau robuste. Abaisser la colonne supérieure du pied aussi loin qu’elle ira dans la colonne inférieure et serrer l’écrou de blocage. Retirer la lentille du projecteur. Saisir et relever avec soin le projecteur ; introduire le cône de lentille à travers le trou du pied servant de support comme indiqué.
Fig. F • Agrafe de Copie vers l’intérieur ou l’extérieur pour la mise au point. Pour avoir l’agrandissement maximal sur le dessus de table (3X), le pied doit être dans sa position la plus élevée (ne pas allonger la colonne supérieure au-delà de l’étiquette jaune d’avertissement). Pour avoir la réduction maximale, le projecteur doit être près de sa position la plus basse. En faisant varier la hauteur du projecteur et en réglant la lentille, on peut réaliser à peu près n’importe quelle taille. Voir la Fig.
BY ARTOGRAPH VERTIKALSTATIV GEBRAUCHSANLEITUNG MODELL 225-206 (ohne Objektiv) Herzlichen Glückwunsch zum Kauf des Prism-/Super PrismTischstativs. Dieses Stativ ist eigens dazu ausgelegt, Vorlagen zum Skalieren und Nachzeichnen auf eine Tischoberfläche zu projizieren. Es ist uns sehr daran gelegen, dass Sie mit Ihrem Kauf zufrieden sind. Lesen Sie daher bitte die folgenden Informationen und Anleitungen sorgfältig durch, um sich mit allen Merkmalen und Vorteilen des neuen Tischstativs vertraut zu machen.
Montieren Und Einrichten Des Stativs Abb. A Wichtiger Hinweis! Das Modell 225-206 ist unser aktuelles Stativ und für den Einsatz mit dem Prism-Objektiv bzw. dem Super PrismZusatzobjektiv ausgelegt. Falls Sie das Modell 225-206 gekauft haben und Ihr Super Prism-Projektor kein Zusatzobjektiv besitzt, können Sie dieses unter der Bestellnummer 200-750 bei Artograph anfordern. Unteres Stativteil ACHTUNG! Im Stativ befindet sich eine starke Spannfeder.
3. Den Projektor installieren (Abb. C und D) Abb. D Vor der Projektorinstallation muss das Stativ an der Kante eines stabilen Arbeits- oder Schreibtischs ordnungsgemäß angebracht sein. Das obere Stativrohr so weit wie möglich in das untere Stativrohr einschieben, unddie Sicherungsmutter festziehen. Das Objektiv aus dem Projektor herausnehmen. Den Projektor vorsichtig anhebenundden Objektivstutzewie abgebildet in die Öffnung der Projektorhalterung einführen.
Abb. F • Vorlagenhalter • Bei Verwendung einer Verlängerungsschnur darauf achten, dass diese für die nötige Stromstärke ausgelegt ist. Vergrößern und Verkleinern: ANMERKUNG: Am hinteren Ende des Objektivs befindet sich ein Gummiring, der dafür sorgt, dass das Objektiv nicht zu weit in den Objektivstutzen eingeschoben werden kann, was das Entfernen des Objektivs erschweren würde.
BY ARTOGRAPH TAFELSTANDARD GEBRUIKERSHANDLEIDING MODEL 225-206 (zonder lens) Bedankt… voor het aanschaffen van deze Prism/Super Prism tafelstandaard. Deze verticale standaard is speciaal ontwikkeld om u in staat te stellen uw projector op tafel te gebruiken en gemakkelijker op de gewenste schaal te werken. Wij vinden het heel belangrijk dat u tevreden bent.
Montage En Installatie Van De Standaard Fig. A LET OP! Model #225-206 is het standaard model dat is ontwikkeld voor gebruik met de Prism lens of de (als accessoire verkrijgbare) Super Prism lens. Als u model #225-206 hebt gekocht terwijl u een Super Prism zonder extra lens hebt, dan kunt u bij Artograph de extra lens aanschaffen. Vraag naar artikelnummer #200-750.
3. Installatie van de projector – Fig. C en D Fig. D Zorg dat de standaard deugdelijk is bevestigd op de rand van een stevig werkof tafelblad. Druk het bovenste deel van de standaard zover mogelijk in het onderste deel en draai de vergrendelring vast. • Knop om project vast te zetten Haal de lens uit de projector. Pak de projector, til hem op en laat hem dan voorzichtig zó zakken dat de lenshouder van de projector als afgebeeld door het gat in de projectorhouder steekt.
Fig. F • Clip om het model op zijn plaats te houden N.B.: Aan het eind van de lens zit een rubber ring die moet voorkomen dat de lenshouder te ver in de projector schuift en daardoor lastig eruit te halen is. Bij het omkeren van de lens schuift u deze ring gewoon naar het andere uiteinde, totdat hij daar in de groef valt. Zet de lens in de vergrotings- of verkleiningsstand, zoals aangegeven in fig. E.
BY ARTOGRAPH SUPPORTO DA TAVOLO MANUALE PER L’UTENTE MODELLO N. 225-206 (senza obiettivo) Grazie… Per aver acquistato questo supporto da tavolo Prism/Super Prism. È progettato specificamente per consentirle di utilizzare il suo proiettore sulla superficie di un tavolo per facilitare il ridimensionamento e la riproduzione. La sua soddisfazione è molto importante.
Montaggio E Funzionamento Ddel Supporto Fig. A NOTA Il modello n. 225-206 è il nostro supporto attuale ed è progettato per l’uso assieme all’obiettivo Prism o all’obiettivo accessorio Super Prism. Se ha acquistato il supporto n. 225-206 e il suo Super Prism non è fornito con un obiettivo accessorio, potrà acquistare l’obiettivo accessorio presso Artograph. Richieda l’obiettivo accessorio n. 200-750.
3. Installare il proiettore Fig. D – Fig. C e D Accertarsi che il supporto sia saldamente montato sul bordo di un tavolo da lavoro o di una scrivania. Estendere la colonna del supporto superiore fino a quando la tensione della molla non sia rilasciata o l’etichetta gialla non sia visibile. Quindi serrare saldamente il blocco del collare. • Manopola di Blocco Rimuovere l’obiettivo dal proiettore.
Fig. F • Fermaglio per la copia NOTA: all’estremità dell’obiettivo è fissato un anello di gomma, che è progettato per impedire all’obiettivo di penetrare nel relativo cilindro troppo in profondità nel proiettore, rendendone difficile la rimozione. Nell’eseguire il movimento inverso sull’obiettivo, ruotare semplicemente l’anello verso il basso nell’estremità opposta fino a farlo rientrare nella scanalatura. 5. Montaggio copia – Fig.