
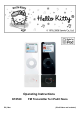
User's Manual


2
Getting Started
(1) Switch on your iPod® Nano. Press the Menu button and enter the Setting mode. Set “Sound
Check” as “Off”.
(2) Plug your Hello Kitty FM Transmitter into the 30-pin connector of your iPod ® Nano.
(3) Play some music on your iPod® Nano.
(4) Switch your radio to FM band and tune it to around 88.0MHz.
(5) To select other transmission frequencies, please see the below instructions.
(6) Set your desired volume level by adjusting the volume control of your FM receiver.
Installing the FM Transmitter Software
In order to change the radio frequency that the FM Transmitter broadcasts on, you need to first install
the software from the included CD driver:
(1) Insert the included driver disc into your Mac® or PC.
Mac® Users - Double click the installer icon “FM Transmitter” to launch the installer.
PC Users – Run the file setup.exe located on the driver disc.
(2) Open iTunes. You should now see a playlist called “FM Transmitter” in the Source column on the
left side of the window. This playlist will contain a series of short audio files, all of which have
radio frequencies as their names. You may also get the short audio files through the path:
C:\Program Files\Kitty\FM Transmitter\
(3) Connect your iPod® Nano to your Mac® or PC and sync the device with iTunes. The FM
Transmitter playlist will be transferred to the iPod. If you have changed the default preferences of
your iPod, you may have to manually transfer the playlist into your iPod®.
Tuning the FM Transmitter
The FM Transmitter can broadcast to any frequency on your FM radio. Once you have installed the
station playlist on to your iPod® Nano, follow these simple steps to tune your FM Transmitter to
broadcast your music on a selected frequency.
(1) Scan the FM stations on your radio to find an empty frequency. The one that does not have any
talking or music on it will be preferable.
(2) Navigate to the FM Transmitter stations playlist on your iPod® Nano by selecting the Playlist
from the Main Menu, then select “FM Transmitter”.
(3) Scroll down and highlight the audio file with the name matching the frequency you found on your
FM radio. Press the SELECT button (the button in the middle of your scroll wheel) to play the
station.
(4) As your chosen station begins to play, the light on the FM Transmitter will begin to blink rapidly.
As soon as you see this, immediately press the PLAY/PAUSE button of your iPod. The light on
the FM Transmitter will pulse three times slowly to let you know you have successfully changed
the transmitting frequency.
The FM Transmitter will now broadcast on the station frequency you selected. Press the MENU
button on your iPod® Nano to return to the Main Menu. Now you can navigate to your own music and
start playing wirelessly.
Special Tips for Operating the FM Transmitter
1. This FM Transmitter is recommended to use with iPod® Nano only.
2. After the FM Transmitter is unplugged, the transmission frequency will be reset. You may need to
tune it again for the next use.
3. Your iPod® Nano cannot be charged if the FM transmitter is connected to it since the transmitter
occupies the 30-pin connector.
4. To get the best sound quality, please select a FM station that is totally quiet and static.