
User`s manual


56 ARTURIA – Analog Lab – USER’S MANUAL
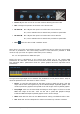
5.5.6 Editing a Sound Preset within Multi mode
The list pictured above shows roughly 20 parameters for each plug-in which you have at
your disposal whether you ‘own’ the plug-in or not. And as with Sound mode, you will
have access to all of the parameters of a given Arturia plug-in if the full version of that
plug-in has been authorized for use on your computer.
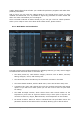
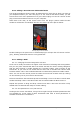
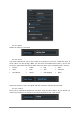
When that is the case, as the cursor hovers over the plug-in picture inside the Part
window it will become “illuminated” like the one at the top of the picture below:
The top plug-in can be edited
Double-clicking on the picture for an authorized plug-in will open the full version in all its
glory, allowing unfettered access to every parameter.
5.5.7 Editing a Multi
5.5.7.1 Changing the Sound assigned to the Part
So far we’ve mostly focused on the higher-level functions of selecting and sorting Multis.
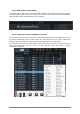
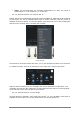
But you may have noticed that above the Preset list and the various sorting categories
that the word “Sound” is visible beneath the “Connect” button. This is known as the
Sound tab. If you click on the Sound tab the entire list of Sounds from Sound mode
becomes visible. This is how individual Sounds are selected for placement inside a Multi.
Note: You can sort the Sound preset list inside the Sound tab of Multi mode by clicking
on the columns just as you would in Sound mode.
Select a Sound from the Sound tab preset list and drag it over to the Part 1 Sound name
window and drop it there. That Sound will now be located inside the Multi as Part 1.
Repeat this process to drag and drop a Sound onto Part 2 and now the Multi is fully
loaded with new Sounds and ready for further editing.
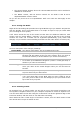
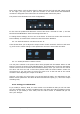
5.5.7.2 Part parameters: Level, Pan and FX
Looking at the screen shot below, let’s go left-to-right through the basic parameters that
are available for a Part within a Multi. Remember that each of these parameters is
available for both Part 1 and Part 2: