
User`s manual


ARTURIA – MiniLab – USER’S MANUAL 15
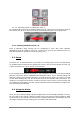
3.2.1.2 Selecting Presets in Analog Lab: Knob 9
For rapid scrolling through the Analog Lab Preset list, simply turn the left-most knob in
the second row: Knob 9. The preset will be selected shortly after the scrolling stops.
3.2.2 Selecting MiniLab Presets 1-8
Each of MiniLab’s eight presets can be configured to work with other software
applications such as a DAW or a plug-in. To select one of the preset locations from 1-8,
hold the Shift button and press one of the pads (1-8).
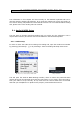
3.3 Setup
In section 3.1 we described how to get audio out of Analog Lab into the world and how
to get MIDI from the MiniLab into Analog Lab. There’s only one other detail of which you
need to be aware: the “Sync” button in the tool bar.
If you already have MiniLab connected to your computer, then when you launch Analog
Lab this connection will be established automatically. But if you’ve started Analog Lab
and then realized your MiniLab was still in its case from last night’s gig, there’s no need
to shut down Analog Lab; just go ahead and connect the MiniLab, wait a second for the
computer to recognize its presence, and then click the “Sync” button. The connection will
be established immediately and the virtual keyboard will be automatically configured to
look and act like the MiniLab.
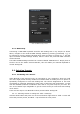
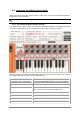
3.4 Using the Knobs
Once you have started Analog Lab and configured the Audio and MIDI settings correctly,
all you need to do is select a Sound or Multi from the preset list and start playing. Each
of the knobs on the MiniLab will assume their assigned parameters immediately and you
can begin experimenting by making your first edits inside that preset.