APPLI A NC E S FOR L I V I NG ACH12BBQ ACH12BBQB OPERATION MANUAL
Congratulations, you are now the proud owner of an ARTUSI cooking appliance. Thank you for purchasing ARTUSI and welcome to the ARTUSI Family. This instruction manual has been specially created to inform you of the full range of features your ARTUSI appliance has to offer and serves as an introduction to getting the very best out of your ARTUSI appliance. We present detailed information on each of the features your ARTUSI appliance consists of.
IMPORTANT SAFETY INFORMATION **Read the complete manual carefully before installation** Warnings: TO REDUCE THE RISK OF FIRE, ELECTRICAL SHOCK OR PERSONAL INJURY, PLEASE OBSERVE THE FOLLOWING: 1. Installation and electrical work must be done by a qualified person in accordance with all applicable codes and standards 2. If the supply cord is damaged, it must be replaced by the manufacturer, its service agent or a similarly qualified person to avoid a hazard.
5. There shall be adequate ventilation of the room when the range hood is used at the same time as appliances burning gas or other fuels. 6. The rangehood can be used on six cookers at most; The rangehood can be used on BBQ.
CAUTION 1. To reduce the risk of fire and to properly exhaust air, be sure to duct air outside. Do not vent exhaust air into spaces within walls or ceiling or into attics, crawl spaces or garages. 2. Take care when using cleaning agents or detergents. 3. Avoid using food products that produce flames under the range hood. 4. Do not flame under the range hood 5. The range hood must only be used for the exhaust of cooking fumes in home kitchens.
INSTALLATION INSTRUCTIONS Before You Start... 1.Read this manual carefully and completely. 2.The range hoods confirms to related appliance standards. Please check your local building codes for any additional requirements. 3.The appliance has been manufactured as class I, therefore ground connection is necessary. The range hood must be installed so that that the plug is easily accessible. Unpacking Remove the packaging with the product in place.
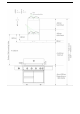
The ideal position of the Rangehood is as follows: 1.Height above cooking surface – min. 650mm 2.Distance from cooking surface to Rangehood mounting bracket bottom screw holes: Model: ACH12BBQ Top mounting holes – Min1085mm Bottom mounting holes – Min 710mm Model: ACH12BBQB Mounting holes – Min 1010mm Mounting bracket is attached and part of the medium rangehood motor cover. Note: Rangehood must be level, if not rangehood will not operate correctly. Model:ACH12BBQ 1.
DUCTING 1.Remove all tapes from the duct’s butterfly flaps and ensure they move up and down freely. 2.Position the butterfly flaps up. 3.Position the ducting over the top of the collection box and butterfly flaps. Note: If unsure about the ducting please contact a rangehood installer. 4.If using a rangehood installer or roof plumber duct through ceiling and roof in accordance with the local, state and national regulations and laws.
OPERATION Press the displayed. to turn on the rangehood. The display backlight will come on and the power icon will be CONTROL PANEL FOR ACH12BBQ DISPLAY PANEL CLOCK 1.Each time the rangehood is reconnected to a power supply, the control panel will beep once. The clock will reset and show 12:00. The rangehood will be in standby mode without lights or motors operating. The control panel will not be backlit. 2.To set the time. In standby mode, press the button. The hour indicator will flash.
Button functions: • Power: Power ON/OFF. • Blower Speed Indicator: Shows current blower (motor) speed (1-3). • Increase Value: Blower (motor) speed increase, Time setting increase. • Decrease Value: Blower (motor) speed decrease, Time setting decrease. • Light: Turns ON/OFF • Power-Off Delay Digital Timer: Press the set/timer button for about 2 seconds to turn on the delay-off timer.The range hood is set for 3 minutes delay-off timer.
BAFFLE FILTERS The baffle filters fitted by the factory are intended to filter out residue and grease from cooking. They are required to be kept clean and should be cleaned after every 30 hours of use or more often if required or after heavy cooking. Note: Always turn the Range hood power off at the point before removing filters. To Remove Lift latch and gently pull down front of baffle filter and remove. To Clean 1.Use warm soapy water and a soft cloth or put into dishwasher on a ‘normal’ cycle. 2.
3. Replace the screws and filters. NB: The light is only meant for use during cooking and not for illuminating the surroundings for longer periods. If the light is used for longer periods, this will considerably shorten the burn time of the lights. Read all instructions before installing and operating this appliance. IMPORTANT SAFETY NOTICE Read all instructions in this manual before operating the appliance. Save these instructions for future reference. Always leave safety grills and filter in place.
Trouble Shooting Guide Problem Possible Reason No electrical supply. Hood doesn't turn on. Poor Airflow Power cord is damaged Baffle filters clogged Hood is not secured in place Hood is vibrating Motor running but no air flow Motor stops after a few minutes Strong cooking smell. Oil dripping onto BBQ. Whirring sound Butterfly valve jammed. High temperature safety device activated. The hood is installed too near the cooking surface. Fan speed too low Baffle filters saturated.
Warranty Card Worldwide Appliances Pty Limited A.B.N. 45868077422 Office: 48-50 Moore Street, Leichhardt N.S.W 2040 Post: Locked Bag 3000, Annandale, N.S.W 2038 P: 1300 694 583 WARRANTY REGISTRATION Your ongoing satisfaction with your artusi product is important to us. We ask that you complete the enclosed Warranty Registration Card and return it to us so that we have a record of the artusi product purchased by you.
Warranty Card continued 4. Time for Claim under the Warranty You must make any claim under this Warranty within twenty eight (28) days after the occurrence of an event which gives rise to a claim pursuant to the Warranty, by booking a service call on the telephone number below. 5. Proof of Purchase Customers must retain proof of purchase in order to be eligible to make a warranty claim in respect of an artusi product. 6.
DISCLAIMER Worldwide Appliances PTY LTD, trading as ARTUSI, is continually seeking ways to improve the design specifications, aesthetics and production techniques of its products. As a result alterations to our products and designs take place continually. Whilst every effort is made to produce information and literature that is up to date, this brochure should not be regarded as an infallible guide to the current specifications, nor does it constitute an offer for the sale of any particular product.