INSTRUCTION BOOKLET CAFG91X CAFG90X CAFG91B Product pictures are for reference only.
WHEN YOU CALL FOR SERVICE When you call for service or order parts for your unit, be sure to give: 1. MODEL 2. SERIAL NUMBER 3. COLOUR 4. PART NAME and/or description of problem 5. YOUR FULL NAME, ADDRESS, and HOME TELEPHONE NUMBER and BUSINESS TELEPHONE NUMBER IF APPROPRIATE. Servicing shall be carried out only by authorised personnel.
Clearances to combustible materials Any adjoining wall surface (side or rear) situated within 200mm of any hob burner must be a suitable non-combustible material from the edge for a height of 150mm for the entire length of the cooker. Any combustible construction above the cooker must be at least 650mm above the maintop. Ensure that a power and gas supply are nearby. The Cooker should be located carefully so that the heat produced by it has plenty of space to escape.
Fig. B - It must not be kinked - It must not be in contact with hot surfaces. Fig. C IT IS RECOMMENDED THAT A SERVICE TAP AND UNION BE FITTED ADJACENT TO THE APPLIANCE INLET TO FACILITATE FUTURE SERVICING. 5 burner models: set the burner pressure to 1kPa for Natural Gas and 2.75kPa for U-LPG with the wok burner operating a full rate'. For commissioning of the appliance with the regulator for Natural Gas, the test point pressure should be 1.00kPa with all burners operating on HIGH.
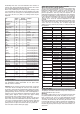
TAB. 1 Gas Type kPa Jet mm ø Burners Power MJ/h Natural 1.00 1.20 0.90 1.50 1.63 Semi-quick Auxiliary Quick Triple Crown 7.1 4.0 11.0 12.7 U-LPG 2.75 0.73 0.53 0.95 1.00 Semi-quick Auxiliary Quick Triple Crown 7.1 3.7 11.7 13.0 Regulator NG Regulator LP Test point adaptor The correct adjustment is obtained when the flame has a length of about 3 or 4 mm. For butane/propane gas, the adjusting screw must be screwed in tight.
- Always turn pan handles to the side or to the back of the hob. If they are left out into the room they can easily be hit or reached by children, knocking the pan off the hob. - Don’t let children sit down or play with the oven door. Do not use the drop down door as a stool to reach above cabinets. - Once your cooking is over make sure to close the main gas supply. WARNING * This appliance is not intended for use by young children or infirm persons without supervision.
Oven thermostat knob To obtain an oven temperature between 60°C and MAX°C, turn the knob clockwise. This method is ideal for all traditional roasting and baking. For sealing red meats, roast beef, leg of lamb, game, bread, foilwrapped food and flaky pastry. Mid shelf position is recommended. Fan assist multilevel oven Cooking of similar or different foods placed on different shelves (up to 2 levels at a time).
Preheating of the oven is recommended for 10-15 minutes or until the oven thermostat indicator light switches off to show the selected temperature has been reached. When using a baking tray it should be placed centrally on the oven shelf with the short sides of the tray parallel to the sides of the oven. Do not use trays, tins or dishes larger than 380 mm (15") long, 356 mm (14") wide, as cooking results may be impaired.
As shown in the picture, on-off control is used to control heating components of oven, the left is power source which can be connected under the 220V. INSTRUCTION FOR USE OF CONTROL DEVICES (Depending on model) Using the Cooking Programs 1 Time Adjustment after Starting up When the power is on, it shows 12:00 and flashes. The relay contact is disconnected, auto-programming icon keeps lighting up, time setting icon flashes. Press K1 or K3 to the time or press K2 to get into the present working mode.
Accessories over, it will automatically turn off the heating and the buzzer is buzzing to inform the user. Press twice to get into the continuous time setting mode under the common mode, press three times to get into the end time. When the continuous time setting is ok or the end time setting is ok, then press K2 to get into the other kind of automatic program time setting, "Auto-programming Icon" flashes, press K1 and K3 to ad just continuous time and end time setting mode.
Using the rotisserie The rotisserie can be used to cook joints such as rolled joints and poultry with excellent results. The meat is roasted thoroughly and evenly. 3. 4. Hook the other end into the holder. Pour a little bit of water into the baking tray and slide this into shelf position 1 to collect the run-off fat. Use the rotisserie in conjunction with the grill. Preparing joints Place the joint as centrally as possible on the rotisserie and secure it at both ends with the retaining clips.
CLEANING Daily Regular wiping down directly after use prevents dirt from burning on. Clean the appliance with water and a detergent or all purpose cleaner. Avoid using too much water to prevent it entering the burner or ventilation openings. Before cleaning the appliance, close the gas stopcock and unplug appliance or disconnect power at the main circuit breaker of the electrical system. Do not clean the appliance surfaces when still hot.
Cleaning the interior glass of the oven The interior glass of the oven door can be removed: with the door in the semi-open position, use both hands to remove the glass. After cleaning, refit the glass by proceeding in reverse order. Removal of oven door In-depth cleaning of the oven becomes more convenient if the door is removed following the instructions below: 1 open the oven door completely. 2 flip the hinge hooks "A" outwards (see fig. 5B).
OPTIONAL: ONLY FOR THE MODELS EQUIPPED WITH TELESCOPIC RAILS The oven is equipped with telescopic rails to position the pan and wire grid (Fig. 3d). You can change the position, depending on your personal taste and needs ofdifferent foods (Fig. 3e). V Fig. 7 Fig. 6 mod. 296 A Fig. 8 GREASING OF TAPS If a tap becomes hard to be turned, grease it using a specific grease withstanding high temperatures.
SOME SAFETY POINTS PROBLEM SOLVER Do not use the appliance as a space heater. Any of the following are considered to be abnormal operation and may require servicing: Yellow tipping of the hob burner flame. Sooting up of cooking utensils. Burners not igniting properly. Burners failing to remain alight. Burners extinguished by oven door. Gas valves, which are difficult to turn. If you smell gas Open a window. Do not use any electrical switches. Immediately extinguish naked flames.
OVEN DOES NOT WORK AT ALL First, when the oven is equipped with timer, check appliance is not programmed to turn on later. If it is, turn to manual setting (i.e. hand symbol). If the button or scale on the timer remains in the automatic position after use, the power supply to the oven will be interrupted. Also, check your appliance is switched on at the mains. Next check for an unexpected power strike by switching on adjacent lights etc. Finally, check fuses and plug wiring.
Warranty Card Worldwide Appliances Pty Limited A.B.N. 45868077422 Distributed by Eurolinx pty Ltd 6ɉJL! 48-50 Moore Street, Leichhardt N.S.W 2040 7VZ[! Locked Bag 3000, Annandale, N.S.W 2038 7! WARRANTY REGISTRATION Your ongoing satisfaction with your artusi product is important to us. We ask that you complete the enclosed Warranty Registration Card and return it to us so that we have a record of the artusi product purchased by you.
Warranty Card continued 4. Time for Claim under the Warranty You must make any claim under this Warranty within twenty eight (28) days after the occurrence of an event which gives rise to a claim pursuant to the Warranty, by booking a service call on the telephone number below. 5. Proof of Purchase Customers must retain proof of purchase in order to be eligible to make a warranty claim in respect of an artusi product. 6.