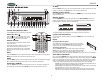
DV2007 CD / MP3 / WMA / DVD PLAYER / RECEIVER Installation and Operation Manual REL M O D STOP RPT RDM DVD AUDIO OSD SET UP E I MENU Edited by Foxit PDF Editor Copyright (c) by Foxit Software Company, 2004 For Evaluation Only.
DV2007 SAFETY INFORMATION DISC NOTES When Driving Compatible Disc Types Keep the volume level Iow enough to be aware of the road and traffic conditions. DVD Video DVDs contain excellent sound and video quality due to Dolby Digital and MPEG2 encoding. A DVD is 12 cm in diameter and can hold more than seven times the data of a CD-ROM. The maximum playing time can be up to 2 hours (a double-sided DVD is up to 4 hours).
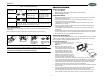
DV2007 INSTALLATION Table 1: General Disc Information Disc Type Diameter/ Playable Sides Logo DVD Video TM Audio CD Before You Begin Playback Time 12 cm single/double side (1 layer & 2 layer) 133 minutes (4.7 GB) 242 minutes (8.5 GB) 266 minutes (9.4 GB) 484 minutes (17 GB) 12 cm single side 74 minutes 1. 2. Important Notes • • REWRITABLE MP3/MWA Disc Disconnect Battery Before you begin, always disconnect the battery negative terminal.
DV2007 8. 9. 3. recheck all wiring until the problem is corrected. Once proper operation is achieved, turn the ignition switch off and proceed with final mounting of the chassis. Carefully slide the radio into the mounting sleeve making sure it is right-side-up until it is fully seated and the spring clips lock it into place.
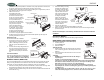
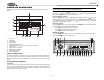
DV2007 WIRING Audio/Video Connections Power/Speaker Connections SUB-WOOFER OUTPUT BLUE FUSE (Optional) EXTERNAL REMOTE JACK PINK REMOTE FRONT CHANNEL iPod (Optional) RED AMP WHITE RED BLUE/WHITE STRIPE EXTERNAL REMOTE RECEIVER (Not supplied) RCA-TO-RCA CABLES L-CH REAR CHANNEL (Optional) BLACK WHITE R-CH (Optional) GREY L-CH 20-PIN AUDIO/POWER HARNESS (See "20 PIN HARNESS PIN CHART") (Not supplied) ANTENNA EXTENDER CABLE ANTENNA JACK R-CH (Optional) iPod ready cable SUB WOOFER WH
DV2007 iX-Bass BASIC OPERATION 3 7 19 4 22 Press the XBASS button (10) to turn on the iX-Bass function. “iX-Bass” will appear in the LCD display for 3 seconds. Press XBASS again to turn off the iX-Bass function. 2 Dimmer Control (DIM) TE U M Press the DIM button (9) on the control panel (or the DIMMER button on the remote control) to adjust the dimmer level.
DV2007 • • • • Local / Distance Selector: Use the volume control knob to choose between Local or Distance mode. This feature is used to designate the strength of the signals at which the radio will stop during automatic tuning. "Distance" is the default setting, allowing the radio to stop at a broader range of signals. To set the unit to select only strong local stations during automatic tuning, turn the volume control knob until "Local" appears in the display.
DV2007 TUNER OPERATION 3 7 Preset Scan 19 4 22 Select a band (if needed). Press AS/PS (11) to scan stations stored in the current band. The unit will pause for ten seconds at each preset station. Press AS/PS again to stop scanning when the desired station is reached. 2 Stereo TE U M The unit will automatically pick up a stereo signal, when available. When in stereo mode, the “ST” icon appears in the display.
DV2007 IPOD OPERATION Audible Fast Forward / Fast Reverse Press and hold the up >>| (21) or down |<< button (20) for > 1 second to fast forward or fast reverse. Playback begins when the button is released. Accessing iPod Mode This unit is equipped with an iPod ready function that will allow you to control your iPod (if compatible) using the control panel control buttons.
DV2007 AUDIO CD OPERATION NOTE: When the last track finishes playing, the unit will automatically enter STOP mode. Press the 1/PAU button to start CD playback again. When an audio CD is inserted into the player, the following image will appear on the TFT monitor. Play/Pause Disc Playback (1/ 4 ) Press the 1/ button (12) on the control panel (or on the remote control) to suspend disc play. Press the 1/PAU button again to resume disc Play.
DV2007 PROGRAMMED MEMORY PLAYBACK The DV2007 allows you to store CD, MP3 or WMA tracks in a favorites playlist for easy recall. Menu Button Functions You can use the following control panel buttons to navigate the on-screen menus. • • • Use the volume control knob (6) to move the cursor up/down and highlight fields. Use the up >>| (21) or down |<< (20) buttons to move the cursor left/right. Press the volume control button (4) to “ENTER” and confirm the selected item.
DV2007 MP3/WMA OPERATION MP3 and WMA (Windows Media Audio) music files are digital audio files that are compressed to allow more files on a single CD. This unit can play MP3/WMA directly from files contained on a CD-R/RW using the buttons on the receiver (or optional remote) as described below. Many types of software are available for converting audio files into MP3/WMA formats. Jensen recommends Nero, MusicMatch Jukebox or Roxio Easy CD Creator.
DV2007 DVD OPERATION Stop Disc Playback (2/STOP, ) Press the 2/STOP button (13) on the control panel (or the button on the remote control) to enter “RESUME STOP MODE.” While in “RESUME STOP MODE,” press the STOP button again to resume playback from the previous location. Once a DVD disc is inserted into the unit, the unit will automatically start playback from the beginning of the disc.
DV2007 Angle Table 2: DVD OSD (Console) Menu Press the ANGLE button on the remote control to display the current angle information in the top left corner of the screen. Press ANGLE again to switch to the next available camera angle on the disc. Repeat to access additional camera angles, if available.
DV2007 Set Up Menu (AS/PS/SET UP) DISPLAY Menu Press and hold the AS/PS/SET UP button (11) on the control panel (or the DVD OSD button on the remote control) to bring up the System Setup menu. Menu navigation methods are listed below: • • • When the cursor is located at the top of the on-screen display, press the left/right arrow keys to switch between different pages. Press the down arrow key to move to the setup page, and then press the up/down arrow keys to select the setting you want to change.
DV2007 • • If the connected receiver or amplifier is incapable of processing digital input with the sampling frequency of 96KHz, it will select 48KHz as the sampling frequency to compress the signal to a standard signal. After the 48KHz frequency is selected, the unit will automatically convert the 96KHz signal into the 48KHz signal, allowing your system to execute decoding on the signals.
DV2007 SPECIFICATIONS TROUBLESHOOTING DVD/CD Signal to Noise Ratio. . . . . . . . . . . . . . . . . . . . . . . . . . . . . . . . . . . . . . . . . . . . . . . . . . > 90dB Dynamic Range. . . . . . . . . . . . . . . . . . . . . . . . . . . . . . . . . . . . . . . . . . . . . . . . . . . . . . > 90dB Frequency Response . . . . . . . . . . . . . . . . . . . . . . . . . . . . . . . . . . . . 20Hz to 20KHz +/- 3dB Channel Separation . . . . . . . . . . . . . . . . . . . . . . . . . . .
DV2007 ASA Electronics Corporation www.asaelectronics.com © 2006 ASA Electronics Corporation v.