
User Manual


S
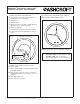
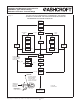
tep 1. With the dial off, install pointer at 9 o’clock “lightly,”
Figure 3.
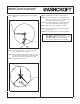
Step 2. Go to full scale pressure…rotate span block with
tool until pointer rests at 6 o’clock.
Step 3. Go to zero pressure (9 o’clock)…if pointer has not
moved away from start point, go to Step 4. If pointer
has moved, repeat Step 1 until span is correct.
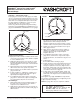
Step 4. Install dial with screws snug.
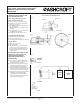
Dial Screws
Zero Box
Full Scale Mark
Mid Scale Mark
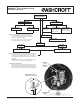
Figure 4 –
ASHCROFT
®
Previous Type 1009 Duralife
®
Calibration Procedure – Pressure Range
© 2010 Ashcroft Inc., 250 East Main Street, Stratford, CT 06614-5145, USA, Tel: 203-378-8281, Fax: 203-385-0499, www.ashcroft.com
All sales subject to standard terms and conditions of sale. I&M008-10077 9/01 AMR 05/10
S
tep 5. Install pointer centered in zero box, Figure 4.
Step 6. Go to full scale pressure…check that pointer is
within 1% of full scale mark. If not, remove pointer
and dial and return to step 1, Figure 4.
Step 7. Go to mid-scale pressure…rotate dial until mid-
scale mark is aligned with pointer, Figure 4.
Step 8. Tighten dials screws and stake on pointer.
Step 9. Check zero and full scale. Reassemble window,
gasket and ring.
Notes: See page 10 for any tools required to calibrate.
For model s pr oduced pr i or t o
Sept ember 2008 f or 2
1
⁄2˝ ver si on and
December 2008 f or 3
1
⁄2˝ ver si on.
Back of gauge will have a date code sticker.
Span Block
Decrease Increase
Start Point
Span
Figure 3 –
13