
Installation Guide


M) Screw all four corners in place through the pre-drilled holes in the frame.
N) Finish screwing the door to the rough opening. Apply a screw through all 11 pre-dilled frame
holes.
Step 5: Secure Hinge and Verify Operation
A) Apply the supplied #12 x 2 1/4" screws through each hinge securing the hinges and frame to
the rough opening. Additional shims are required behind each hinge. (Fig. 21)
B) Verify the operation of the door is correct. By doing so you will verify that the door swings
without binding on another member of the door and by remaining motionless throughout the
operation when left in static position.
C) If the operation of the door is not correct, first verify that the rough opening is plumb, level
and square. Second, verify that the door is shimmed and fastened properly as stated in these
instructions. Third, verify that the hinges are adjusted to the optimal position.
Step 6: Completing the Sill
Note: Disregard step A if No Nail Fin Installation is utilized.
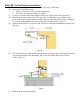
A) Important!
Below the nail fin at both bottom corners, apply a generous amount of silicone to seal the void
between the rough opening and the sill. If the gap is too large, insert backer material in the
void prior to sealing. (Fig. 22)
Fig. 22
Fig. 21