
Instructions / Assembly


Step 4a: Nail Fin Door Installation (Go to Step 4b for No Nail Fin Installation)
A) Removeallpackagingmaterial(blocks,pads,protectors,stretchwrap,nailn).
B) Inspectandverifythefollowing:
a. Thedoorunitisthecorrectsizeandconguration.
b. Theunitisfreefromanydamageordefects.
C) ContactyournearestAshworthdistributorifthereareanyproblemswithstepBabove.
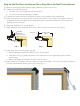
D) Installthesuppliednailntobothsidesandtopofthedoorasshownbelow.Thelocationofthenail
ndependsonthejambdepthoftheroughopening.Ensurethecorrectlocationischosenpriorto
applyingthenailn.(Fig.8)
E) Applythesuppliednailncornergaskets.
F) Applysealanttotheoutsidefaceofthenailn.Toolinsealanttoensurenovoids.(Fig.9)
G) Installuppernailncornergaskets.(Fig.10)
a. Removeprotectivepaperfrombackofnailncornergasket.
b. Placefoamnailingngasketovercornerwithinsidecornerofthegaskettightagainstoutside
framecorner.
c. Repeatapplicationatallcornerswherethenailnsmeet.
H) Applysealanttotheinteriorsideoftheheadandsidenailn.Applya1/4"continuousbeadofsiliconein
linewithandcompletelycoveringthenailnholes.(Fig.11)
FIG. 8
NAIL FIN
DRIP CAP
(MULLED UNITS)
FIG. 9
SILICONE
DESIRED JAMB
DEPTH
FIG. 10 FIG. 11