FLASH UPGRADE USER GUIDE IMPRESSION A10+/A9+/A8+
FLASH UPGRADE USER GUIDE IMPRESSION A10+/A9+/A8+ 1. TABLE OF CONTENTS 1 2 3 4 5 6 7 8 TABLE OF CONTENTS ...............................................................................................1 INTRODUCTION.........................................................................................................4 NEEDED MATERIAL...................................................................................................4 CONNECTING THE CABLES ..................................................
FLASH UPGRADE USER GUIDE IMPRESSION A10+/A9+/A8+ 2. INTRODUCTION This User Guide has been created to provide an easy to understand description on how to flash upgrade the SW on projectors that are prepared for this in the field. It describes the methodology and the correct software and hardware to use to perform flashing without any hassle. This User Guide does only apply to the following ASK products or their equivalents: Product : IMPRESSION A10+/A9+/A8+ 3.
FLASH UPGRADE USER GUIDE IMPRESSION A10+/A9+/A8+ 4. CONNECTING THE CABLES The Flash upgrade is done via the serial mouse port on the projector. This is the communication interface from the computer to the projector. All PC/notebooks are equipped with serial interface connectors, and may thus be used for this purpose. 1. Connect the computer to the projector using the regular VGA cable.
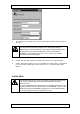
FLASH UPGRADE USER GUIDE 4. IMPRESSION A10+/A9+/A8+ The settings to use depend on the current communication settings on the projector in question. Check the ADVANCED /SERVICE / INFO dialog box in the projector menu to see the current communication settings to use. Change the settings in Hyperterminal so that it matches the communication settings in the projector. In the projector menu check the FEATURE / RS-232 and verify that CONTROL is activated with a green tick.
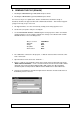
FLASH UPGRADE USER GUIDE IMPRESSION A10+/A9+/A8+ 6. SENDING THE FILE (SW&HW) 1. Flashing the SW EPROM: Type RRP;38400 and press Enter. 2. Flashing the HW EPROM: Type FPG;38400 and press Enter. It is not necessary to use capital letters, but the command must be written exactly as described, otherwise the projector will return “Undefined Command..”. This will also happen if you type incorrectly or try to erase text. 3. On “Hyperterminal”, close the connection by clicking on the “hang up phone icon”. 4.
FLASH UPGRADE USER GUIDE IMPRESSION A10+/A9+/A8+ 10. Press “Send”. The file will be transferred and the status and progress can be seen in the “Hyperterminal” status window. You will not receive visual feedback on the projected image during flash except the indicator stating time left and the progress of the EPROM flashing. 7. FINISHING THE FILE TRANSFER When the END prompt is visual in Hyperterminal the flashing is finished (approx. 2min.). 1.