Wireless CF Card User Manual
Information in this document is subject to change without notice. No part of this document may be reproduced or transmitted in any form or by any means, electronic or mechanical, for any purpose, without the express written permission of the seller. The seller provides this documentation without warranty, term, or condition of any kind. The seller may make improvements or changes in the product(s) and/or the program(s) described in this documentation at any time.
Federal Communication Commission Interference Statement This equipment has been tested and found to comply with the limits for a Class B digital device, pursuant to Part 15 of the FCC Rules. These limits are designed to provide reasonable protection against harmful interference in a residential installation. This equipment generates, uses and can radiate radio frequency energy and, if not installed and used in accordance with the instructions, may cause harmful interference to radio communications.
Wireless CF Card User Manual About This User Manual For brevity, throughout this manual the “Wireless CF Card” will be referred to as “the wireless adapter” or “the card” and following terms or abbreviations are used interchangeably: x x x x Access Point – AP Ad-Hoc – Peer-to-Peer Wireless LAN – WLAN Ethernet network – LAN – network This User Manual contains information on how to install and configure your Wireless CF Card.
Contents 1 Introduction .......................................................1 1.1 Overview ............................................................................1 1.2 System Requirements........................................................1 2 1.3 Unpacking ..........................................................................2 Wireless LAN Basics.........................................3 2.1 Local Area Network (LAN)..................................................3 2.2 Ad-Hoc Mode ....
1 Introduction 1.1 Overview This Wireless CompactFlash Card is designed for Windows CE–based Pocket PC to easily join an 802.11b wireless network with a range of up to 550 meters. With its CF Type II extended form factor, low power consumption, advanced power management, and rugged design (with antenna on the card), the card is ideally suited for integration into your Pocket PC.
Wireless CF Card User Manual 1.
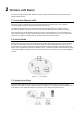
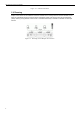
2 Wireless LAN Basics This section contains some Wireless LAN basics to help you better understand how the product can be used to create a wireless network. 2.1 Local Area Network (LAN) Simply put, a LAN is a network that exists in a relatively limited area. A network is two or more computers connected together sharing files and peripheral devices such as printers. The Wireless LAN Card allows you to interact with other computers without having to run cables normally associated with networks.
Wireless CF Card User Manual Figure 1-2 Infrastructure Mode 2.4 Roaming Multiple Access Points can be installed to extend the wireless service coverage area for seamless wireless access. Within an extended service area, all Access Points and wireless clients must have the same Service Set Identity (SSID). Roaming among different Access Points is controlled automatically to maintain the wireless connectivity at all times.
3 Installing the Driver and CF Card The software provided with the Wireless CF Card supports Windows CE 2.11, 2.12, 3.0 and 4.0. Most Windows CE devices use a host computer with Microsoft ActiveSynch software to synchronize data. Therefore you should synchronize your Pocket PC and a host computer before installing the driver and utility. The Wireless CF Card is to be inserted into your Pocket PC at the last stage. Follow the steps described in this chapter to complete the installation.
Wireless CF Card User Manual 3. When the Welcome screen pops up, click Next. 4. Click Yes to install the driver into the default directory. To change the directory, click No to locate desired directory and then click Yes to proceed. 5. If no additional steps are required on your Pocket PC as shown in the example figure below, just click OK. Otherwise you should follow the instructions on your Pocket PC before you click OK on the host PC. The screen on Pocket PC indicates the installation is complete.
3. Installing the Driver and CF Card 6. Click Finish to complete the installation. Step 3: Disconnect the Pocket PC from the host computer. Since the synchronization between the host computer and the Pocket PC has been completed, you may now disconnect your Pocket PC from the host computer. Step 4: Insert the Wireless CF Card. At the last stage, insert the Wireless CF Card into the Type II CompactFlash slot in your Pocket PC with the printed label facing up.
4 Using Client Manger Your Wireless CF Card program comes with a utility, Client Manager, which allows you to configure the device. This utility also includes a number of tools to display current statistics and status information pertaining to your Wireless CF Card and to perform link test. See the appropriate subsection as required. 4.1 Accessing the Client Manager You can access the Client Manager by any of the following methods: x Tapping the wireless icon on the system tray.
Wireless CF Card User Manual When the main screen of the Client Manager pops up, it displays the following information: 10 x x x Network: The current active configuration profile. x x Channel: The channel used by the current wireless network. Connection: The communications quality of your connection. AP: The MAC address of the AP your Wireless CF Card has associated with. This information is blank if your card is working in Peer-to-Peer Group mode.
4. Using Client Manger 4.2 Configuration for Peer-to-Peer Group To connect to other wireless clients to form a Peer-to-Peer group, please take out the steps below: 1. Enter the main screen of the Client Manager and tap on the Edit Wireless Profiles link at the bottom. 2. Tap on the Add button to add a new profile or select one existing profile from the Select Profile drop-down list and then tap on Edit to modify the settings.
Wireless CF Card User Manual 3. Enter these fields and then tap Next. Profile Name: Enter a unique name to identify this configuration. A maximum of 32 characters is allowed. Network Type: Select Peer-to-Peer Group. 4. In the Network Name field, enter a network name with a maximum limit of 32 characters. It is the name of the wireless group you want to participate in. The network name for all stations in a single Peer-to-Peer Group must be the same.
4. Using Client Manger After completing all the required settings, tap on the Finish button. 6. You will return to the first screen. Make sure the profile appearing in the Select Profile field is the one you want to apply. Then tap on OK on the upper right corner. 7. If you are prompted to remove and re-insert your Wireless CF Card to obtain a new IP address, just do as the request and then tap on OK.
Wireless CF Card User Manual At this stage, you can see that current connection status on the main screen of the wireless utility. When you return to your desktop, the wireless icon always appears as the figure below to indicate a Peer-to-Peer Grope mode.
4. Using Client Manger 4.3 Configuration for Access Point Connection To connect to a wired/wireless network through an Access Point, please take out the steps below: 1. Enter the main screen of the Client Manager and tap on the Edit Wireless Profiles link at the bottom. 2. Tap on the Add button to add a new profile or select one existing profile from the Select Profile drop-down list and then tap on Edit to modify the settings.
Wireless CF Card User Manual 3. Enter these fields and then tap Next. Profile Name: Enter a unique name to identify this configuration. A maximum of 32 characters is allowed. Network Type: Select Access Point. 4. In the Network Name field, enter a network name with a maximum limit of 32 characters. It is the name of the Infrastructure network you want to participate in. The network name for all stations in a single Infrastructure network must be the same.
4. Using Client Manger The Scan feature will not be able to detect the “Closed” Access Point which are set to deny access of wireless clients with incorrect SSID or with the SSID of “any”. To connect to such an Access Point, you will need to enter all the settings that apply to the Access Point. 5. If your are going to set security, check the Enable Data Security checkbox and choose to use Alphanumeric characters or Hexadecimal digits format to enter your WEP key.
Wireless CF Card User Manual 18
4. Using Client Manger At this stage, you can see that current connection status on the main screen of the wireless utility.
Wireless CF Card User Manual 4.4 Site Monitor You can use the Site Monitor feature to display the communications quality of your Pocket PC with multiple wireless devices in its vicinity. The Site Monitor allows you to conduct a site survey to: x x x Determine the overall wireless coverage of your network. Optimize placement of the Access Points, to provide seamless connectivity to mobile stations. Roam throughout the wireless network environment with your Wireless CF Card.
4. Using Client Manger 2. This will open the Site Monitor screen to display the scan results. To view detailed information of a certain network, tap on the network you want to monitor and then tap on the Open button. Note: The Site Monitor list will only display “open” Access Points. 3. Then you will be provided with the following information for the chosen network: AP MAC Address: The MAC address for the AP.
Wireless CF Card User Manual To start the Link Test function: 22 1. Enter the main screen of the Client Manager. Tap on the Advanced link at the bottom and then the Link Test option. 2. From the Select Partner drop-down list, select a test partner. The link test results will be then displayed.
4. Using Client Manger 4.6 Network Troubleshooting If your Wireless CF Card cannot connect to a wireless network, you can use the troubleshooting function to identify possible reasons. To use the troubleshooting function: Enter the main screen of the Client Manager. Tap on the Advanced link at the bottom and then the Network Troubleshooting option. This will open the main screen of Network Troubleshooting. The Network Troubleshooting function allows you to perform a couple of tasks.
Wireless CF Card User Manual 4.6.1 Viewing Current IP Address In the Network Troubleshooting screen, you can see the IP address assigned to your device. It could be a fixed IP address you manually specified or a dynamic one assigned by the DHCP server on the network. Tapping the Advanced button allows you to view detailed IP information.
4. Using Client Manger 4.6.2 Renewing IP Address If your Wireless CF Card is set to use a dynamic IP address assigned by the DHCP server on the network, you can tap on the Repair button to update the IP assignment. Note that to request a new IP address, the prerequisite is your Wireless CF Card has successfully connected to an Infrastructure network where a DHPC server is available. Otherwise your IP update process will fail. 4.6.
Wireless CF Card User Manual 26
4. Using Client Manger 4.7 Tools This section describes the Tools menu of the Client Manager. x Enable/Disable Radio Allows you to enable or disable the radio. x Suspend While Connected If this option is checked, when the inserted Wireless CF Card is not in use, your Pocket PC will enter suspend mode and the Wireless CF Card will be powered off to prevent draining your battery. Note: If you have changed the suspend options, you will be prompted to reset your device to enable the new settings.
Wireless CF Card User Manual x Version Info Allows you to verify the version of individual software components. Note: The displayed information is subject to release version. x Edit Wireless Profiles Allows you to edit the wireless profiles. Selecting a profile from the drop-down menu and then tapping Edit will launch a step-by-step editing process. You can end the editing at any point by tapping on the OK at the upper right corner.
4. Using Client Manger 4.8 Checking Connection Status You can check your wireless link quality via the Client Manager icon on the system tray. The communications quality is expressed in different color coding and indicators. The corresponding link quality is given in the table below. Note: The indicator is always blank if your Wireless CF Card is in Peer-to-Peer Group mode.
5 Setting Up TCP/IP This chapter contains instructions for configuring the TCP/IP protocol of the Wireless CF Card. The IP address policy depends on your network. You should configure your TCP/IP protocol as instructed by your network administrator. To configure the TCP/IP settings in Window CE, carry out the steps below: 1. Tapping Start > Settings > Connections > Network Adapters. 2. In the Adapters installed list, tap on your Wireless CF Card, e.g.
Wireless CF Card User Manual 4. 32 After finishing the settings, tap on the OK on the upper right corner. If the Wireless CF Card is inserted to your Pocket PC, remove and re-insert it to activate the new settings.
6 Troubleshooting Radio interference. You may be able to eliminate any interference by trying the following: x x x x Reseat the Wireless CF Card. Increase the distance between the Wireless CF Card and the device causing the radio interference. Keep the device with the Wireless CF Card away from the microwave oven and large metal objects. Consult the dealer or an experienced radio technician for help. No radio link.
Appendix A: Glossary 10BaseT An IEEE standard (802.3) for operating 10 Mbps Ethernet networks (LANs) with twisted pair cabling and a wiring hub. Access Point An internetworking device that seamlessly connects wired and wireless networks. Access Points combined with a distributed system support the creation of multiple radio cells that enable roaming throughout a facility. Ad Hoc A network composed solely of Wireless CF Cards within mutual communication range of each other (no Access Point connected).
Wireless CF Card User Manual Internet Protocol. The standard protocol within TCP/IP that defines the basic unit of information passed across an Internet connection by breaking down data messages into packets, routing and transporting the packets over network connections, then reassembling the packets at their destination. IP corresponds to the network layer in the ISO/OSI model.
Appendix B: Specifications Software Standards Compliance x x x IEEE 802.11 / 802.11b Standard IEEE 802.3 Standard IEEE 802.1d MAC Bridges Standard Wireless LAN Features x x x x x Fully compliant with IEEE 802.11 / IEEE 802.11b DSSS devices Provide 11 / 5.5 / 2 / 1 Mbps wireless connectivity to the wireless clients Auto fallback data rate under noisy environment IEEE 802.
Wireless CF Card User Manual x x 40-bit key plus 24-bit initialization vector (as defined by IEEE 802.
Appendix B: Specifications Hardware Interface x One 2.4GHz RF interface for Wireless LAN connection Radio Characteristics x x x Frequency Band: 2.400 ~ 2.4835 GHz ISM Band (subject to local regulations) Spreading: Direct Sequence Spread Spectrum (11-chip Barker sequence) Modulation CCK: 11Mbps and 5.
Wireless CF Card User Manual Temperature x x x Operating: 0°C to 55°C Storage: -20°C to 75°C Relative Humidity: 5% to 80% (non-condensing) Physical x 40 Dimensions: 57.04 mm (L) u 42.