Dear Customer, Thank you for choosing this quality product from ASKO. We hope it will meet your expectations and fulfil your needs for many years to come. Scandinavian design combines clean lines, everyday functionality and high quality. These are key characteristics of all our products and the reason they are greatly appreciated throughout the world. To get the most out of your new machine, we recommend that you read the operating instructions before using the machine.
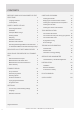
CONTENTS BEFORE USING YOUR MACHINE FOR THE FIRST TIME 3 CARE AND CLEANING Cleaning the lint filter 15 Language selection 3 Emptying the condensed water container 16 Laundry labels 3 Cleaning the evaporator filter and evaporator 16 4 Cleaning the auto filter 17 Cleaning the outside of the machine 17 SAFETY INSTRUCTIONS Grounding instructions 5 Installation 6 Transport/Winter storage 6 The machine will not start Packing material 6 The machine loses all power during a programme 18 Rec
BEFORE USING YOUR MACHINE FOR THE FIRST TIME LANGUAGE SELECTION You will be prompted to select the display language when you have connected your machine and start it for the first time. Do as follows: 1. Turn the programme selector to choose from: US English, English, Svenska, Dansk, Norsk, Suomi, Français, Deutsch, Italiano, Espanol, Русский, Nederlands. 2. Press Stop to save the setting. LAUNDRY LABELS Certain materials are not suitable for tumbledrying.
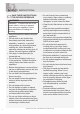
SAFETY INSTRUCTIONS SAVE THESE INSTRUCTIONS FOR FUTURE REFERENCE WARNING! WARNING - To reduce the risk of fire, electric shock, or injury to persons when using your appliance, follow basic precautions, including the following: • Read all instructions before using the appliance.
SAFETY INSTRUCTIONS CAUTION! HOT SURFACE! During the program, the back of the dryer will get very hot. Let the machine cool completely before touching the back. WARNING! This appliance must be properly grounded. GROUNDING INSTRUCTIONS A) Grounding instructions for a grounded, cord-connected appliance In the event of malfunction or breakdown, grounding will reduce the risk of electric shock by providing a path of least resistance for electric current.
SAFETY INSTRUCTIONS INSTALLATION See the separate installation instructions. WARNING! Do not start the machine until it has been in position for 24 hours. If for some reason the tumble dryer needs to be laid down for transport or service, it must be laid on its left side viewed from the front. TRANSPORT/WINTER STORAGE If you need to move your machine or store it over the winter in unheated premises, make sure that you drain the condensed water container beforehand.
SAFETY INSTRUCTIONS KIDSAFE™ CHILD-SAFE WARNING! DO NOT ALLOW CHILDREN TO PLAY WITH THE TUMBLE DRYER. • If the door is opened when a programme is running the garments may be very hot, with a risk of burn injuries. • The tumble dryer does not start automatically when the door is closed (if a child pulls the door shut from the inside, for example). KIDSAFE™ CHILD-SAFE START By activating the child-safe start function you can prevent children from starting the tumble dryer or changing the current programme.
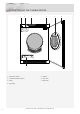
DESCRIPTION OF THE TUMBLE DRYER 1 2 3 4 7 1. Main power switch 5. Lint filter 2. Condensed water container 6. Outer door 3. Panel 7. Heat pump 4. Type plate Customer Care Center, 1-800-898-1879, www.askousa.
ADVICE AND TIPS BEFORE YOU TUMBLE-DRY Here are some tips that may help you before you begin tumble-drying. HAVE THE CLOTHES BEEN SPUN? Items to be tumble-dried should be spun at 1000 rpm or faster. Higher spin speeds save energy and reduce drying time. MATERIALS THAT CAN BE TUMBLEDRIED This symbol means that the material is suitable for tumble- drying. Fabrics best suited to tumble-drying are cotton fabrics, terry cloth and synthetic fibres.
TUMBLE DRYING Below are step-by-step instructions to help you achieve the best possible tumble-drying results. Press the main power switch until the display lights. Open the door, load the items and then close the door. NOTE! SORT YOUR FABRICS You will achieve the most uniform drying results if the items are made of the same type of material. Do up zips and buttons, fasten belts, sort the items and adjust the load and temperature. Make sure that objects e.g.
TUMBLE DRYING NOTE! When using the Timed dry program with a program time that is too long, the garments can become “overdry”. This can cause items to shrink or crease and feel rough to the touch. Synthetic materials can also become charged with static electricity. with the Revitalise programme. If the Audible Volume option has also been activated, an audible signal will sound each time the drum rotates as a reminder that the drying programme has finished.
TUMBLE DRYING DRYING PROGRAMME FINISHED The text Done appears on the display when the programme is finished. If the Anti crease option has been selected, the drum will rotate for three seconds per minute for two hours after the programme is finished. The compressor’s cooling fan continues to run after the program fi nishes, but stops automatically or when any button/knob is activated.
TUMBLE DRYING PROGRAMME CHART Here we present the energy and time consumption of a few different programmes. The table shows the effect of using different spin speeds when washing the load. Consumption can vary depending on room temperature, humidity, load, variations in the power supply and selected options. For the consumption values given below, the requirements are as follows: Temperature of intake air: 73 °F (23°C) Moisture content of intake air: 55% Drying temperature: Normal Program time approx.
SETTINGS YOU CAN CARRY OUT THE FOLLOWING SETTINGS • Language • KidSafe™ Child-safe You will be prompted to select the display language when you have connected your machine and start it for the first time. LANGUAGE Do as follows: 1. Turn off the machine using the main power switch. 2. Press and hold the Start button and then press the main power switch. 3.
CARE AND CLEANING CLEANING THE LINT FILTER The lint filter must be cleaned after each load. 1. Lift the filter from the holder in the door. 4. Use your hand or a soft cloth to remove the lint from all sides of the filter. If necessary, use a damp sponge and a small amount of washing-up liquid to remove any deposits. Dry the filter thoroughly with a towel. NOTE! Clean the surface of the lint (fluf) filter after each drying program. 2. Open the lint filter.
CARE AND CLEANING EMPTYING THE CONDENSED WATER CONTAINER CLEANING THE EVAPORATOR FILTER AND EVAPORATOR Clean the evaporator and the evaporator filter at the intervals shown on the machine’s display or more often. 1. Turn off the Main power switch and open the outer door. 2. Remove the plinth. 3. Open the heat pump door. If you have not connected the machine to a separate drain the condensed water container must be emptied after each load.
CARE AND CLEANING 5. Remove the sponge filter (B) from the filter support (A). Clean it with a vacuum cleaner and wash it under running water. CLEANING THE AUTO FILTER Clean the filter at the intervals shown on the machine’s display or more often 1. Pull the condensed water container out and up. A 2. Unscrew and remove the auto filter. B Sealing RECOMMENDATION! Wash the sponge filter in the washing machine after 30 drying cycles (use the rinse or quick wash program). 6.
TROUBLESHOOTING NOTE! ERROR MESSAGES When starting the tumble dryer for the first time or after a long period without use, you may notice a slight thumping noise. This noise is completely normal and will disappear after a few loads. • If Over Flow appears on the display, the condensed water container is full or the evaporator filter is blocked. Empty the container, clean the filter and restart the machine. See the Care and cleaning chapter.
TECHNICAL INFORMATION TECHNICAL DATA Height: 33 1/2” (850 mm) Width: 23 1/2” (595 mm) Depth: 29 1/3” (745 mm) Weight (net): 134,5 lb (61 kg) Cylinder volume: 38,3 gal (145 l) Max. drying capacity: 24 lb (11 kg) Speed: 50-55 rpm Rated power: See type plate. Drum material: Stainless steel Outer casing material: Powder-coated and hot-galvanized sheet steel or stainless steel Setup: Stacking or freestanding STANDARD TESTS Europe: Drying performance: EN 611 21 (392/2012).
TECHNICAL INFORMATION INFORMATION ON ENERGY LABELLING Information sheet, in compliance with Commission Delegated Regulation (EU) No. 392/2012 ASKO Model designation T884HP XL Max.
SERVICE AND GUARANTEE LIMITED WARRANTY – RESIDENTIAL APPLIANCES ITEMS EXCLUDED FROM WARRANTY ASKO Distribution North America, LLC. (“ASKO”) warrants to the original purchaser (the “ASKO Customer”) of the ASKO product (the “ASKO Product”), who purchased the ASKO Product from a distributor, dealer, manufacturer’s representative or other seller who has been authorized by ASKO, that this ASKO Product is free of defects in materials and/or workmanship, subject to the terms and conditions set forth herein.
SERVICE AND GUARANTEE DISCLAIMER YOUR SOLE AND EXCLUSIVE REMEDY UNDER THIS LIMITED WARRANTY SHALL BE PRODUCT REPAIR AS PROVIDED HEREIN. EXPRESSLY DISCLAIMED ARE ALL OTHER EXPRESS AND IMPLIED WARRANTIES, INCLUDING ANY IMPLIED WARRANTIES OF MERCHANTABILITY AND FITNESS FOR A PARTICULAR PURPOSE. Some jurisdictions do not allow exclusion or limitations regarding warranty rights. This Limited Warranty gives you specific legal rights and you may have other rights that vary from jurisdiction to jurisdiction.
INSTALLATION INSTALLATION CONNECTION ON DELIVERY See the separate installation instructions included in the set of documents. • 208-240 V, 1-phase, 15 A • 60 Hz • Use a type A residual-current device. ELECTRICAL INSTALLATION Connect the machine by plugging it into an earthed wall socket. The electrical wall socket must be placed outside of the installation area to be easily accessible. NOTE! Do not connect the machine to the mains electricity supply by an extension lead.
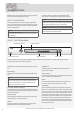
DOOR HANGING 1 6 2 5 1. Hinge pins (top and bottom) 4. Locking hook 2. Cover plate 5. Hinges (left + right side) 3. Plastic plugs (on the upper and lower edges) 6. Plinth Customer Care Center, 1-800-898-1879, www.askousa.
DOOR HANGING You can choose whether the door is hung on the right or the left. 6. Loosen and remove the catch (lift up and pull out) and the cover plate on the door and the machine. Switch the catch and the cover plate. Follow these instructions: 1. Remove the plinth. 2. Remove the hinge, two screws 1 2 7. Refit the door by loosening the hinge screws slightly, affixing the door and closing it. Retighten the hinges. Replace the plinth. 3. Lift the door up and remove it. Support the door at the same time.
NOTES Customer Care Center, 1-800-898-1879, www.askousa.
NOTES Customer Care Center, 1-800-898-1879, www.askousa.
QUICK GUIDE TURN ON THE MAIN POWER SWITCH Load the garments and close the door. 1. SELECT A PROGRAMME AND ANY OPTIONS Turn the programme selector to the required programme. 2. PRESS THE START BUTTON 3. DRYING PROGRAMME FINISHED The text End appears on the display when the programme is finished. 4. Clean the lint filter after each load. Turn off the main power switch. Close the door. We reserve the right to make changes. www.askousa.com TD80.