Dear Customer, Thank you for choosing this quality product from ASKO. We hope it will meet your expectations and fulfill your needs for many years to come. Scandinavian design combines clean lines, everyday functionality, and high quality. These are key characteristics of all our products and the reason they are greatly appreciated throughout the world. To get the most out of your new dishwasher, we recommend that you read the operating instructions before using it.
Contents Front panel Important safety instructions Before washing for the first time Loading the dishwasher Using the dishwasher Settings 2 3 4 5 8 11 Care and maintenance instructions Troubleshooting Technical information Service Program chart Notes 14 16 19 20 21 22 Front panel The panel is fitted with touch buttons with audible feedback (see the chapter Settings).
Important safety instructions SAVE THESE INSTRUCTIONS FOR FUTURE REFERENCE WARNING! This manual does not cover all possible conditions and situations that may occur. Common sense and caution should always be used when installing, operating, and maintaining any appliance. • Read all instructions before using the dishwasher. • Dishwashers must be electrically grounded. Read the Installation Instructions for details. • Use the dishwasher only for its intended purpose.
Before washing for the first time Water supply The machine can be connected to either a hot (max. 160 °F, 70 °C) or cold water supply. We recommend a cold water supply. The water pressure should be 4.2-140 psi. See also the section Economic dishwashing in the chapter Loading the dishwasher. Program key Some dishwashers include program keys in different languages. Attach the program key in the appropriate language to the top of the door.
Loading the dishwasher Setting the rinse aid dosage Economic dishwashing The section Settings describes how to set the rinse aid dosage. Run programs only with a full load Wait until the dishwasher is fully loaded before running a program, this way you save energy. Use the Rinse & Hold program to rinse the dishes if there are any unpleasant odors while you wait for the dishwasher to become fully loaded.
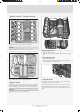
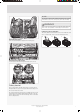
Typical load for 10 place settings Upper basket with 10 place settings AHAM DW-1 NOTE! Ensure the upper basket is set to its lowest position. Raising the upper basket 1 Pull out the upper basket. 2 Grab the sides of the upper basket with both hands and lift it up. Lowering the upper basket 1 Pull out the upper basket. 2 While holding the basket, pull out the two locking handles on either side to lower the upper basket.
NOTE! Do not place cutlery made of different materials, such as silver and stainless steel, in the same place (risk of discoloration). WARNING! Knives and other pointed items must be placed with the points down in the cutlery basket or horizontally in other baskets. Fold-down section for small items The cutlery basket has a fold-down section in the middle for small items, or small shafts, such as electric whisk attachments.
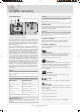
Using the dishwasher Add detergent NOTE! Use only dishwasher detergent! Liquid hand-washing detergent must not be used as the foam that forms prevents the dishwasher from operating effectively. Dishwasher tablets Halve the tablet if it is difficult to close the dispenser lid. There is a risk that the detergent will not be released properly if the lid is tight and cannot open correctly. NOTE! Dishwasher tablets are not recommended for short programs (less than 75 minutes).
Press and hold Start/Stop for five seconds if you want to cancel the Delayed start option. Rinse & Hold Use to rinse dishes while you wait for the dishwasher to become fully loaded. Selecting Options To select an option, press one of the option buttons. The field next to the button lights when the option is activated. The available options depend on the selected program. Once you have started the program, the options you selected are saved for the next time you use the same program.
Once the program has finished Once the program has finished, "End" appears on the display. A buzzer also sounds at the end of the program. See the section Settings, which describes how to change this function. Once the dishwasher has finished, it uses only standby power. Turn off the dishwasher using the main power switch if you want to completely cut the power. Turn off the water supply valve after each use. 10 Customer Care Center 1-800-898-1879 www.askona.
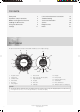
Settings Do as follows to open the settings menu: + 1. Turn off the dishwasher using the main power switch. Wait about five seconds. 2. Then press the main power switch again. Wait until the numbers appear in the right-hand display before continuing to the next step. 3. Within five seconds, press and hold the Program selector (wait for the audible signal confirming the button press) and then immediately press the Long dry button without releasing the Program selector. 4.
Button press Options (Off) Settings Description Operation volume This sound is used to confirm each button press. (Low) (High) Press Start/Stop to save the setting value and continue to the next setting. (Low) LCD contrast For adjusting the contrast of the display. (High) Press Start/Stop to save the setting value and continue to the next setting. (Off) Rinse aid Rinse aid dosage setting. (Low dosage) (High dosage) Press Start/Stop to save the setting value and continue to the next setting.
Button press Options Settings Description Press Start/Stop to save the setting value and continue to the next setting. (Soft water) Water hardness (Hard water) Adjusting the water softener. Read off the appropriate setting from the water hardness table below. °dH °fH 0-5 0-9 6-8 10-14 9-11 15-20 12-14 21-25 15-19 26-34 20-24 35-43 25-29 44-52 30-39 53-70 40-49 71-88 50+ 89+ Press Start/Stop to exit the settings menu. Customer Care Center 1-800-898-1879 www.askona.
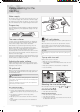
Care and maintenance instructions Coarse filter NOTE! The coarse filter traps larger food particles, which cannot get past the drain pump. Empty the coarse filter as necessary. The dishwasher must not be used without the filters in place! 1 Lift the coarse filter by the handle. Dishwashing results may be affected if the coarse filter is incorrectly fitted. 2 Empty the coarse filter. Remember to replace it! Drain pump The pump can be accessed from inside the dishwasher.
Door When cleaning the edge around the door, use only a slightly damp cloth (with a little cleaner if necessary). WARNING! Do not use a spray bottle or the like around the door lock. This is to ensure that water does not penetrate the door catch and come into contact with the electrical components. Upper spray arm 1 Pull out the basket. 2 Unscrew the spray arm bearings as illustrated to remove the spray arm from the upper basket.
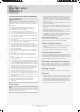
Troubleshooting Display Type of fault Action Overfilling Call the Customer Care Center. Water outlet fault See "Water remains in the dishwasher above the filters" in the table below. Water inlet fault Check that the water supply valve is on. Inlet valve leakage Turn off the water supply valve and call the Customer Care Center. Turn off the machine with the main power switch and then turn it on again to clear the error message from the display.
Problem Possible causes Action Spots on stainless steel or silver. Some types of food, such as mustard, may- Rinse off these types of food if not starting onnaise, lemon, vinegar, salt, and dressings, the dishwasher immediately. Or why not run can mark stainless steel if left for too long. the Rinse & Hold program? All stainless steel can cause spots on silver Silver and stainless steel items should not if they come into contact during dishwashing. come into contact during dishwashing.
Problem Possible causes Action The dishes are not dry enough. Drying power too low. Activate the Long dry option. The dishwasher is not fully loaded. Fully load the dishwasher. Rinse aid needs topping up or dosage is set Top up with rinse add or increase the rinse too low. aid dosage. See the sections Before washing for the first time and Settings. Open the door a little once the program has finished. Cannot close door. The baskets are not correctly positioned.
Technical information Technical data Height: 32-1/4'' - 34'' (819-864 mm) Width: 24" (610 mm) Depth: 22-7/8" (581 mm) Weight: 115 lb (52 kg) 1) Water pressure: 4.2–140 psi Electrical connection: See serial number tag and rating plate. Rated power: 1) See serial number tag and rating plate. Weight can vary due to different specifications. Customer Care Center 1-800-898-1879 www.askona.
Service LIMITED WARRANTY – RESIDENTIAL APPLIANCES ASKO Distribution North America, LLC. (hereinafter “ASKO”) warrants the original purchaser (the “ASKO Customer”) of the ASKO product (the “ASKO Product”), who purchased the appliance from a distributor, dealer, manufactures representative or other seller who has been authorized by ASKO (“Authorized ASKO Dealer”), that this ASKO Product is free of defects in material and workmanship, subject to the terms and conditions set forth herein.
1 2 1 Normal wash 4) - Normal wash Eco wash 0:04 0.01 0.9 2.9-5.0 3.2 4.7 3.1 5.2 3.5 The energy label performance figures are based on this program. 0.01 0.4-1.2 0.5 0.9 0.5 0.7 0.8 Connection to hot water, approx. 120 °F (50 °C). 0:06 0:30-3:00 2:20 2:10 2:10 3:10 1:40 4) - 0.6-1.6 0.9 1.6 1.0 1.5 1.4 Connection to cold water, approx. 50 °F (10 °C). 1 0:30-3:00 2:30 2:35 2:30 3:40 2:00 3) - max.
Notes 22 Customer Care Center 1-800-898-1879 www.askona.
Notes Customer Care Center 1-800-898-1879 www.askona.
Quick guide Load the baskets (see page 5) 1. Do not rinse dishes under running water before loading them in the dishwasher. Simply scrape off large food particles before loading the dishwasher. Check that the spray arms can rotate freely 2. Check also that the water supply valve is on. Add detergent (see page 8) 3. The detergent compartment has one smaller compartment for the prewash and one for the main wash. Press the main power switch and close the door. 4.