
Use & Care Guide


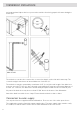
Table Of Contents
- Front page
- Contents
- Your dishwasher
- Important safety instructions
- Before washing for the first time
- Greener dishwashing
- Loading the dishwasher
- Using the dishwasher
- Add detergent
- The main power switch
- Select program
- Select program mode
- Select option
- Starting the dishwasher
- Time remaining
- Status light™
- Stopping or changing a program
- If you want to load more dishes
- If the dishwasher is turned off due to a power failure
- Once the program has finished
- How to get the best drying results
- Unloading the dishwasher
- Program chart
- Settings
- Care and maintenance instructions
- Troubleshooting
- Installation instructions
- Service
- Technical information

4. Adjust the front feet by turning them clockwise to raise and counterclockwise to lower the dish-
washer.
1''
5/8''
5. Verify there is an air gap of at least 1/8'' between the underside of the countertop and the top
edge of the dishwasher.
6. Slide the dishwasher into place.
• Pull the supply and drainage hoses when sliding the dishwasher into place.
• Check that the hoses have no kinks or sharp bends, and check that there is nothing that
can damage the hoses.
7. Make any final adjustments to the feet (the dishwasher may lean no more than 1/4'') and tighten
the lock nuts on the front feet.
Drain connection
This dishwasher is suitable for installing in a raised recess (to attain an ergonomic working height).
This means that the dishwasher can be placed so that the drain hose runs to a lower level than the
bottom of the dishwasher, such as by routing it directly to a floor drain. The dishwasher is fitted with
39
Installation instructions