
Use & Care Guide


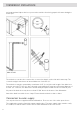
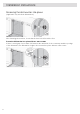
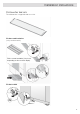


Table Of Contents
- Front page
- Contents
- Your dishwasher
- Important safety instructions
- Before washing for the first time
- Greener dishwashing
- Loading the dishwasher
- Using the dishwasher
- Add detergent
- The main power switch
- Select program
- Select program mode
- Select option
- Starting the dishwasher
- Time remaining
- Status light™
- Stopping or changing a program
- If you want to load more dishes
- If the dishwasher is turned off due to a power failure
- Once the program has finished
- How to get the best drying results
- Unloading the dishwasher
- Program chart
- Settings
- Care and maintenance instructions
- Troubleshooting
- Installation instructions
- Service
- Technical information

Once the installation is complete, turn on the water supply valve and allow the pressure to settle for
a while. Check that all connections are watertight.
Water supply
The machine can be connected to either a cold or a hot (max. 160 °F (70 °C)) water supply. The
water pressure should be 4.2-140 psi.
Connection to cold water supply
Connect the dishwasher to the cold water supply if the building is heated using oil, electricity, or
gas.
Connection to hot water supply
Connect the dishwasher to the hot water supply (max. 160 °F (70 °C)) if the building is heated using
an energy-efficient means such as district heating, solar power, or geothermal power. Choosing a
hot water connection cuts dishwashing times and reduces the dishwasher's energy consumption.
NOTE!
Do not exceed the permitted water supply temperature. Certain materials used in some cookware
cannot withstand strong heat. See Fragile dishes in the chapter Loading the dishwasher.
Electrical connection
Information about the electrical connection can be found on the serial number plate. This specification
must match the electricity supply.
The power outlet for the appliance shall be installed in a cabinet or on a wall adjacent to the under-
counter space in which the appliance is to be installed. Do not use an extension cord for this appli-
ance.
The access hole for the electrical supplie must be round and smooth and no bigger than 1 1/2'' in
diameter. If the partition is metal, it needs to be covered with an edge protector.
Use caution when the appliance is installed or removed to reduce the likelihood of damage to the
power cord.
Grounding instructions
This appliance must be grounded. In the event of a malfunction or breakdown, grounding will reduce
the risk of electric shock by providing a path of least resistance for electric current. This appliance
is equipped with a power cord fitted with an equipment grounding conductor and a grounding plug.
The plug must be plugged into an appropriate power outlet that is installed and grounded in accor-
dance with all local codes and ordinances.
WARNING!
Improper connection of the equipment grounding conductor can result in a risk of electric shock.
Check with a qualified electrician or service representative if you are in doubt as to whether the
appliance is properly grounded. Do not modify the plug provided with the appliance. If it does
not fit the power outlet, have an appropriate power outlet installed by a qualified electrician.
41
Installation instructions