OPERATING INSTRUCTIONS Read the instructions before using the machine.
Dear ASKO customer, Congratulations on making an excellent choice, and welcome to the ASKO family, a global family with its roots in Sweden. We at ASKO thank you for your trust and hope that you will enjoy using your new drying cabinet. A good drying cabinet should be well designed, dry clothes well, have a low environmental impact, be user-friendly, save time and energy, have a long service life and be reliable. ASKO offers you all these features.
CONTENTS Important safety information 4 Setting of drying programmes 20 For a healthy environment 5 Programming mode 20 Parameter list 21 Adjustment 22 Procedure 23 Restoring to factory setting 23 Cleaning 24 Servicing 24 Replacement parts 24 Packaging materials 5 Management of end-of-life drying cabinet 5 Components 6 Control panel 7 Language setting 8 Installation 9 Unpacking 9 Placement 10 Evacuation / air supply 11 Connection to evacuation 11 Electrical connecti
IMPORTANT SAFETY INFORMATION This drying cabinet complies with applicable safety requirements. Incorrect use may, however, lead to personal injury and damage to objects. This advice on safe operation has been compiled so that you can avoid incorrect use and unnecessary risks of accidents and should be read before the drying cabinet is installed and used. CAUTION: This equipment is only intended to be used to dry textiles washed in water. p The drying cabinet must be installed and kept indoors.
FOR A HEALTHY ENVIRONMENT PACKAGING MATERIALS The packaging protecting the drying cabinet against damage in transit has been chosen with concern for the environment in mind and is therefore recyclable. Returning packaging to the material cycle means reduced consumption of raw materials and lower levels of waste. MANAGEMENT OF END-OF-LIFE DRYING CABINET When the drying cabinet has reached the end of its life it must be taken to a recycling station for disposal.
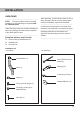
COMPONENTS Power cord Air intake Damp air outlet Heater and fan components assembled in a removable fan unit behind the cover panel Door hangers Three sliding sets of hangers Door hangers Door, right-hung or left-hung Adjustable feet (4) Control panel 6
CONTROL PANEL The drying cabinet is equipped with four automatic programmes and four manual programmes for different types of garments. These programmes are set through programming menus using the buttons on the menu panel. Several languages can be handled. BUTTONS ON/OFF START STOP OK starts and stops the programme. confirms selection ARROW UP, increase the value or step in one direction through the programmes. ARROW DOWN, reduce the value or step in one direction through the programmes.
LANGUAGE SETTING The following languages can be handled: english, swedish, norwegian, danish, finnish, russian, french and german. SETTING 1 Make sure that the drying cabinet’s main ON/OFF switch is off. The display is unlit. 2 Hold in the ARROW UP and ARROW DOWN buttons and press the the main ON/ OFF switch to the ”ON” position. The display lights up and ”P105”, the parameter for language setting, flashes on the top row.
INSTALLATION UNPACKING ______________________________________ NOTE: The drying cabinet must be handled carefully if it is only standing on its pallet. RISK OF TIPPING OVER. ______________________________________ Check that the product has not been damaged in transit. Any damage in transit must be reported to the dealer within 7 days.
PLACEMENT ______________________________________ The drying cabinet is only intended for use indoors in a dry area. ______________________________________ Do not place the drying cabinet in an area where high-pressure water is used for cleaning. ______________________________________ LEVELLING The drying cabinet must stand level on a flat surface, resting on all four feet. Use the Allen key supplied and adjust the feet from inside the cabinet. Press the four covering plugs firmly into the holes.
EVACUATION / AIR SUPPLY When the cabinet is on, 45 m³ moist air per hour is evacuated. It must therefore be ensured that air can enter the room to replace the moist air that is vented out. CONNECTION TO EVACUATION The drying cabinet is connected to an exhaust ventilation unit in accordance with standard. The drying cabinet can be connected to the evacuation duct in two ways, either with a draft stabilizer or permanently fitted to a mechanical exhaust ventilation unit.
WITH DRAFT STABILIZER Connect the flexible hose to the spigot. Connect the other end of the hose to the draft stabilizer and then secure this over the exhaust vent in the room. ______________________________ Make sure the air intake is not blocked ______________________________ Moist air out Air intake 1 2 Do not connect the drying cabinet to an existing chimney. ______________________________ 1. Draft stabilizer 2. Flexible hose 3.
ELECTRICAL CONNECTION The drying cabinet should be connected to a 230 V single-phase 50-60 Hz and earthed wall socket. The drying cabinet is supplied ready for connection with a cable with an earthed plug. Fuse 10 A. ______________________________________ ______________________________________ The drying cabinet should be connected using the connecting cable supplied to an earthed wall socket and must not be permanently wired.
BEFORE USING THE DRYING CABINET ______________________________________ ______________________________________ Read this User Manual before starting to use the drying cabinet. ______________________________________ CAUTION: Read the safety instructions on page 4 before using the cabinet. ______________________________________ 1 Check that the cabinet is securely attached to the wall. See page 10. 2 Check that no packaging material has been left behind.
OPERATION ARRANGING ITEMS FOR DRYING There are three sets of hangers inside the cabinet. Each set has a number of rails for hanging items to dry, as described below. The most efficient drying results are obtained by hanging the items in this way. Hang the items in the drying cabinet according to how much space they require – not according to their weight. For most effective drying, do not position items laid flat on the upper hanger section.
DRYING PROGRAMMES This drying cabinet is equipped with automatic programmes and manual programmes for efficient drying of textiles of different types. The automatic programmes automatically switch off the drying process when the textiles are dry. During the last 10 minutes, the heat is switched off while the fan cools down the textiles (cooling-down period). The manually time-controlled programmes stop after a set time has been counted down.
CHILD LOCK To ensure that the drying process is not halted or started by mistake, a child lock function can be activated. FUNCTION OF THE CHILD LOCK Activation buttons must be held down for at least 3 seconds (the delay time). ACTIVATION/DEACTIVATION OF CHILD LOCK The child lock is activated and deactivated using a setting parameter described on page 21. When the button is activated, a clock symbol appears on the display.
STARTING AN AUTOMATIC PROGRAMME Start the drying cabinet by pressing ON/OFF. The display lights up and shows the last used programme. Ex. AUT 40° Normal dry The text flashes. If this is OK - press OK, the process starts. or select a different programme with ARROW UP ARROW DOWN + OK, the process starts. STARTING A MANUAL PROGRAMME Start the drying cabinet by pressing ON/OFF. The display is lit and shows the last used programme, Ex. MAN 40° The text flashes.
TIPS p If you have made a mistake or are unsure where you are, you can always press ON/OFF and start selecting drying programme again. p If the door is open when a drying programme starts and the OK button is activated, the display will show ‘CLOSE DOOR’. Close the door, and the selected drying programme will start. p The animated symbol (bar) on the left-hand side of the display indicates that the drying process is under way. p When the drying process has finished, the text “END” (flashing) appears.
SETTING OF DRYING PROGRAMMES Setting to optimise the drying cabinet’s automatic programmes is done by pressing the buttons on the control panel when the drying cabinet is in programming mode. Adjustments should only be made if you find that p the washing does not dry sufficiently p the washing is over-dried – long drying time PROGRAMMING MODE 1 Make sure that the main ON/OFF switch on the drying cabinet is off. The display is unlit.
Max value 1 0 7 Swedish P115 Child lock On/Off 0 0 1 Off P2011 Min drying time Aut40° 35 (min) 10 45 Max drying time Aut40° 60 360 Max temp Aut40° 360 (min) 51° 41° 61° Exhaust temp. process finished. Aut40° 38° 34° 54° Extra drying time Aut40° 30 (min) 10 45 Cooling time 10 (min) 2 20 Min drying time Aut60° 35 (min) 15 45 Max drying time Aut60° 60 360 Max temp Aut60° 240 (min) 90° 61° 100° Outlet temp. process finished.
Cooling time Aut60° 30 (min) 10 45 10 (min) 2 20 Signifies Factory preset Max value Extra drying time Aut60° Min value P2026 Name Parameter P2025 Extra programme drying time after exhaust temp. has been reached. Time when only the fan is in operation, without heating elements. Provides more even drying time.
ADJUSTMENT Programme Aut 40° Normal is controlled via exhaust air temp. sensor Programme Aut 40° Extra is controlled via exhaust air temp. sensor and a time factor. Programme Aut 60° Normal is controlled via exhaust air temp. sensor. Programme Aut 60° Extra is controlled via exhaust air temp. sensor and a time factor. The automatic programmes stop automatically when the washing is dry.
PROCEDURE The setting parameters according to the list on page 21 are shown on the display as follows: the current parameter is shown on the top row of the display, e.g. P 2014, the set value of the parameter is shown on the bottom row. 1 Go to programming mode. See page 20. 2 Step through to the relevant parameter by pressing the ARROW UP or DOWN buttons repeatedly. If you go too far, just continue until the display shows the correct parameter. 3 When the display shows the correct parameter, e.g.
CARE CLEANING ______________________________________ NOTE: High-pressure cleaning must not be used. ______________________________________ p p The walls of the cabinet should be cleaned with a mild soap solution and a damp cloth. Dust tends to gather around the air intake below the cabinet and on the top of the cabinet. This may cause disturbance which in turn may lead to breakdowns in operation. REPLACEMENT PARTS If the power cord for any reason is damaged, it must be replaced.
THERMAL CUT-OUT The cabinet is fitted with a thermal cut-out that is reset automatically when the temperature inside the cabinet has fallen to an acceptable level. The reset delay varies between 10 and 15 minutes from the time when the thermal cut-out was tripped. The cabinet cannot be restarted while the thermal cut-out is tripped. If this happens, always wait for 15 minutes and then try to restart the cabinet before reporting a fault. If there are repeated cut-outs, contact your supplier.
TROUBLE SHOOTING HOW TO DEAL WITH MINOR FAULTS YOURSELF Problem The drying cabinet does not work What you can do 1. Check that the power cord is connected to a wall outlet 2. Check that no fuse has tripped 3. Have you pressed the start button? The display shows an alarm/error code Drying takes a long time The washing does not become dry The sealing strip does not seal tightly/the door is ajar 27 4.
FAN UNIT The heater and fan components are assembled in a removable fan unit located on top of the drying cabinet. REMOVAL ______________________________________ Unplug the power cord ______________________________________ 1 Detach the fan unit lock screws. The screws are located in the roof inside the drying cabinet and on top of the cover. The screws inside the drying cabinet become accessible if the door is opened and the upper hanger section is pulled out.
TECHNICAL DATA Capacity: 4 kg of laundry (cotton) MANUFACTURING STANDARD See cabinet rating plate. Evaporation rate: 17 g/min WIRING DIAGRAM Wiring diagram can be ordered from manufacturer. Fuse: 10 A Heating element: 1500 W Fan capacity: 180 m³/hour Electrical supply: Single phase 220 - 230 V, 50-60 Hz Motor: 35 W Thermal cut-out: Yes Hanging length: 16 metres Dimensions DC7774: Height 1700 mm Width 595 mm Depth 608 mm 635 mm incl.
www.asko.com We reserve the right to make changes.