Instructions for use OVEN OT8687S / BO6CO4F3-42 OT8687A / BO6CO4F3-42
EN Manual Pictograms used Important information Tip EN 3 - EN 35
YOUR OVEN Your oven Introduction Control panel Description Guide rails Door Cooling fan Main functions Keys Navigation 4 5 6 7 7 7 7 9 10 What to do first 12 Selecting your function Functions settings mode Progress mode Finish display Changing settings during the progress 13 13 15 15 16 Functions table Settings menu Plus menu Cooking information Fast preheat Delayed start Gratin Stage cooking Go to manual cooking Programs and Favourites Egg timer Child lock Plate warming Warming Defrost 17 21 22 23 2
YOUR OVEN Introduction Congratulations on choosing this ASKO oven. This product is designed to offer simple operation and optimum user-friendliness. The oven has a wide range of settings enabling you to select the correct cooking method every time. This manual shows how you can best use this oven. In addition to information about operating the oven, you will also find background information that may be useful when using the appliance.
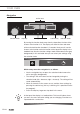
YOUR OVEN Control panel 2 3 4 5 1 6 7 8 9 10 12 13 14 15 11 16 17 18 19 1. Function knob (in ‘Off’ position) 2. Defrost 3. Programs & Favourites 4. Fast preheat 5. Oven 6. Eco hot air 7. Plate warming 8. Warming 9. Aqua clean 10. Display 11. Selection knob 12. On/off key and stop key (cancel) 13. Light key 14. Timer key 15. Navigation key left 16. Navigation key right 17. Plus key 18. Child lock key (lock key) 19.
YOUR OVEN Description 1 Level 5* Level 4 Level 3 2 Level 2 Level 1 3 4 1. Control panel 2. Oven levels ▷ OT86: 5 levels* ▷ OT84: 4 levels 3. Oven door 4. Door handle The following accessories are supplied with your oven: • Baking tray; used for pastries and cakes. • Oven rack; mainly used for grilling. A dish or pan with food can also be placed on the oven rack. The oven rack is equipped with a safety peg. Lift the rack slightly at the front to slide it out of the oven.
YOUR OVEN Guide rails • The oven has four or five guide rails (level 1 to 4/5), depending on the model. Level 1 is mainly used in combination with bottom heat. The upper two levels are used mainly for the grill function. • Place the oven rack or baking tray in the gap between the guide rail sliders. Door • The door switches interrupt the operation of the oven when the door is opened during use. The oven continues operating when the door is closed. • This oven has a ‘Soft close door system’.
YOUR OVEN Main functions With the function knob you can select the main functions of your oven.
YOUR OVEN Keys In the table below you can find the discription of the different keys. Keys Description of the keys On/off key and stop key: - Press short: cancel operation or go one step back in the menu. - Press long: turn the appliance off or on. Light key: - To turn the cavity light on or off. Egg timer - The egg timer can be used independent of the oven function. - The longest possible timer setting is 23:59. Navigation key left - To move the active area to the left.
YOUR OVEN Navigation active area function knob stop key navigation keys confirm key selection knob By turning the function knob away from the 0-position, the icon of the chosen main function is lit. The display will show the icon and name of the activated function for about 1,5 seconds. Next you will see the chosen main function and sub-function at the top of the display in the feedback bar. Also the function settings mode will become active (grey background).
INITIAL USE What to do first • Clean the oven interior and accessories with hot water and washing-up liquid. Do not use aggressive cleaning agents, abrasive sponges and similar. • The oven will emit a strange smell when it is used for the first time; this is normal. You should ensure that there is good ventilation during initial use.
INITIAL USE Setting the time TIME l HOUR 11 : 12 00 13 1. Turn the selection knob and select the hours. 2. Confirm this setting by pressing the right navigation key or by pressing the selection knob. 3. Turn the selection knob and select the minutes. 4. Confirm this setting by pressing the confirm key. All the start-up settings are set and the appliance will show the standby display. The language, date and time can also be set in the settings menu.
OPERATION Selecting your function Select a function appropriate for the meal you are cooking. Consult the table in chapter ‘Functions table’ to see which functions are available. • Go directly to the progress mode by pressing the confirm key (this key is blinking if it is possible to start the program). After you have chosen a main function, the function settings mode is active (grey background). In this activated area, it is now possible to change the settings in this funtion.
OPERATION 5. Confirm the setting by pressing the right navigation key or by pressing the selection knob. The next sub-function setting becomes active. OVEN l COOKING TIME 14:30 210 °C ▷ The timer icon shows that there is no timer necessary for this function. Press the confirm key to start the program directly with the chosen settings (see step 7). ▷ To set the timer, go to step 6. ▷ If there is a timer necessary for a current function, then the default timer setting is displayed instead of the timer icon.
OPERATION Progress mode • Left side on the screen, the temperature is displayed (if the set temperature is not reached, the temperature will switch between cavity temp (grey) and set temp (white)). If the set temp is reached a pop-up will appear ‘set temperature is reached’. • Right side on the screen, the time (counting down) or the progress time (counting up if no time was set) is displayed. Next to the cooking time you can see the finishing time.
OPERATION Add extra time 1. Press the right navigation key to select ‘Add extra time’. 2. The time setting becomes active and can be changed directly by rotating the selection knob. 3. Confirm by means of the confirm key. The previous process is activated again. Gratin 1. Press the right navigation key to select ‘Gratin’. Grill settings will be shown. 2. The temperature (default 200 °C) and time can be set or the program can be started directly by pressing the confirm key (time will start counting up).
USE Functions table Consult the table to select the preferred function. Also consult the instructions for preparation on the dish packaging. • Only use glass dishes that can withstand temperatures of 275 °C. Function Description Oven functions Hot Air • Heating by means of hot air from the back of the oven. • This mode provides uniform heating and is ideal for baking. • Place the baking tray or oven rack on level 2. • Suggested temperature: 180 °C • Preheating is recommended.
USE Function Description Large Grill • Heating by means of the upper element and grill element. • This mode can be used with dishes and baked goods that require a distinctive bottom crust or browning. Use just before the end of the baking or roasting time. • Place the the oven rack on level 4 and the baking tray on level 2. • Maximum allowed temperature: 240 °C • Monitor the cooking process at all times. The dish may burn quickly due to the high temperature. • Preheating is recommended.
USE Function Description Top Heat • Heating only by means of the upper heating element. • This mode can be used when you wish to bake/ roast the top part of your dish. • Place the baking tray or oven rack on level 2. • Suggested temperature: 150 °C 2 Bottom Heat • Heating only by means of the lower heating element. • This mode can be used with dishes and baked goods that require a distinctive bottom crust or browning. • Place the baking tray or oven rack on level 2.
USE Function Description ECO hot air ECO Hot air • Heating by means of hot air. ECO hot air uses less energy but gives the same result as the hot air setting. Cooking takes a few minutes longer. • This mode can be used for roasting meat and baking pastry. • Place the tray on level 2. • Suggested temperature: 180 °C • This setting makes use of the residual heat (heating is not on the whole time) to achieve low energy consumption (in accordance with energy class EN 60350-1).
USE Settings menu The settings menu is only available by pressing the plus key when the appliance is in standby mode.
USE • Standby (auto switch off / manually switch off) Changing to manually switch off will increase energy consumption. If the oven is switched off manually (or when an interruption of the power supply occurs) this function will be reset (the display will automatically switch off).
USE + Menu Description Icon Delayed start The cooking process will start automatically at the time you set. Only available if a cooking time is set, not available in combination with preheat. Gratin To add the grill function at the end of the progress; gratin time will be added at the end of the progress. Add to favourites Add the settings for the cooked dish to your favourites (see chapter ‘Finish display’). Stage cooking Combine up to three functions in one cooking process.
USE Activate the fast preheat in the plus menu. 1. Press the plus key (in the ‘Function settings mode’). 2. Select ‘Fast preheat’ by pressing the right navigation key. 3. Press the confirm key to activate fast preheat. The small preheat icon will be shown next to the current time. ▷ When preheat is activated, the delayed start will be greyed out, because these functions do not work together. ▷ When delayed start is activated preheat will be greyed out. ▷ To cancel the preheat: press the confirm key again.
USE Gratin To add the grill function at the end of the progress (gratin time will be added at the end of the cooking process). 1. Press the plus key (in the ‘Function settings mode’). 2. Select ‘Gratin’ with the right navigation key. 3. Press the confirm key. A small grill icon will appear next to the current time. ▷ To cancel gratin: select ‘cancel gratin’ in the plus menu. Stage cooking This function allows you to combine up to three functions in one cooking process.
USE Go to manual cooking • In the manual cooking mode, a standard program from the ‘Programs and favorites’ function can be chosen and edited as in ‘Stage cooking’ mode. • By selecting the manual function in the plus menu, a popup will appear: ‘Switch to oven mode?’. After confirmation the display will switch to the stage cooking mode if the selected program has more stages.
USE Egg timer The egg timer can be used independent of the oven function. 1. Press the timer key. 2. Change the time by rotating the selection knob. ▷ The longest possible timer setting is 23:59. 3. Confirm the setting by pressing the confirm key. The egg timer is started. ▷ To cancel the timer, set the time back to 0:00 and confirm by pressing the confirm key ▷ To close the egg timer menu, press the timer key or the stop key. 4.
USE Plate warming ▷ This function is used when you want to warm tableware (plates, cups) so that the served food stays hotter for longer. ▷ By choosing this function you can determine the warming up temperature and duration. Warming • Keep warm ▷ Use this function to keep already cooked food at temperature. ▷ By choosing this symbol you can determine the food-warming temperature and duration. Defrost • This function uses hot air (30 ºC).
CLEANING Cleaning the appliance Clean the oven regularly to prevent fat and leftover food from accumulating, especially on the surfaces of the interior and the exterior, the door and the seal. • Activate the key lock (to prevent that the appliance is switched on accidentally). • Clean the exterior surfaces with a soft cloth and warm water with soap. • Wipe afterwards with a clean, damp cloth and dry the surfaces. • Remove splashes and stains on the interior surfaces with a soapy cloth.
CLEANING Removing and cleaning the guide rails Use conventional cleaning products to clean the guide rails. • Remove the screw using a screwdriver. • Remove the guide rails from the holes in the back wall. Removal and installation of the oven door Keep your fingers away from the hinges of the oven door. The hinges are spring loaded and can cause injury if they spring back. Make sure that the hinge latches are applied correctly to lock the hinges. Remove the oven door 1.
CLEANING Install the oven door 1. Hold the door at an angle of approximately 45° in front of the oven. 2. Insert the hinges into the slots and make sure they are both positioned correctly. 3. Open the door to the fully open position. 4. Lift both hinge latches and move them towards the oven. 5. Gently close the oven door and make sure that it closes correctly. If the door does not open or close correctly, then make sure that the hinges are positioned correctly in their slots.
CLEANING Replacing the oven light bulb The lamp in this household appliance is only suitable for illumination of this appliance. The lamp is not suitable for household room illumination. The light bulbs (2x) (halogen G9, 230 V, 25 W) are a consumer items and therefore not covered by warranty. To replace it, first remove the baking tray, oven rack and guide rails. Disconnect the appliance from the power supply by removing the plug from the socket or by switching off the circuit breaker in the fuse box.
SOLVING PROBLEMS General If you have problems with your oven, consult the error overview below. Should the problems persist, please contact the Customer Services Department. The food stays raw • Check whether the timer has been set and you have pressed the confirm key. • Is the door closed properly? • Check whether a fuse has blown and whether a circuit breaker has been activated. The food is overcooked or undercooked • Check whether the correct cooking time has been set.
SOLVING PROBLEMS Light reflects on the door and the exterior of the appliance. • This is normal. Steam escapes from the door or the vents. • This is normal. Clicking sounds can be heard when the oven is working, particularly in the defrost setting. • This is normal. The fuse switches off regularly. • Consult a service technician. The display gives an error code, ERROR XX ... (XX indicates the number of the error). • There is a fault in the electronic module.
YOUR OVEN AND THE ENVIRONMENT Disposal of the appliance and packaging This product is made from sustainable materials. However, the appliance must be disposed of responsibly at the end of its useful life. The government can provide you with information about this. The packaging of the appliance can be recycled. The following materials have been used: • cardboard • polyethylene wrap (PE) • CFC-free polystyrene (hard PS foam) Dispose of these materials responsibly in accordance with legal provisions.
The appliance rating label is located on the inside of the appliance. When contacting the service department, have the complete type number to hand. en (04-16) 566944 / VER 1 / 17-03-2016 You will find the addresses and phone numbers of the service organisation on the guarantee card.