Operating Instructions Washing Machine Save these instructions for future reference Dear Customer, Thank you for choosing this quality product from ASKO. We hope it will meet your expectations and fulfill your needs for many years to come. Scandinavian design combines clean lines, everyday functionality, and high quality. These are key characteristics of all our products and the reason they are greatly appreciated throughout the world.
Contents Before using your machine for the first time Transport protection Packing material Washer door Language selection Checking water hardness Important safety instructions Grounding instructions Installation Overflow guard function Transport/Winter storage Disposal Child safety Keep an eye on children! Child safety catch Parts of the washing machine Detergent compartment Advice and tips before washing Sorting your laundry Clothing Laundry labels Laundry label symbols Hot water connection Colored cotton
Contents Transport protection Installation Connection to water supply Leveling the machine Water supply connection Drain outlet connection Electrical Connections Grounding instructions Freestanding installation Stacked installation Built-in installation Reversing the door Follow these instructions: Service Warranty How to contact ASKO Appliances Inc. Quick guide 30 31 31 31 31 32 32 32 32 32 33 34 35 36 37 37 40 Customer Care Center 1-800-898-1879 www.askousa.
Before using your machine for the first time Do you need this Use&Care Guide in Spanish? Log on to www.askousa.com/customer-care to download. ¿Necesita esta Instrucciones de uso y cuidado en español? Entre en www.askousa.com/customer-care y descárguesela. 4 Customer Care Center 1-800-898-1879 www.askousa.
Before using your machine for the first time Transport protection Remove any transport protection devices before installing the machine. See the "Transport protection" chapter. Packing material Please sort waste materials in accordance with local guidelines. Washer door • The washer door cannot be opened until the machine is connected to the electricity supply. • To open the door manually, see "The washer door will not open" in the "Troubleshooting" chapter.
Important safety instructions SAVE THESE INSTRUCTIONS FOR FUTURE REFERENCE WARNING! To reduce the risk of fire, electric shock, or injury to persons when using your appliance, follow basic precautions, including the following: • Read all instructions before using the appliance. • Do not run appliance while you are out of the home.
Important safety instructions Disposal B) Grounding instructions for a permanently connected appliance: This appliance must be connected to a grounded metal, permanent wiring system, or an equipment-grounding conductor must be run with the circuit conductors and connected to the equipment-grounding terminal or lead on the appliance.
Child safety Keep an eye on children! Be observant of children! • Laundry detergents are corrosive, so always keep them out of reach of children. • Should a child swallow detergent, give plenty to drink immediately, i.e., one or two glasses of milk or water. Do not try to induce vomiting. Seek medical advice immediately: The National Poison center phone number is 1-800-222-1222. • Always close the door and start the appliance as soon as you put in the detergent.
Parts of the washing machine 1. 2. 3. 4. 5. 6. 7. Main power switch Detergent compartment Program panel Serial number plate (on inside of washer door) Drain pump cover Drain pump (behind cover) Washer door 1 2 5,6 Customer Care Center 1-800-898-1879 www.askousa.
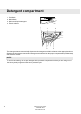
Detergent compartment 1. 2. 3. 4. Pre Wash Main Wash Main wash liquid detergent. Fabric softener 1 2 4 3 The detergent drawer automatically dispenses the detergent and fabric softener at the appropriate times. Simply pour the measured amounts of detergent and softener into the proper compartments (as illustrated) and close the drawer. NOTE! To avoid oversudsing, do not put detergent in the prewash compartment unless you are using one of the Heavy wash programs which has a prewash cycle.
Advice and tips before washing Here are some tips that may help you before washing. Sorting your laundry Sort items according to: • how soiled they are • color • material Clothing 1. Close zippers and Velcro straps so they won’t damage fabrics. 2. New colored items may contain excess dye and should therefore be washed separately the first few times. 3. Turn delicate items inside out. This reduces the risk of burling and fading. 4. Empty pockets and wash them inside out if possible.
Advice and tips before washing Wash cycle Tumble dry cycle Tumble dry heat setting Wash water temperature Special drying instructions Bleach instructions Ironing instructions Dry clean symbol 12 Customer Care Center 1-800-898-1879 www.askousa.
Advice and tips before washing Hot water connection Hot water intake has a positive effect on grease stains and certain pigment stains, such as oil, soot, and coffee. Note, however, that difficult protein stains with albumen content (blood, milk, meat, and fish) first need to be soaked in cold water, as they are difficult to dissolve at temperatures above 104 °F (40 °C).
Advice and tips before washing Detergents Eco-labeled detergents are less harmful to the environment. Detergent overdosing does not give better washing results; it merely causes a greater impact on the environment. Try to use less detergent, and increase only if you are not satisfied with the results. Dyeing fabrics If you want to dye fabrics in the machine, select the Color program with the Super Rinse option. Select the temperature according to the dye manufacturer’s recommendations.
Advice and tips before washing recommended detergent amounts based on water hardness. Remember, you should adjust the amount of detergent you use by small amounts until you find the correct amount. Note that 12 grains and higher is extremely hard water and detergent alone may not be enough. You may need to use a water softener to maximize the performance of your washer.
Operating instructions Wash ball or net WARNING! To reduce the risk of fire, electric shock, or injury to persons, read the IMPORTANT SAFETY INSTRUCTIONS before operating this appliance. 1 Sort your laundry. See the "Advice and Tips before washing" section. Place underwired bras in a laundry net. Empty pockets. Coins, nails, and the like can cause damage to the machine and fabrics. See the "Advice and Tips" section before washing.
Operating instructions 5 Select the program Temperature Spin Program name Door opening Start/Stop Time 2h Super Rinse Pre-soak High Water Level Super Wash Anti Wrinkle function You select a program by turning the program selector. The selected program is shown on the display. Now use the option buttons to select any options. See the "Select options" chapter. 1.
Operating instructions 6. Quick Program for normally soiled cotton and/or linen clothes for daily use. You can select "Cold" (incoming water temperature), 104 °F (40 °C), or 140 °F (60 °C). The lower the selected temperature, the shorter the program time. Garments worn next to the skin should be washed at 140 °F (60 °C). 7. Everyday Wear (Easy care) Program for blended materials, permanent press shirts, and functional sports clothing.
Operating instructions Program chart Program 1. Auto 2. Time Choice 3. Sani 4. White Water consump- Energy consump- Program time Pre Number of Spin speed Max. load tion (approx. hrs and tion Wash Temp. °F rinses rpm ( lb) (approx. gallon) (approx. kWh) min.) X X 203 5 1800 18 22,5 2.2 2:45 140 3 1800 18 15,6 1.20 2:21 140 104 5 3 1800 1800 18 18 19,8 15,6 1.2 0.59 2:02 5. Color 140 3 1800 18 15,9 7. Everyday Wear (Easy care) 104 2 1200 9 13,2 9.
Operating instructions 6 Select options You can select options to adjust the wash program to suit your own specific requirements. The available options depend on the selected program. If the option is available for the selected program, the symbols lights up when you press the button. The machine will remember the options you select for each program (with one exception – Delayed Start). You can still change the selected options the next time you select a particular program.
Operating instructions Super Rinse Use the Super Rinse option if you want to increase the number of rinses. The maximum number of rinses is seven and varies depending on the selected program. Recommended for persons with extremely sensitive skin and/or in areas with very soft water. • Select Super Rinse by pressing the button under the symbol. • The symbol above the button lights when this option is activated. High Water Level Use High Water Level if a garment's laundry label includes this symbol.
Operating instructions 7 Close the washer door and press the Start/Stop button NOTE! A few seconds after you start a program, the washing machine will begin to fill with water from the hot and cold supplies. If for some reason no hot water is available, the machine waits for one minute and then fills with cold water only. The wash drum does not start to rotate until it begins to fill with water. Time remaining When the program starts, an estimated program time, in hours and minutes, is displayed.
Settings You can change the following settings: • • • • • • Child-safe Start Door opening Language Temperature Extra rinses Hot water How to choose the settings: 1. Turn off the machine using the main power switch. 2. Press and hold the Door Opening button and then press the main power switch. Then press the Door Opening button 5 times within 10 seconds. 3. Select the setting you want to change by turning the program selector. 4. Press the Door Opening button once to select the setting. 5.
Settings Hot water However, if you choose to connect your ECO-machine to cold water only, it is important that you shut off the hot water connection. Now select "Hot water Off". If your machine is connected to both hot and cold water, you should select "Hot water On". 1. Turn the program selector. Select "Hot water Off" for a cold water connection or "Hot water On" if the machine is connected to both hot and cold water. 2. Press the Door Opening button once to save the setting.
Care and maintenance instructions Cleaning the trap and the drain pump The washing machine has a trap where small items such as coins, buttons, and hairpins can collect. To clean the trap and the drain pump, do as follows: 1. Make sure the machine is empty of water and switched off at the main power switch. Cleaning the detergent compartment NOTE! Do not wash the detergent compartment or the insert in a dishwasher! Open the detergent compartment and remove the insert.
Care and maintenance instructions Rinse holes under the paddle If you suspect that objects such as nails or paper clips may have fallen into the wash drum, you should check the space under the paddles. Such objects can rust and cause spots on clothing. Nails and other sharp objects can cause holes in fabrics. Do as follows: If you have hard water If you live in an area with hard water (high limescale content), a grayish-white coating may form on the wash drum.
Troubleshooting The washer door will not open 1. Check that the main power switch is on. 2. Is there power? Check your home’s fuses (circuit breakers). The washer door cannot be opened with the door opening button (with the key symbol) if the power is off. If nothing else works, the washer door can be opened as follows: WARNING! The door may only be opened manually if the electric power is cut and the machine has been drained of water. A Run the Drain program to empty the water from the machine.
Troubleshooting Error messages If an error occurs during the program, a message is shown on the display. To exit the message after taking action, turn the machine off and then back on. The error messages that may be shown in the display are: Close the door Close the washer door and the program will start. Overfilling 1. Shut off the water tap. 2. See "Drainage error". 1. Shut off the water tap. 2. Unscrew the hose. 3. Clean the filter in the intake valve on the machine. 4. Screw the hose back on. 5.
Technical information Technical data Height: 33 1/2'' (850 mm) Width: 23 1/2'' (597 mm) Depth: 23 7/8" (606 mm) Weight: 161 lb (73 kg) (172 lb (78 kg) with outer door) Cylinder volume: 15,9 gal (60 l) Max. laundry capacity: 18 lb (8 kg) Spin speed (rpm): 400-1800 Rated power: See serial number tag and rating plate. Heater output: See serial number tag and rating plate.
Transport protection Remove the three transport bolts and the plastic plugs for locking the machine for transport before using the machine. NOTE! 1. Loosen and remove the bolts as illustrated below. If the machine is to be transported, the bolts and plastic plugs for locking the machine during transport must be installed to prevent damage to the machine through shaking. If the transport bolts or plastic plugs have been lost, you can order new ones from your retailer.
Installation Water supply connection Connection to water supply Hot water connection A few seconds after you start a program, the washing machine will begin to fill with water from the hot and cold supplies. If for some reason no hot water is available, the machine waits for one minute and then fills with cold water only. The wash drum does not start to rotate until it begins to fill with water.
Installation Drain outlet connection The machine is supplied with the outlet hose already attached. The hose should be extended over a suitable sink edge or drain pipe at a height of 24" to 36" (610 mm to 914 mm) above the bottom of the unit. (The lower height is preferable.) Make sure the hose is not kinked. 24" to 36" NOTE! If the hose is extended, the internal diameter of the coupling must not be less than ½".
Installation Built-in installation ASKO washers can be installed beneath a cabinet or worktop with a height of 34" to 35" (863 to 889 mm) or in a closet. There must be a gap of about ½" (12 mm) all around the machine, including between the rear edge of the machine's top panel and the back wall. The opening width must be at least 24½" (622 mm). Space must also be available for the fill and drain hoses. See the illustration below for measurements and positions.
Reversing the door 1 2 6 34 3 4 5 1. Hinge pins (top and bottom) 4. Lock hook 2. Cover washer 5. Hinges (left + right side) 3. Plastic plugs (on the upper and lower edges) 6. Toe kick Customer Care Center 1-800-898-1879 www.askousa.
Reversing the door You can choose whether the outer door is hung on the right or the left. Follow these instructions: close the door. Retighten the hinge. Replace the toe kick. 1. Remove the Toe kick. 2. Remove the hinge (two screws). 3. Lift up the outer door and remove it. Support the door while doing this. 4. Remove both door pins (top and bottom). Fit them on the opposite side of the outer door. Refit the hinge. 5.
Service It is important to register your product warranty by logging onto "http://www.askousa.com/customercare/register-my-appliance/" and filling out all required fields within 90 days from the date of purchase. After doing so, you will be e-mailed a certificate that will extend the original warranty for one additional year.
Service Warranty ASKO Appliances Inc. will not pay for: • Service calls to: 1. Correct the installation of the appliance. 2. Repair damage due to shipment, delivery, installation, misuse or abuse. 3. Instruct how to use the appliance. 4. Replace house fuses or correct house wiring. 5. Correct house plumbing, including drainage problems related to improper installation. 6. Clean or service air device in drain line.
Notes 38 Customer Care Center 1-800-898-1879 www.askousa.
Notes Customer Care Center 1-800-898-1879 www.askousa.
Quick guide 1 Washing 1. Empty pockets and close zippers. 2. Read the item’s laundry label. 3. Sorting laundry. NOTE! Place underwired bras in a laundry net. 2 Load the laundry 1. Pressing the main power switch. 2. If the washer door is closed, press the Door Opening button (key symbol) and the door will open. 3. Load the laundry and close the washer door. 3 Detergent compartment 1. Pour detergent into the main wash compartment, and pre-wash compartment as well if required.