
User manual


PAGE 4
User Manual PS 430 / October 2013 © ASL Intercom BV
.
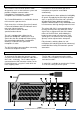
1 LISTEN LEVEL control knobs
To preset the listen level for each channel
separately (see also #4).
2 TALK buttons
Allow talking to each channel separately or to
several channels simultaneously. If a TALK button
is switched on, its large green LED is lit.
Momentary switching:
If a TALK button is pushed and held, the
microphone signal is sent to the referring intercom
channel until the button is released.
Latched switching:
If a TALK button is pushed shortly, it is electroni-
cally latched and the microphone signal is sent to
the referring intercom channel. If pushed again,
the TALK button switches off.
Mic Mute when latched on:
After on an intercom channel a so-called Mic Mute
signal has been received from a PRO Series
master station or power supply, the connection
between microphone and that intercom channel is
interrupted. By pushing the TALK button, that
connection is restored again.
3 CALL buttons
To activate the call system, for each channel
separately. By a momentary push a call signal is
sent to all stations connected to the referring
intercom channel and all Call LEDs start flashing.
Pushing and holding the CALL button for 2
seconds activates the call buzzer, provided there
is no buzzer mute signal on the referring channel.
After the CALL button is released the LEDs
continue to flash for a further 2 seconds.
4 MASTER VOLUME knob
Functions as the master volume control of the
listen levels of the 4 intercom channels (see also
#1), for both the speaker and the headset.
5 SIDE TONE LEVEL trimmers
These trimmers (one for each channel) are to
minimize the speaker feeding back into the
gooseneck microphone (unit feedback); They also
determine the level of your own voice as you hear
it in the speaker or headset.
6 SIDE TONE HI trimmers
These trimmers have the same purpose as
trimmers #5, but solely for the high frequencies.
Trimmer #5 and #6 adjustment procedure,
for each channel separately:
o set trimmers in start position: fully
clockwise
o switch off the microphones of all
connected (speaker-) stations
o make sure that there is no automatic
speaker attenuation (turn trimmer #7 fully
clockwise)
o push the TALK button of the channel of
which one wants to adjust the side tone.
o Slowly turn up the listen volume of the PS
430 (channel- and master volume).
o speak into the gooseneck microphone
o adjust the speaker listen level to a
minimum by turning the side tone trimmers
counter-clockwise (first trimmer #5 and
then trimmer #6; repeat this a few times)
o connect a headset to the PS 430 (the
speaker and gooseneck are now
automatically disabled) and speak into the
headset microphone
o check whether the level of your voice in
the headset can(s) is sufficient. If not,
push up this level a bit by turning side tone
trimmer #5 clockwise.
The trimmer operating area is between fully
clockwise and minimum level. Adjusting the side
tones does not affect the level of your voice as it
is heard by other stations.
7 SPEAKER ATTENUATOR trimmer
To adjust the extent to which the loudspeaker is
automatically dimmed if the gooseneck mic is
switched on. It prevents unit feedback if side tone
rejection is not sufficient.
It also minimizes system feedback or a 'hollow'
sound when the gooseneck microphones of other
speaker stations (on one or several of the
connected party lines) are switched on as well.
Adjustment procedure :
o make sure that there is no headset
connected
o switch off all TALK buttons of the PS 430.
o inject an audio signal on one of the
intercom channels via the aux input of a
Pro Series master station or separate
power supply
o turn up the listen volume of the PS 430
(channel – and master volume).
o activate the gooseneck microphone (push
the TALK button of the selected channel)
o adjust the desired degree of speaker
attenuation (turning the trimmer counter-
clockwise increases the attenuation)