
User's Manual


14 of 38
DEVICE NAME
Changing your local device name:
1. Connect your PlugLink adapter to your PC. For instructions on how to connect
your PlugLink to your PC, please refer to page 7 (Installing the Hardware).
2. Run the PlugLink Power Manager software. If you have not installed the PlugLink
Power Manager software onto a PC, please refer to page 8 (Installing the
Software).
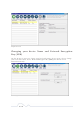
3. From the Power Manager main menu, click “Device(s)”.
4. A list of PlugLink devices will appear on the left side of your Power Manager
screen. Your Local Device will always be the first device in the list by default.
5. Select your local device, by clicking on the first device MAC Address from the
list. Make sure that the device selected is highlighted in yellow. NOTE: It is not
necessary to check the box to the left of the Device Name.
6. Enter the new name in the New Device Name field. The new name must be at
least 4 characters long and can’t have spaces.
7. Click “Update” to update the new name.
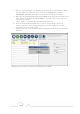
8. If the new name was accepted, the message “You have successfully changed
your Device name.” will appear.
9. Congratulations, you have successfully changed your local device name.
Changing your local device name