
Installation Guide

The substrate to which you are applying Aspect tiles must be primed with a fresh coat
of latex or oil-based primer such as Zinsser
®
or KILZ
®
. Ingredients in “paint & primer
in one” products can cause adhesion failure; as such, be sure to use a stand-alone
primer. See below for Method 2 if you prefer not to prime the surface.
Occasionally, even after properly preparing the substrate, the surface can still have
bows, high spots, ridges, or uneven areas. Place a level against the wall. If there is
a 1/8” gap or greater, use a ller such as spackling or drywall compound to ll in
imperfections.
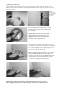
Method 2: If you do not intend to prepare,
sand and prime the surface, an additional
adhesive should be used. We recommend a
high-quality polyurethane construction adhesive
be applied to the back of each tile in these
cases. Be sure to remove the release film on
the back of each tile before applying additional
adhesive. Apply some small pea-sized dots of
adhesive to the back of a full tile (see right).
Keep the adhesive a half-inch from the edges.
Firmly press the tiles into place. If adhesive
squeezes out around the tiles, be sure to wipe
it off before it dries.
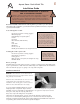
Recommended Adhesives
Brand Type
Loctite
®
PL Premium
®
Loctite
®
PL Premium Advanced
®
LePage
®
PL Premium
®
Layout
Measure the rst area to be covered by Aspect material. We recommend you lay out
the entire project on a at surface, like the counter top, a table or the oor, before
adhering to the substrate, to be sure you have enough tiles and your design and
layout is correct. This will also give you good reference as to how the tiles will look on
your wall.
As each project is different, be sure to plan for cutouts, corners or edge treatments
before applying tiles.
One popular layout method is to begin from the inside corner of your counter and
work across left to right. This method allows you to use two points of reference,
your vertical wall and horizontal counter top. Note — when using these two points
of reference, be sure to check them for level on the horizontal plane and 90° on the
vertical plane. This will prevent any problems as you build your backsplash.
Lay a 4’ level on top of your counter top or backsplash return lip if you have one. If the
counter is level, use it as your reference. If not, identify the high point(s) of the counter
top. Draw a horizontal line using your level and snap a reference line to indicate the
high point. Snap a reference line to indicate the top of the rst row of tiles. The top
edge of the rst row will be installed along this line. Use a level or measuring tape to
mark the vertical termination point of your installation.
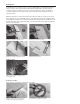
Method 2 - Using high-quality
polyurethane construction adhesive