
Installation Guide
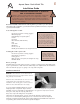

Installing your rst tile
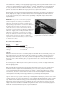
Here’s where the fun begins. Be sure the substrate is clean and dry. Remove the
adhesive liner from the back of the matted tile. Align the tile where you want it on the
reference lines.
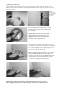
Do not bend tiles backward as it could
permanently stretch and misshape the
tile matting.
Lightly place the tile onto the wall
using your reference lines. Do not
apply pressure to the tile until you
are sure of your placement.
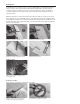
The aggressive design of the adhesive does
not allow for repositioning after pressing rmly.
If it is in the right position, rmly apply even
pressure across the entire tile.
When applying subsequent tiles, rst “dry t”
the tiles with the adhesive liner in place to
ensure proper t. Dry t tile against the wall
exactly where it will be placed. Place each
section as if placing a puzzle piece.
Lightly place subsequent tiles on the wall using your reference lines.
Do not apply pressure to the tile until you are sure of your placement.
Mark
horizontal
and vertical
reference
points
Do not apply pressure until you are sure
of your placement
Place each section as if placing a puzzle piece
Lightly place the tile onto the wall