
User Guide

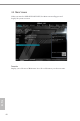
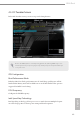
Table Of Contents
- Chapter 1 Introduction
- 1.1 Package Contents
- Chapter 2 Installation
- 2.1 Installing the CPU
- 2.2 Installing the CPU Fan and Heatsink
- 2.3 Installing Memory Modules (DIMM)
- 2.4 Expansion Slots (PCI and PCI Express Slots)
- 2.5 Jumpers Setup
- 2.6 Onboard Headers and Connectors
- 2.7 CrossFireXTM and Quad CrossFireXTM Operation Guide
- 2.7.1 Installing Two CrossFireXTM-Ready Graphics Cards
- 2.7.2 Driver Installation and Setup
- 2.8 M.2_SSD (NGFF) Module Installation Guide
- Chapter 3 Software and Utilities Operation
- Chapter 4 UEFI SETUP UTILITY
- 4.1 Introduction
- 4.2 EZ Mode
- 4.3 Advanced Mode
- 4.4 Main Screen
- 4.5 OC Tweaker Screen
- 4.6 Advanced Screen
- 4.6.1 CPU Configuration
- 4.6.2 Chipset Configuration
- 4.6.3 Storage Configuration
- 4.6.4 Intel® Thunderbolt
- 4.6.5 Super IO Configuration
- 4.6.6 ACPI Configuration
- 4.6.7 USB Configuration
- 4.6.8 Trusted Computing
- 4.7 Tools
- 4.8 Hardware Health Event Monitoring Screen
- 4.9 Security Screen
- 4.10 Boot Screen
- 4.11 Exit Screen

46
English
4.3 Advanced Mode
e Advanced Mode provides more options to congure the BIOS settings. Refer to
the following sections for the detailed congurations.
To access the EZ Mode, press <F6> or click the "EZ Mode" button at the upper right
corner of the screen.
4.3.1 UEFI Menu Bar
e top of the screen has a menu bar with the following selections:
Main
For setting system time/date information
OC Tweaker
For overclocking congurations
Advanced
For advanced system congurations
Tool
Useful tools
H/W Monitor
Displays current hardware status
Security
For security settings
Boot
For conguring boot settings and boot priority
Exit
Exit the current screen or the UEFI Setup Utility