
User Manual
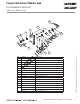
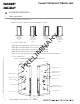


Table Of Contents

10 1-800-810-WIRE • www.sargentlock.com • A8011E
Copyright © 2010, Sargent Manufacturing Company, an ASSA ABLOY Group company. All rights reserved.
Reproductions in whole or in part without express written permission of Sargent Manufacturing Company is prohibited.
12/15/10
Passport 1000 Series P2 Mortise Lock
3
Install Lock Body
1. Feed the wires first through the mortise pocket
and out the inside prep, followed by the
lockbody (Fig. 3A).
2. The wires from the lockbody exit the inside
door prep through the mortise pocket (Fig. 3B).
3. Loosely secure the lockbody in the door with
two #12 x 1-1/4” wood screws or
#12-24 x 1/2” machine screws.
4
Install Cylinder
1. Slide cylinder through the spring and ro-
sette/collar and screw into lockbody, rotat-
ing the cylinder clockwise.
Cylinder should be flush with rosette/collar.
Note: SARGENT logo must be horizontal
and on the top of the cylinder (Fig. 4B).
2. Secure the cylinder by tightening cylinder
clamp screw located above the deadbolt.
3. Using the key, verify that the key retracts
the
latchbolt (and deadbolt).
Position cylinder so that the SAR-
GENT logo is right-side up.
Correct Incorrect
Fig. 4B
Align cylinder groove
with tapped hole,
then tighten set screw
to hold lock cylinder.
Must feed
the harness first,
followed by
the lockbody.
(2) #12 x 1-1/4” Long
Flat Head Wood Screw
for Wood Doors
(2) #12-24 x 1/2” Long
Flat Head Machine Screw
for Metal Doors
Mortise Lockbody
Connector and
Grounding Lug
Fig. 3A
Fig. 3B
PRELIMINARY