
User Manual


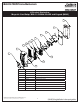
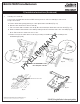


Table Of Contents

ML20700 PWI/PIP Series Mortise Lock
7
Copyright © 2011 Corbin Russwin, Inc., an ASSA ABLOY Group company.
All rights reserved. Reproduction in whole or in part without the
express written permission of Corbin Russwin, Inc. is prohibited.
5) Installation Instructions (Continued)
3. Handing of Lock Body:
If necessary re-hand latch and move RED locking screw to side of lockbody to side of lock
body to be locked:
a. Push in latch while gently pushing on catch plate with screwdriver (Fig. 3a).
b. Release latch and remove from lock body.
c. Turn over latch and re-install in lock body; Be sure anti-friction latch tail hooks into front (Fig. 3c).
d. Hold screwdriver behind tail socket while pushing in latch. Push latch until ‘click’ is heard (Fig. 3b).
Note: Pull on latch to make sure it is secure.
e. Rotate lock front to match bevel of door by inserting screwdriver into lock mounting holes
and twisting (Fig. 3d).
Fig. 3a
Fig. 3b
Move the RED-HEADED screw to
the Locking Side of the door
Fig. 3c
Anti-friction Latch 0Tail
Fig. 3d
Lock Front
PRELIMINARY