3/13
:: Introduction Thank you for purchasing this Team Associated Qualifier Series product. This manual contains instructions and tips for maintaining your new RIVAL MT RTR. Please take a moment to read through it and familiarize yourself with these steps as they will help you to understand each component’s function and show you some tips for getting the most out of your RIVAL MT RTR.
:: Table of Contents 1....................Cover 12-14..........Front / Rear Diff Access 2....................Introduction 15-...............Shock Maintenance 3....................Table of Contents 16.................Motor Manual 4....................Blueprint of the RIVAL MT 17................. ESC Manual 5-7................Quick Start Guide 18-27..........Catalog 8....................Electronics Wiring / Camber & Toe Settings 28................1:1 Hardware “Fold Out” 9...................
:: Blueprint of the RIVAL MT Front Steering Bumper Block Front Arm Front Body Mount Front Shock Front Steering Link Servo Battery w/ Deans® Plug Receiver Box Battery Strap Roll Bar Rear Hub Pinion Spur Gear Motor Electronic Speed Control Chassis Rear Body Mount Rear Arm Rear Shock Rear Bumper Rear Camber Link
:: Quick Start Guide Battery Charging Steps and Safety: NiMH Wall Charger: (Part #29154 Wall Charger AC 120V 350MaH) NiMH Quick Charger: (Part #610 Reedy 447-S AC/DC 4-7 Cell Peak Prediction NiMH/NiCd Charger) Remove the battery from the vehicle before charging. Be sure to select the correct charging mode for the type of battery you are charging. NEVER leave the battery unattended while charging! NiMH: NiMH batteries (nickel-metal hydride) are high current rechargeable batteries.
:: Quick Start Guide - (cont.) Change the speed control to NiMH or LiPo battery modes. Battery Management System - A choice of either LiPo mode or NiMH mode adjusts the low voltage cutoff point. This is critically important when using LiPo batteries that should not, for performance and safety reasons, be discharged below 3.0V per cell. In LiPo mode, the ESC detects whether you are using 2 or 3 cells and adjusts the cutoff accordingly.
:: Quick Start Guide - (cont.) Radio System Tuning and Controls: 4 RULE: Transmitter on First/Vehicle on Second. When done driving: Vehicle off First/ Transmitter off Last! 1) 2) 3) 4) Slide the battery cover in the direction shown to remove cover. Install eight (6) alkaline or rechargeable AA size batteries into the battery holder. Slide the battery cover back into place making sure it is completely closed and secure. Turn the power ON.
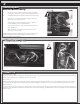
:: Wiring Diagrams Motor and Receiver Wiring: 1. If motor runs in reverse when you apply throttle, unplug any two of the motor wires and switch them. 2. Your Receiver has multiple channel ports for plugs. 1 Channel 1 - you should always plug your steering servo into this channel port. Channel 2 - you should always plug your speed control (ESC) into this channel port. Channel 3 - Used for optional equipment such as fans, lights, ect... Batt - Used for optional receiver battery pack.
:: Gear Mesh Gear Mesh: To correctly set your gear mesh, follow the steps below: 1. Loosen the set screw on the motor’s pinion gear. Slide the pinion on the motor shaft until the gear face of the pinion is entirely aligned with the gear face of the spur gear (see diagram). Tighten the set screw while ensuring it is aligned with the flat face on the motor shaft. Pinion Spur Gear 2. Loosen the motor screws until the motor is able to move freely.
:: Spur Gear Access :: Spur Gear Access - (cont.) Spur Gear Maintenance: When accessing your spur gear, check for wear on the teeth of the gear. If teeth are deformed or sharp at the peak, the spur gear should be replaced. Also, check the slipper pads for wear. Replace if necessary.
:: Center Diff Access :: Center Diff Access - (cont.) :: Center Diff Access - (cont.) Stock Diff Fluid Setting: Center Diff: Grease Center Differential Maintenance: Once you have removed the Center Diff gear, you can now clean the existing diff grease from the differential. Check the diff gasket for wear or damage. Replace if necessary Fill the diff to the top of the cross pin with your choice of diff fluids.
:: Front Diff Access :: Front Diff Access - (cont.) :: Front Diff Access - (cont.
:: Front Diff Access - (cont.) ! Diff gear teeth pointed towards the right hand side of the vehicle. :: Rear Diff Access :: Rear Diff Access - (cont.
:: Rear Diff Access - (cont.) :: Rear Diff Access - (cont.) ! Diff gear teeth pointed towards the left hand side of the vehicle. :: Front and Rear Diff Maintenance Differential Maintenance: Once you have removed the Diff gear, you can now clean the existing diff fluid from the differential. Stock Shock Fluid Setting: Check the diff gasket for wear or damage. Replace if necessary Front: grease Fill the diff to the top of the cross pin with your choice of diff fluids.
:: Shock Maintenance Bladder Installation t 40w luid ck f Sho Stock Shock Fluid Setting: Front: 40wt Rear: 40wt A B C As you install the shock cap with the bladder, it will force out any extra fluid. If you install the cap with the shaft fully extended, you are running FULL REBOUND.This means the shaft will fully rebound when compressed. To run less rebound, unthread the cap 1-2 turns and compress the shaft to the desired position and re-tighten the cap with the shaft compressed.
:: Motor Manual 1515-SL BRUSHLESS MOTOR Introduction Congratulations on your purchase of the Reedy 1515-SL Brushless Motor. The latest brushless motor technology along with the design and engineering experience that is responsible for 28 World Championship titles has been incorporated into its design. Due to its sensorless design, the Reedy 1515-SL Brushless Motor operates powerfully and efficiently without complicated sensor harnesses.
:: ESC Manual #29146 XP SC1300-DB Brushless ESC Introduction Congratulations on your XP Brushless Electronic Speed Control (ESC) purchase. The latest electronics technology along with the design and engineering experience that is responsible for multiple World Championship titles has been incorporated into its design. Your XP Brushless ESC is water-resistant for maximum durability. Its light and compact design allows for easy installation in most 1/8 vehicles.
:: Shocks 25058 25059 25061 25062 25063 25064 25065 25069 25070 :: Drive Shafts Assembled Shocks, Set of eight Assembled Shocks, Set of two Shock Rebuild & Shafts, Set Blue/Soft Shock Springs, 4.40 lbs Gold/Medium Shock Springs, 5.10 lbs Red/Firm Shock Springs, 5.95 lbs Copper/Extra Firm Shock Springs, 6.
:: Radio Tray and Servo Saver 6338 25162 25166 25167 25181 25207 25215 25225 25232 25613 25751 89208 1 1 1 1 20 20 20 20 20 20 1 10 Antenna Tube with Cap, black Servo Saver, XT/Futaba - (Used in RTR) Servo Saver, Hitec Servo Saver, JR/Airtronics M3 x 10mm BHPS M3 x 10mm BHPTS M3 Locknut M3 x 3mm Set Screw Lock Washer M3 x 6mm BHPS RIVAL-MT Receiver Tray M3 x 14mm FHCS 25181 25181 25181 25751 25225 6338 25751 25162 25215 6338 25215 25162 25751 25162 89208 25162 89208 25162 25751 89208 2
:: Front Bumper 7164 25183 25184 25203 25208 25763 Washer, 3 x 6 x 0.5mm M3 x 14mm BHPS M3 x 16mm BHPS M3 x 12mm FHCS M3 x 22mm BHPS RIVAL-MT Front Bumper 10 20 20 20 20 1 25184 25763 7164 25184 7164 25763 25183 25763 25183 25208 25763 25208 25203 :: Rear Bumper 7164 25182 25184 25203 25208 25764 Washer, 3 x 6 x 0.
:: Transmission Internal Gears 25236 25238 25741 25742 25743 25744 25745 Bearing, 8 x 16 x 5 Bearing, 6 x 12 x 4 RIVAL-MT Gear Set RIVAL-MT Center Diff RIVAL-MT Center Diff RIVAL-MT Center Diff RIVAL-MT Center Diff 2 2 1 1 1 2 1ea Assembly Rebuild O-Rings Outdrives 25238 25741 25238 25742 25238 25741 25741 25741 25238 25741 25741 25745 25236 25743 25742 25744 25741 25743 25742 25743 25743 25743 25743 25743 25236 25744 25743 25743 25742 25745 25744 :: Transmission 25180 25181 25
:: Front Gearbox 25051 25056 25080 25082 25106 25125 25128 25184 25190 25191 25199 25201 25202 25203 25208 25209 25215 25236 Front / Rear Drive Input Cup w/ Set Screws Drive Cup Set Screws Differential Pinion Gear & Shaft Front/Rear Transmission Case with screws Front & Rear Transmission Chassis Mounts Bellcrank Plastic Parts Front Skid Plate M3 x 16mm BHPS M3 x 14mm SHCS M3 x 18mm SHCS M3 x 8mm FHPS M3 x 8mm FHCS M3 x 10mm FHCS M3 x 12mm FHCS M3 x 23mm BHPS M3 x 32mm BHPS M3 Locknut Bearing, 8 x 16 x 5
:: Rear Gearbox 25051 25056 25080 25082 25106 25134 25184 25191 25199 25202 25208 25209 25215 25236 89218 Front / Rear Drive Input Cup w/ Set Screws Drive Cup Set Screws Differential Pinion Gear & Shaft Front/Rear Transmission Case with screws Front & Rear Transmission Chassis Mounts Rear Skid Plate M3 x 16mm BHPS M3 x 18mm SHCS M3 x 8mm FHPS M3 x 10mm FHCS M3 x 23mm BHPS M3 x 32mm BHPS M3 Locknut Bearing, 8 x 16 x 5 3 X 8mm Washer 1 4 1 1 1 1 20 20 20 20 20 20 20 2 10 25191 25082 25236 25184 25215
:: Front Bumper and Chassis 25102 25105 25181 25201 25207 25215 25753 Chassis Guards (L&R) and End Covers (2) Front & Rear Upper Arm Mounts M3 x 10mm BHPS M3 x 8mm FHCS M3 x 10mm BHPTS M3 Locknut RIVAL-MT Chassis 1 2 20 20 20 20 1 25181 25181 25201 25102 25181 25105 25181 25105 25207 25102 25215 25215 25201 25207 25215 25105 25215 25105 25181 25105 25105 25201 25753 25207 25102 25181 25105 25102 25215 25207 25105 25201 25215 25215 25215
:: Front and Rear Shock Towers 2208 25070 25135 25136 25137 25188 25189 25205 Large Hood Pins Shock Mounting Hardware Front Shock Tower Rear Shock Tower Pivoting Body Mounts (2) & Posts (4) M3 x 20mm BHCS M3 x 22mm BHCS Body Post Mounting Screws 6 1 1 1 1 20 20 20 25205 2208 2208 25137 25137 25188 25189 25205 25137 25188 25189 25070 25205 25070 25070 Front - 25135 Rear - 25136 25070 25070 25205 25070 :: Turnbuckles 25754 25756 :: Lubes & Adhesives / Decals / Misc.
:: Slipper, Spur Gear, Pinion, and Drive Shaft 25677 25678 25679 25680 25681 25746 31541 Slipper Hardware Spur Gear Hub Slipper Friction Ring Slipper Pad Slipper Hub RIVAL-MT Spur Gear (56T) - Kit M3 x 0.
:: Reedy Accessories / Motor :: Body / Decals 25758 25759 25765 Rival MT Body - Painted Rival MT Body - Clear Rival MT Decal Sheet 1 1 1 :: Factory Team and Option Parts 25062 25063 25064 25065 25139 25140 25381 25382 25383 25390 25391 25392 25395 25396 25397 25398 25403 25404 25725 25726 25727 25728 MGT Blue Spring, Soft [4.40lb] MGT Gold Spring, Medium [5.10lb] MGT Red Spring, Firm [5.95lb] MGT Copper Spring, Extra Firm [6.
:: Hardware - 1:1 Scale View Cap Head (shcs) Button Head (bhcs) Flat Head (fhcs) 3x10mm (25620) 3x12mm w/hole (31427) 3x14mm (25190) 3x18mm (25191) 4x12mm (31426) 2.5x6mm (4675) 2.5x6mm (31520) 2.5x8mm (31448) 3x4mm(91158) 2.5x10mm (31350) 3x6mm (31531) 3x6mm BHPS (25613) 3x6mm (31541) Shims and Washers 3x8mm (25201) 3x8mm FHPS (25199) Nylon Washer .
:: Apparel :: 1/8 Kits and RTR’s 20501 MGT 4.60 SE RTR (ready-to-run) 20502 MGT 8.0 Nitro RTR (ready-to-run) 20503 Limited Edition MGT 4.60 Nitro RTR, w/flag body (ready-to-run) 20504 Limited Edition MGT 8.0 Nitro RTR, w/flag body (ready-to-run) 80905 RC8RS “Race Spec” Nitro Buggy RTR (ready-to-run) 80906 RC8.2 Nitro Buggy FT Kit 80907 RC8.2e Electric Buggy FT Kit 80908 RC8.2e Electric Buggy RTR (ready-to-run) 80912 RC8T Championship Edition 80933 SC8.
:: Trouble Shooting Description Problem Solution Receiver LED remains red. Charge battery. Plug in battery. Reset speed control using your instruction manual. Re-bind transmitter to the receiver. No Throttle Motor not plugged in............ Speed control out of ............ adjustment. Motor failure............................ Plug in motor. Reset speed control using your instruction manual. Replace motor. No Steering Servo not plugged in............. Locked up steering linkage. Servo failure....