USER MANUAL . Wireless DMX Receiver/Transmitter (ART3) Manual Version: Release Date: 3.8.18 July 11, 2013 Astera LED Technology GmbH Address : Nahestrasse 68-70, 55593 Rüdesheim an der Nahe, Germany Tel.: +49(0)6536-355361 Email: sales@astera-led.
Index Contents Index ........................................................................................................................................................ 2 Safety....................................................................................................................................................... 3 Introduction ............................................................................................................................................ 4 Overview ...........
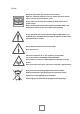
Safety Before you operate the unit, read this manual carefully. Make sure to keep the manual, in case you need to consult this manual again or you give the unit to another person. Always make sure to include this manual if you hand out the unit to another person. Keep in mind that this manual cannot address all possible dangers and environments. Please use your own caution when operating.
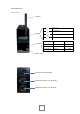
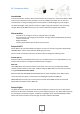
Introduction Overview antenna Receiving Transmitting display settings are stored in memory sync between units is active statusLED red color ready to transmit XLR = input red flickering transmitting XLR = input green color ready to receive XLR = output green flickering receiving XLR = output power on/off AC power input (110-240V) DMX socket (works as in- & output) DMX socket (works as in- & output 4
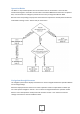
Operation Modes The ART3 is a very versatile product and can be used to send or receive data. It can work with wireless Astera lights or controllers as well as with conventional DMX fixtures from other companies. Also, it can be used as an emergency remote control in case you forgot the ARC2 or ARC6. Because of the many settings and purposes of the ART3 it is important to carefully check the desired mode before starting to use it.
Operation DMX Transmitter Mode Introduction The DMX Transmitter mode is for customers that want to send DMX data to Astera lamps and/or to other ART3s that are set to DMX receiver mode. The DMX Transmitter simply transmits the DMX protocol from a standard DMX controller such as Martin Lightjockey, GrandMA and computer-based systems over the air to Astera lights and ART3s that are set to DMX Receiver. For this, the DMX Data gets compressed.
Lights with display and 5 buttons (AL6, AL7-W): Hold the menu button for 3 seconds, select DMX Setup > DMX Setup > confirm with Enter > select an address > confirm with Enter. For setting a larger number of lights, set addresses with ART3 or ARC2 as described above but confirm the address with the light’s Enter button (not the on/off button). Channels: Sets the amount of channels that is used to control 1 unit. 1 RGB channel means that all LEDs have the same color. DMX Tab: Several DMX tables can be chosen.
Summary: There are several ways to increase the performance of the ART3. It is important to know the ART3’s characteristics and sometimes adjust a lighting installation. If you transfer fewer data the performance will be better. For video content we recommend no more than 100 channels per ART3 for slow ambient installations 200 channels per ART3. If all the above info is not enough you can switch to the RC Transmitter mode (see page 9), which has a much higher range and works more stable.
RC Transmitter Mode Introduction In the RC Transmitter mode the ART3 controls Wireless Astera lamps, the same way an ARC2 or ARC6 remote control would do but the parameters are set by a DMX control table. You can send and customize basic running and fading effects and send them to individual lights or groups of lights. The basic advantages of this operation mode are a higher range and that data is only sent during changes. With only 20 DMX channels you can control a whole setup of lights and/or ART3s.
To assign lights to Groups and build Sets this we recommend to use the ARC2, the ARC2 Quick Start Guide explains this process well. Alternatively you can take an ART3, go to Setup > Create a Set or respectively to Setup > Remote Setup > Remote Group. Lights with display and 5 buttons also offer the chance to change their group. To do this hold the menu button for 3 seconds > choose Auto Settings > Group > select a group with the + and – buttons and confirm with Enter.
DMX Receiver Mode Introduction An ART3 in DMX Receiver Mode enables conventional DMX fixtures to be controlled by wireless DMX. It transmits the DMX protocol that is sent from another ART3 (in DMX Transmitter mode) over the air so that the lights can be controlled in the same way as if wired by DMX cable. Characteristics - Very easy to set up, just like an invisible wire. Just set the DMX address for each fixture Setup of ART3 Set the ART3 to DMX Receiver Mode (see page 5).
RC Receiver Mode Introduction An ART3 in RC Receiver Mode enables conventional DMX fixtures to be controlled by the Astera Remote Controls. That enables customers to control battery-powered Astera lights together with conventional DMX fixtures. Characteristics - Receives data from ARC2 and ARC6 and ART3 in RC Transmitter Mode Can connect up to 32 third-party fixtures Can be used as standalone controller to control the connected fixtures Setup of ART3 Set the ART3 to DMX Receiver Mode (see page 5).
Troubleshoot The connected fixtures do not display anything: As soon as the ART3 receives a new program the display will show this program which confirms that it is receiving data. If you see that the program names on the display are changing the link to the remote control is ok and there must be a problem with the connected fixture. Try to connect another fixture.
Control Lamps Introduction The ART3 can be used as a remote control, providing basic functionality of the ARC2 and ARC6 remote controls. Although the other remotes are easier to use and have more buttons ART3 can do most of the ARC2 functions in case no other remote is available.
Setup Introduction The Setup is used to set up the lights, rather than the ART3 itself. It offers advanced settings that can be used before or after an event like factory reset, forming groups of lamps, setting a light’s DMX address etc. To get to Setup, see bottom of page 5. Settings The following settings can be adjusted. After changing the settings all lights in range will blink in white light once a second.
Technical Specifications General Temperature (operation) 5 °C – 40 °C Temperature (transport) -25 °C – 55 °C (70 °C for 24h) Altitude up to 2000 m above sea level Environment indoor Input Power 110-240V, 50-60Hz AC Radio Frequency RF coverage 50m up to 300m Frequency Europe: 868.000 MHz – 869.
Appendix 1: DMX tab for ART3 in RC transmitter mode SIMPLE MODE STANDARD 1 EXTENDED 1 VALUE FUNCTION 0-255 2 2 0-3 4 5 6 7-255 3 3 0-6 7-14 15-22 23-30 31-38 39-46 47-54 55-62 63-70 71-78 79-86 87-94 95-102 103-110 111-118 119-126 127-134 135-142 143-150 151-158 4 4 0 1-255 5 5 0-255 6 6 0-63 64-127 128-190 191-255 17 DIMMER Brightness of 0%-100% STROBE OFF RANDOM STROBE FAST RANDOM STROBE MEDIUM RANDOM STROBE SLOW STROBE SLOW->FAST PROGRAM ONE COLOR STATIC TWO COLOR STATIC THREE COLOR STATI
7 7 SINGLE = Programs run separate on each group CONNECTED = Programs span over selected groups 8 1 2 3 4 5 6 7 8 9 10 11 12 9 10 11 12 13 14 15 16 17 18 19 20 SEND TO GROUPS G1 G1 G2 SINGLE G2 G3 G2 G3 SINGLE G1 G2 G3 SINGLE G4 G3 G4 SINGLE G2 G3 G4 SINGLE G1 G2 G3 G4 SINGLE 1 3 2 4 6 7 8 12 14 15 130 132 131 133 135 136 137 141 143 144 8 9 10 11 12 13 14 15 16 17 18 19 20 21 0-10 11-245 246-255 0-255 0-255 0-255 0-255 0-255 0-255 0-255 0-255 0-255 0-255 0-255 0-255 0 1-255 18 G1 G1 G2 CONNECTE
Appendix 2: DMX Output Chart Pixel # 1 2 3 4 5 6 7 8 9 10 11 12 13 14 15 16 17 18 19 20 21 22 23 24 25 26 27 28 29 30 31 32 Address RGB 1 4 7 10 13 16 19 22 25 28 31 34 37 40 43 46 49 52 55 58 61 64 67 70 73 76 79 82 85 88 91 94 Address RGB000 97 103 109 115 121 127 133 139 145 151 157 163 169 175 181 187 193 199 205 211 217 223 229 235 241 247 253 259 265 271 277 283 19
This instruction manual is part of the device and persons operating the device must have access to it at any time. Safety precautions mentioned in the instruction manual have to be observed. If the device is being sold, this instruction manual has to be included. Translations If the device is being sold, this instruction manual has to be translated into the national language of the destination country.