ASTON ESCAPE THE EVERYDAY INSTALLATION AND OWNER'S MANUAL Te [= Shower Door Model Number: SDR950 Please carefully read these instructions before you begin to install the products. IMPORTANT: ASTON reserves the right to alter, modify or redesign products at any time without prior notice.
Before you start Thank you for purchasing your Aston shower door. We hope it will provide you with years of satisfying use and enjoyment. Please read this manual carefully because it contains information and instructions about the proper installation of the unit. If you do not follow certain conditions of installation and maintenance, your warranty may be affected. 1. Inspect boxes for shipping damage.
Installation Guide Please read and follow the installation instructions and guidelines in this section. Failure to follow the recommended instructions and installation techniques may lead to possible damage to the unit or the surrounding area. This can affect warranty claims. ATTENTION: This unit requires assembly. A minimum of two people are required for assembly, as several of the sections can be large and unstable until assembled.
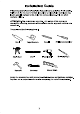
Detailed Diagram of Shower Door Components Ember Description QTY Ember Description 1 Fixed Glass 1 6 Door sweep 1 2 Door 1 7 Wall Channel Seal 1 3 Door Handle 1 8 Door Hinge 2 4 Glass Clamp 1 9 Support bar 1 5 L-shaped seal 1 10 Wall Channel 1 PLEASE NOTE: During unpacking carefully inspect all parts and use the exploded view drawing to identify all parts in the parts listing. Before discarding the packaging check for any parts or small hardware bags that may have been overlooked.
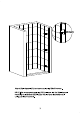
WALL CHANNEL INSTALLATION TOP VIEW LT TTT pad > Minimum 1" width required Wall channel 3/4" minimum threshold width requirement. Measuring the threshold mark a line a from the inside edge of threshold a minimum of 1" from inside edge of threshold. Extend the line marked on threshold up shower wall to determine the location for attaching wall channel to shower wall. Important: With level check the marked line on shower is level.
/ J EAN [ff] \ TT Attach Wall channel (10) to shower wall using M4x40 screws. NOTE: We recommend applying 100% silicone into the Wall channel mounting holes before attaching the Wall channel to shower wall using provided hardware.
FIXED GLASS PANEL INSTALLATION Fixed glass panel check the plumb of stationary glass pane. SCREW PACK 2) 1.Position the Fixed glass panel (1) as seen in figure (1) and insert fully into Wall channel (10). Note: Mounting holes are located away from Wall channel (10). Note: The Glass clamp notch should be positioned next to threshold and on opposite side away from Wall channel. 2.While holding the Fixed glass panel (1) in potion, remove the per-installed screw from per-assembled Glass clamp (4).
3.Carefully set the Fixed glass panel (1) aside. Using a 5/16" drill bit, drill the marked hole location on shower threshold and install the anchor into drilled hole. Using M4x40 screw attach the glass clamp to shower threshold. Never set your glass down directly onto a tile or concrete floor. Always use a piece of wood or cardboard and leave the corner pads on the glass until it becomes necessary to remove them to protect the bottom edge and the corners of the glass from breakage.
This model is treated with Aston's Sarcastically Shield Glass technology. The Stationary glass for this product is treated on both sides of glass to allow this product to be installed for Left or Right hand door installations. fet After ensuring the Fixed glass panel is set properly checking the level and plumb apply a small neat bead of 100% clear silicone to the inside bottom of Wall channel. 2 Carefully insert fixed glass panel (1) fully into Wall channel (10).
\_ outside SCREW PACK 3) Position the Support bar (9) on the Fixed Glass panel (1). Using a level, check support bar is level and mark the bracket's location on the shower wall. Remove the Support bar (9) from the Fixed Glass (1) and detach the wall bracket. Position the wall bracket to the marked area on shower wall and mark the drilling location on shower wall. Drill the hole using 5/16" drill bit. Insert the Wall anchor and fasten the bracket to the wall with M5X60 screw .
Door Hinge Installation Top hinge orientation for left hand door opening. Fixed panel Bottom hinge orientation for left hand door opening. LT inside 2 This model is treated with Aston's Sarcastically Shield Glass technology. The Glass door should be installed so that the Endure Shield label is to the outside of shower (coated glass surface to inside of shower Locate the hinges and arrange as seen in figure (1) and figure (2). Notice in drawing the top hinge is positioned so the Door clamp is pointing down.
vinyl spacers vinyl spacers / : Door clamp Fixed glass panel Loosen the set screws and position the Glass door (2) into the door clamps with vinyl spacers. The vinyl spacers must be installed in between the Glass door and door clamp to protect the glass door and to increase clamping pressure. Tighten door clamp set screw in top and bottom door hinge. Slowly close the Glass door (2) adjusting as required to get a 3/16" gap at wall. Securely tighten door clamp hardware for glass door after adjustment.
TT 1.Clean the wall area where the L-shaped Door seal (5) will be installed. With the door closed place the L-shaped Door Seal (5) on the door edge and marks its location on the wall. Note: The corner of the L-shaped Door seal should face inward. Open the door. Gently remove the plastic tape from the adhesive side of the L-shaped Door seal (5) and firmly press to the wall. 2.To install the Door sweep seal (6), measure the distance from edge of door glass to bottom hinge.
Care and Maintenance As with any other luxury item, maintenance and care are critical to the long lasting quality and enjoyment of your shower door and tray. The proper care and maintenance outlined in this section are necessary to ensure the longevity of the unit. Damage caused by not following the care and maintenance guidelines in this section is not covered under the manufacturer's warranty.
ASTON GLOBAL INC. — Limited Warranty This warranty applies to products purchased from Aston Global Inc. after May 1, 2017. Aston Global Inc., a Texas Corporation ("Aston"), provides the following warranty coverage for shower doors and enclosures, bathtubs, shower panels and related components (The Products).
PARTS ONLY WARRANTY This warranty is extensive in that it covers replacement of all defects. LABOR CHARGES AND/OR DAMAGE INCURRED DURING INSTALLATION, REPAIR, OR REPLACEMENT, AS WELL AS ANY OTHER KIND OF ANCILLARY COST, LOSS OR DAMAGE ARE EXCLUDED. COMMERCIAL USE AND OTHER EXCLUSIONS This warranty excludes all industrial, commercial and business usage.
Aston product installations and repairs must be performed by either an Aston authorized agent or a licensed, insured and experienced professional contractor installation or repairs performed by any other party shall void the warranty.
RESIDENTIAL INSTALLATIONS SHOWER DOORS and ENCLOSURES GLASS: Limited Lifetime Aston warrants the glass of shower doors, tub doors and shower enclosures to be free from defects in workmanship and materials under normal residential use for the life of the product. Star Cast Protective Coating by Windshield: Ten (10) Years, provided by PCT Global LLC. For shower doors treated with Star Cast protective coating, warranty coverage is provided by its maker, PCT Global LLC.
DRAIN, OVERFLOW AND ACCESSORIES: Limited Lifetime Aston warrants the freestanding tub Drain, Overflow and Accessories in Polished Chrome and Brushed Stainless Steel finishes to be free from defects in workmanship and materials under normal residential use for two (2) years. The warranty for any part in Oil-rubbed Bronze finish shall be limited to one (1) year.
HARDWARE: One (1) Year Aston warrants shower door, tub door and shower enclosure hardware (i.e. handles, rollers, hinges, profiles, clips, guides, brackets, towel and support bars) to be free from defects in workmanship and materials under normal commercial use for one (1) year. SHOWER BASES: One (1) Year Aston warrants shower bases to be free from defects in workmanship and materials under normal commercial use for one (1) year.
SHOWER PANELS: One (1) Year Aston warrants shower panels to be free from defects in workmanship and materials under normal commercial use for a period of one (1) year from the initial date of purchase. STEAM SHOWERS: One (1) Year Aston warrants steam showers panels to be free from defects in workmanship and materials under normal commercial use for a period of one (1) year from the initial date of purchase.
ASTON ESCAPE THE EVERYDAY Customer Service 877-424-9699 Aston Global Inc 2805 Market Street, Suite 187 Garland, TX. 75041 If further assistance is needed, or you have a question, please visit our web site at: www.astonbath.