INSTALLATION AND OWNER'S MANUAL Whirlpool Bathtub Model Number: MT620-L Please carefully read these instructions before you begin to install the products.
Before you start Thank you for purchasing your Aston whirlpool bathtub. We hope that it will provide you with years of satisfying use and enjoyment. Please read this manual carefully because it contains information and instructions about the proper installation of the unit. If you do not follow certain conditions of installation and maintenance, your warranty may be affected.
Important Safety Instruction WARNING: To reduce the risk of drowning, electrical shock, or injury, read the following important precautions before using the unit. If you do not fully understand the meaning of any of the precautions and warnings please consult your dealer or the manufacturer for a full explanation. Do not use the unit until you understand all of the following: 1. WARNING: Read and follow all instructions. 2.
10. WARNING: To avoid the risk of accidental injury or drowning children should not use the hydro massage bathtub without adult supervision. 11. WARNING: To avoid injury, take care when entering or exiting the hydro-massage bathtub. 12. WARNING: To avoid unconsciousness and possible drowning, do not take drugs or drink alcohol before or during the use of a hydro massage bathtub equipped with a heater. 13.
Installation Guide Please read and follow the installation instructions and guidelines in this section. Failure to follow the recommended instructions and installation techniques may lead to possible damage to the unit or the surrounding area and can affect warranty claims. ATTENTION: This unit requires assembly. A minimum of two people are required for assembly, as several of the sections can be large and unstable until assembled.
Phillips head screw driver Bathroom rated silicone sealant Electrical Requirements Installation by a Licensed Electrician 15 Amp service, 110-120 VAC @ 60Hz GFCI breaker required Before starting the installation, please ensure that you have inspected all components of the unit and check for broken or damaged sections. If you find damage, please contact your dealer or the manufacturer.
Remove the whirlpool tub skirt for access Using a Phillips screw driver to remove the screws holding the skirt onto the whirlpool tub To remove the skirt but pulling down on the skirt carefully 6
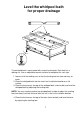
Level the whirlpool bath for proper drainage The whirlpool bath is constructed with several leveling feet. Each foot has a locking nut. Use an adjustable wrench and level to complete this next step. 1. Loosen all of the locking nuts so that the leveling feet are free and easy to move. 2. Place the whirlpool bath into the exact final installation location or a flat surface. 3. Place the level across the top of the whirlpool bath (side to side) and level the whirlpool bath by adjusting the leveling feet.
WARNING: Failure to apply proper pitch or grade for drainage can cause leaking and/or flooding of the area surrounding the unit. 5. After making all the leveling adjustments ensure that all leveling feet (including center foot) are in contact with the floor. To ensure the unit is supported, stand in the whirlpool bath in several places looking for any movement and adjust as needed. 6.
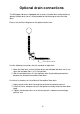
Optional drain connections The Whirlpool tub comes equipped with a factory installed drain and overflow an optional flexible drain hose is also provided to avoid having to move the floor drain. Please see the Drain diagram for the optional drain hose. Flex drain hose Use the following instructions for the standard straight drain: 1. Move the floor drain so that the floor drain and whirlpool tub drain are in line when the whirlpool tub is in it's final position 2.
Electrical Connection With the skirt removed make the final electrical connections. The unit MUST be connected to a GFCI protected circuit.
Operation of the whirlpool tub WARNING: Never operate the whirlpool pump with out water above the suction cover this will damage the pump and void the warranty. Use the following steps to operate the whirlpool tub: 1. Fill the tub with water until the whirlpool jets are covered 2. Press the air button to turn on the whirlpool jets 3. You can use the air control knob to adjust the whirlpool jet pressure by adding or removing air. 4.
Troubleshooting Symptoms Possible Causes Solutions No power to unit 1. Loose power connections 2. GFCI Breaker tripped 1. Verify and check all power connections 2. Reset GFCI, if GFCI keeps tripping replace pump Whirlpool jets not working 1. No power to pump 2. Pump issue 1. Verify power to the unit, Check GFCI 2.
Warranty PLEASE READ THESE WARRANTY TERMS AND CONDITIONS CAREFULLY BEFORE USING YOUR ASTON GLOBAL BATHROOM PRODUCT. BY USING THE PRODUCT, YOU ARE CONSENTING TO BE BOUND BY THE FOLLOWING WARRANTY TERMS AND CONDITIONS. Aston Global Inc. Parts-Only Limited Warranty Aston Global, Inc.
verification that the Product arrived in a good and acceptable condition); and (b) clearly notate damage on the delivery acknowledgment receipt. Failure to do so, and any damage discovered to glass or acrylic panel after delivery, will be repaired or replaced at the sole discretion of Aston Global. THIS WARRANTY DOES NOT COVER: 1. Product installed in buildings other than single family dwelling units. 2. Product installed outdoors or any other non-standard bathroom location. 3.
allow the exclusion or limitation of incidental or consequential damages, so the above limitations or exclusions may not apply. No dealer, distributor, service company or other party is authorized to change, modify or extend the terms of this warranty in any manner whatsoever.
Customer Service 877-424-9699 Aston Global Inc 1501 10th St Suite 150 PLANO, TX 75074 If further assistance is needed, or you have a question, please visit our web site at: www.astonglobalinc.