INSTALLATION AND OWNER'S MANUAL Shower Door Model Number :SD908 Please carefully read these instructions before you begin to install the products.
Before you start Thank you for purchasing your Aston shower door and tray. We hope that it will provide you with years of satisfying use and enjoyment. Please read this manual carefully because it contains information and instructions about the proper installation of the unit. If you do not follow certain conditions of installation and maintenance, your warranty may be affected.
SUPPLIED HARDWARE SCREW PACK (1) M 5x16.
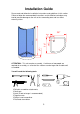
Installation Guide Please read and follow the installation instructions and guidelines in this section. Failure to follow the recommended instructions and installation techniques may lead to possible damage to the unit or the surrounding area and can affect warranty claims. 36" 123 5 " 2 1 2" 36" 75" 123 5 " ATTENTION: This unit requires assembly. A minimum of two people are required for assembly, as several of the sections can be large and unstable until assembled.
ϒ⁄ Bathroom rated silicone sealant Before starting the installation, please ensure that you have inspected all components of the unit and check for broken or damaged sections. If you find damage, please contact your dealer or the manufacturer.
Preparation of base for installation of shower tray The shower tray needs to sit on a flat level base for proper support. Ensure that the area for the shower tray is properly prepared for installation. Using the drawing provide place the floor drain in the proper location so that the shower tray drain and the floor drain are in line after final installation. Place the shower tray in the final installation position line up the drain holes and check for level.
Assemble the glass panel M5x16.5mm M5x16.5mm SCREW PACK (1) 1. Remove and inspect all of the glass panels. If any are broken, please contact your dealer or the manufacturer. NOTE: The glass panels are labeled to indicate the direction for the top of the glass panels. 2. Remove and inspect the aluminum top and bottom rails for the glass assembly. NOTE: The aluminum rails are labeled to distinguish the top and bottom rail and their orientation within the assembly.
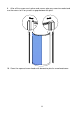
3. Place the bottom aluminum rail on the floor with correct orientation up to receive the glass panel. 4. Apply a liberal bead of sealant on the bottom rail from the slot that receives the glass panel out to the end of the rail. NOTE: The next steps of assembly will require two people. 5. Side glass panel and insert it into the slot on the bottom rail. 6. Take the top aluminum rail and apply a liberal bead of sealant from the slot for the glass panel out to the end of the rail. 7.
. After all the screws are in place and secure, wipe any excessive sealant and use the excess to fill any cracks or gaps between the joints. 10.
Mark the Glass panel mounting holes Place the assembled glass wall panel onto the shower tray and mark the predrilled holes onto the wall. Remove after marking the walls.
Drilling and installing the wall anchors ? 8mm Using the appropriate drill bit for your wall surface drill each hole location with a 5/16” diameter drill bit. Install the plastic wall anchors provided into the drilled holes NOTE: If your surface is prone to cracking or chipping then it is recommended that you pilot drill first using a smaller drill bit, and then step up to the final size.
Secure the glass wall panel to the walls SCREW PACK (3) Using the screws provided secure the glass wall panel to the walls.
Secure the glass wall panel B ? 3.2 C M4x12mm SCREW PACK (4) Use a ? 1/8 inch diameter drill bit and drill 3 equally spaced holes along each wall channel on the inside of the shower. Do not drill all the way thru to the other side drill only until the drill bit enters the void in the wall channel. Using the hardware provided secure the fixed glass panel to the wall channel. Repeat on the other side.
Install glass sliding door 1. Remove and inspect the glass door. If any are damaged or broken, please contact your dealer or the manufacturer. 2. Four roller mount assemblies for the door are located inside on the unit on the upper and lower aluminum rails. 3. Carefully disassemble each door roller mount assembly. IMPORTANT: Note the disassembly order of the roller mount assembly. It is critical that the order be repeated for proper adjustments of the doors. Please see the illustration provided.
4. Remove the decorative nut, locking nut, and plastic washer. Leave the plastic tube and back plastic washer on the door roller. 5. Taking the door, and slide the door over the top two-door roller mounts. IMPORTANT: The plastic tubes must be inserted into the two top mounting holes in the door. 6. Reinstall the plastic washers onto the top roller and then install the metal locking nuts. Hand tighten the locking nuts. 7.
Install the door handles 1. The door handles are located within the accessory manual box. Remove them from the packaging and note the end with the knob on it. The door knob will be located to the top after final installation. 2. Remove the doorknob and one of the vinyl washers, but leave the plastic tube and the other vinyl washer. NOTE: Sometimes when removing the doorknob the threaded stud will come out.
3. Insert the door handle with the threaded stud into the top hole on the glass door with the plastic tube in the hole and the vinyl washer between the glass and the door handle. 2. Install the remaining vinyl washer onto the stud and then install the doorknob. Located within the packaging for the door handles you will find: a.2 Vinyl washer b.2 Screws c.1 Hard plastic washers d.1 Decorative covers 3.
Final sealing Using bathroom rated silicone sealant or caulk seal the bottom of each fixed glass panels to the shower tray and seal along each wall channel where the wall channel meets the wall.
Care and Maintenance As with any other luxury item, maintenance and care are critical to the long lasting quality and enjoyment of your shower door and tray. The proper care and maintenance outlined in this section are necessary to ensure the longevity of the unit. Damage caused by not following the care and maintenance guidelines in this section is not covered under the manufacturer's warranty.
Warranty PLEASE READ THESE WARRANTY TERMS AND CONDITIONS CAREFULLY BEFORE USING YOUR ASTON GLOBAL BATHROOM PRODUCT. BY USING THE PRODUCT, YOU ARE CONSENTING TO BE BOUND BY THE FOLLOWING WARRANTY TERMS AND CONDITIONS. SHOWER DOOR/SHOWER TRAY Aston Global Inc. Parts-Only Limited Warranty 5 years Aston Global, Inc.
THIS WARRANTY DOES NOT COVER: 1. Product installed in buildings other than single family dwelling units. 2. Product installed outdoors or any other non-standard bathroom location. 3. Component parts not manufactured by Aston Global. 4. Workmanship of any installer of Aston Global Product.
Aston Global and it representatives shall not be liable for any injury, loss, cost or other damages, whether incidental or consequential, arising out of any defect covered by this Warranty including and without limitation, loss of use of the Product and cost for removal of defective Product, even if Aston Global has been advised of the possibility of such damage. The liability of Aston Global under this Warranty, if any, shall not exceed the original amount paid for the Product covered by the Warranty.